landscape and design
I post this picture of The Heap to warn you of what can happen if you do not prune your old fashioned spirea at least every other year

This Spiraea x vanhouttei was only a little slip of a thing when Lois fobbed it off on me – admittedly quite a while ago. The house is 20 feet wide. The spirea is still on the march. How did this happen? Read More…
Like every garden writer in the history of humankind, I’ve spent my entire career begging ” don’t blow the whole wad on spring. If everything in the yard is done blooming by the 4th of July, how boring is that.”
But then every year about this time I’m glad the people who owned this house before us – in some cases WAY before us – believed in planting the usual.
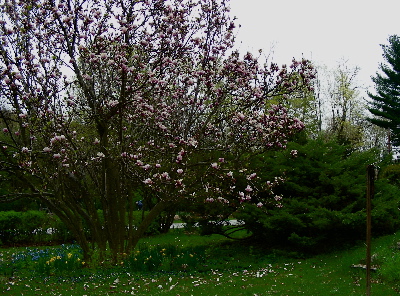
Actually, for our first decade or so I DID have mixed feelings about the magnolia, which would routinely just start opening into a huge glorious pink cloud and then there would be a frost and believe me a huge brown cloud is not glorious. Then things got warmer and it routinely escaped; we got a whole month of being happy that this giant unit eats about half the side yard. This year, however, after about 10 days of splendor it’s already going over. Eighty degrees is not a whole lot better than 29 from the magnolia longevity point of view.

The amazing thing about plum blossoms is that they smell exactly like the cheap plum incense that perfumed so many groovy abodes in the 60’s. Bees love them, though, so when you stand under the trees you see and hear a very cheering assortment of these threatened creatures.

In contrast to the plum, the viburnum ( carlesii) smells wonderful. Like itself and only like itself, a sweet, non-cloying New Englandish perfume that fills the entire yard on warm evenings and justifies the existence of an otherwise unexciting shrub and if it really does freeze on Tuesday night and clonk it when it’s only about half-open I’m going to put face in my hands and weep. This post hints at my addiction – and offers a few seasonally appropriate garden tips. (Appropriate if you’re in the lower Hudson valley, anyway. And it doesn’t up and snow)
( For the pizzelle recipe, please scroll down)
It’s hard to think coldly about the garden just now, when the catalog stack is approaching tilt and there’s not much else to think about warmly, but this is an ideal time to take a hard look at your return on garden investment. A little abstract evaluation helps ensure high-performing options are not overlooked, and that the resources locked up in losers will be re-allocated to something more profitable.
And we will stop here with the analogy; finance not being my long suit.
Nevertheless. It really helps to list assets and liabilities before you plunge in, and it helps the most to write it down, however roughly, instead of just thinking about it in the shower for a couple of mornings. Unless your garden is confined to 3 or 4 containers, human nature more or less ensures you’re not counting everything. (Think how few calories most of us think we eat and how wrong we are about it almost all the time).
Items It’s Useful to Reassess Yearly:
Space: Not only is there never enough, what there is is not usually tabula rasa. For instance, there’s a 3 X 10 foot strip in the front shade garden completely open for something new, but that something must remain no more than four feet tall without any help from me. By writing this down, I am reminded that it’s not happening with witch hazels, and that time spent mooning over Fire Charm (brilliant red fall leaves, copper-red winter flowers) and the super-fragrant Moonlight should be devoted to the hunt for plants that will actually fit.
You probably have a rough layout of the annual/vegetable garden – or so I hope – so the allocational trick here is simply to fill it all in, in as much detail as possible, before looking through the saved seeds or ordering any new ones. Our roughly 4000 square feet sounds huge, but given how much of it must support tomatoes, corn, garlic, greens, etc. ( including flowers) there’s only a rather small area for the winter squash. As most of it will be filled by super-sweet, long-keeping Cha Cha, from Johnny’s, and Tetsakabuto, from Pinetree, it would be better if I didn’t even LOOK at the Baker Creek catalog (85 winter squash and 80 even more tempting – and space-hogging – melons).
Time: it’s not that writing the truth on paper reveals anything new about “not enough,” but rubbing it in can be bracing. Almost all our new plantings have been and will be shrubs because last year I finally inventoried the gardens, assigning each the time it should have to be at its best. Duh of the week? Even under ideal conditions, it’s impossible for someone with a day job to have more than one complex tapestry of annuals, perennials, vines, grasses, bulbs and shrubs and small trees.
Mulch keeps weeds down and drought at bay; healthy plants resist pests and disease. But some weeds always make it through – that’s why they’re weeds; baby vegetables must be watered by us if nature is disobliging; resistant doesn’t mean immune and anyone who says organic pest control takes no more time and attention than blanketing everything with noxious pollutants is lying. Plus if you don’t formally assign some time to simply enjoying the damn thing, you may find when you look back at season’s end that all you did – however enjoyably – was work.

The bed that used to hold these cheerful perennials now features a dwarf Chinese Elm (Ulmus parvifolia), with white-edged leaves on lacy branches and patchy bark that will grow more and more lovely with time. It is nicely surrounded with mulch and very little else. The carefree echinaceas went to the rough edge of the field, where they’ll be fine, and the yellow Asiatic lilies have been consigned to the compost. They were nice, but not THAT nice, and getting rid of them makes it easier to keep the evil lily beetles from doing in the far rarer L. henrii (barely visible at the far right and slightly more visible below).

Money: a yacht is famously defined as a hole in the ocean into which one pours money. A garden is a hole in the ground which serves the same purpose – except that you have to dig the hole before throwing the money in. Less than romantic necessities like pest control products, compost, twine, fertilizer(s) and gloves are inexpensive individually but they do add up. Add them up before the season starts and you may be unpleasantly surprised, but you’ll also have a better idea of when it’s time to start saying “ I really shouldn’t, ” when visiting the nursery.

When it comes to impulse purchased winter orchids, my advice is to buy ‘em in bloom and then throw them out when they’re done, a great saving of space and time if not, admittedly, money. But I don’t always listen to me. This cymbidium came home with the groceries in February last year, and when it finally finished flowering 2 months later went into the enclosed porch we keep at about 40 degrees to use as a walk-in refrigerator. Come spring, we stuck it in the vegetable garden. In fall it returned to the porch, where it remained until a couple of weeks ago and thereby hangs the tale. With these increasingly common orchids, finding a winter home that’s cool enough is often harder than finding one with enough light, so if you have a reasonably bright spot that stays between 45 and 55 degrees you might as well give it a shot, especially if the spot is somewhere out of sight. Non- blooming cymbidiums aren’t as ugly as non-blooming phalaenopsis,but they’re not all that lovely, either.
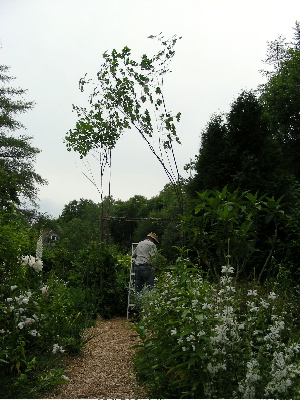
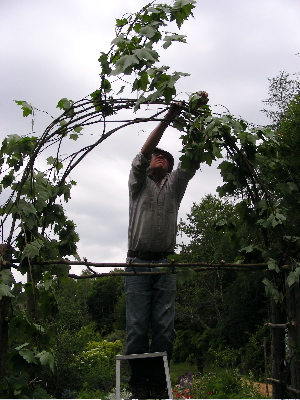
The twig and branch arch that divides the main upper garden from the white/herb garden near the house looks almost as though it grew there naturally, and every time there’s a garden tour it gets more comment from visitors than most of the plants. For years I have been promising to explain how Bill builds them, so here finally is the how-to.
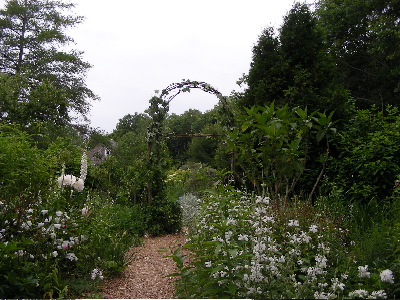
our new arch, right after completion
You will notice I called the arch “them” even though there is only one. That’s because structures like these biodegrade pretty quickly. The corner posts are durable – ours have been in place for 15 years and show no signs of declining – but the lacy branch work that makes the arch lasts only about 5 years, at least here in the Northeast where it’s exposed to pretty fierce weather.
This is a good thing. Whether you let it go as long as possible or decide to take it down earlier, everything will return to the earth without leaving paint residues, major quantities of rusting metal or other unpleasantness. There is no debris to dispose of except a little bit of wire and a few screws.
When I had Bill proofread these instructions to be sure I hadn’t missed anything, he said “This sounds complicated! If I had to read all this I’d never build anything.” It sounds more complicated than it is, but if you are as handy as Bill ( and as disinclined to read directions before plunging into projects), all you have to do is scroll through the pictures and you will know all you need to.
For those who would prefer a bit more guidance, I’ve written it up like a recipe. But please think of it as a recipe for stew, not a recipe for cake; it’s just a way to get you started. Bill can build an arch from posts to completion in an afternoon. You might want to spread it out, scouting for saplings and setting the posts on day one, building the arch on day two. Just don’t cut the saplings until you’re ready to use them; they stiffen up quickly and you want them to be as flexible as possible.
Materials (For an arch 6 feet wide, 20 inches deep and 9 or 10 feet tall) :
4 4-inch diameter 8-foot length cedar or locust posts, available at lumber yards
4 12-14 foot willow, oak or maple saplings, roughly 1.5 inches in diameter at the base. The ones that grow deep in the woods are more likely to be tall and straight because they’re reaching for the light. Make sure the main trunk is flexible from about 5 feet on up; sometimes skinny trees are older and stiffer than they look.
2 straight(ish) branches roughly 6.5 feet long and a generous inch in diameter .
12 to 15 straight(ish) branch pieces, each about ¾ inch in diameter and 19 inches long. This sounds like a lot, but most if not all of them can be gleaned from sapling branches you will be removing. It’s ok if 5 of them are only about ½ inch thick.
An assortment of different length screws: 1 to 2.5 inches long ( You won’t know exactly what sizes you need until you have the saplings and branches).
A roll of the thickest wire you can easily use as though it were string: 14 to 16 gauge probably.
Tools:
Shovel and trowel ( a post hole digger is better, should you happen to have one lying around. These instructions assume you don’t)
a pruning saw
Pair of pruners
Cordless drill
Wire cutter ( some pruners have one built in)
A ladder
Method:
1. Set the posts in pairs, 18 inches from center to center, the pairs 6 feet apart on centers. Bases should be buried 14 to 16 inches deep. If the soil is loose you can dig narrow holes using nothing but the trowel. If it isn’t, you’ll have to go at least partway down with the shovel, then backfill.
2. Cut the saplings. If you can’t get the 6 foot pieces from their side branches, cut lower branches from other trees. ( they don’t have to be the same kind of tree).
3. Bring the harvest to a spot where there is plenty of room to work, i.e. the lawn. Remove all branches from the bottom 6 feet of the saplings, so you have very skinny poles with very branchy tops. Bill just leaves the leaves in place; they fall off after a few weeks. You can remove them if you are a neat freak but then I take it back about one afternoon.
4. Prune side branches and twigs from the prunings to get the short pieces.
5. You are now going to tie the posts together with short pieces and build a ladder across the top of the arch to stabilize it. Use the hunkiest short pieces near the bottoms of the posts, the thinnest ones across the top. Let everything overlap a little. (Screws should be at least ¾ inch in from the ends or they’re likely to split the wood. And you need overlap to make tying things together easy.)

Bill trying out a cross piece
Okay. Attach the short pieces to the posts at regular intervals, screwing them to the inside faces. Attach the 6 foot pieces to the insides of the posts, around 2 inches down from the tops. Get up on the ladder and lash the cross-pieces to the tops of the 6-footers. ( You would think this would be easier to do on the ground, but everything is so irregular it doesn’t work out that way.)
6. Set the sapling bases against the outsides of the posts, starting about a foot off the ground, butting them up to the cross-pieces. Screw them into place.
7. Now comes the interesting part. Get up on the ladder and bend the saplings down to form the arch. They can go in parallel or be crossed kitty-corner, whichever is easiest and most attractive. Tie them to the tops of the posts, weaving the wire in and out around the cross piece ends to keep everything secure.

8. The arch is still having a bad hair day. Weave the branches in and out around each other until the shape is under control.
There; that’s it. Plant some vines. Clematis, perennial sweet peas and annuals like cup and saucer vine and Spanish flag work well, or you can plant climbing roses and pray they make their own woody frame before the arch gives out.
The previous arch, covered with Clematis virginiana and doing fine until this year’s Patriots Day Storm.
As lilac lovers go, I’m a very small timer: there are 8 of them in the New York yard; 10 in Maine, a mere token compared to big public collections like Highland Park, in Rochester NY, where 500 different lilacs – 1200 plants – are blooming right this minute.
But even our tiny assortment gives us a full six weeks of fragrant delight because it includes a few season stretchers: bushy, pale purple ‘Miss Kim’ (Syringa patula), pink-flowered ‘James Macfarlane’ (S. x prestoniae) and a 20 foot tall pair of Japanese tree lilacs (S. reticulata), all of which bloom later than the old fashioned French kind (S. vulgaris).

I wish I could tell you. I bought it at a clearance sale at an Agway now long gone and it was supposed to be a plain old single flowered purple lilac, the sort used for hedging in an ampler age.
Hence this bit of lilac advice: keep the sales slip until you see flowers. Mislabeling is fairly common and it’s vexing – take it from my experience – to get a dark purple-red that looks like ‘Charles Joly’ when you thought you bought a white ‘Miss Willmott’.
One way to know what you’re getting is to join up with the National Phenology Network and request one of their lilac clones. Follow the” submit data” links and you’ll be sent to the application form.
The lilac will be a ‘Red Rothomagensis’ (S. x chinensis) a somewhat gangly, fragrant early bloomer with reddish buds that open to dark pink flowers. There is a picture of one here.
And why is the National Phenology Network sending you this present? Because they want your help. Phenology is the art/science of measuring climate with biological events like frog song, fish migration and plant bloom; and lilacs were chosen, way back in the 1950’s, to be standard measuring instruments. Gardeners all over the country have been watching lilacs, sending in data and, as citizen scientists, helping to document the process of climate change. (In the Midwest, where the Network was born, spring – as measured by lilac – is now almost a week earlier than it was 50 years ago).

For now, we’re watching this common lilac, which is already in place in Maine. As long as you monitor the same plant, year after year, you can contribute useful data by watching any lilac you choose. But we will ask for a ‘Red Rothomagensis’ and start watching that one too, because that’s even better. By eliminating the variations of species, cultivar and individual plant, clones make it easier to measure accurately.
For more on this communal effort, read the short history of the project that was broadcast on National Public Radio or go directly to Project Budburst, where there are full instructions and a long list of alternate watch plants. If lilacs aren’t your thing – and for some reason you’re still reading – the list includes ocotillo, redbud, wild strawberry and many other common plants.
One warning about the clone: Can’t say for sure about RR, but most Chinese lilacs are very mildew prone, and although the fungus does no long-term harm it isn’t very attractive. Try to plant your contribution to science in an inconspicuous place.
PS: Losing your local Agway isn’t phenological, but it’s just as reliable as a measure of change. Our county in Maine ( Knox) has fewer and fewer farms and truck gardens, more and more suburban sprawl.
Like most of the Northeast, we had a false alarm last Wednesday: it was actually warm out, almost balmy. The crocus in the crocus lawn was beginning to look carpetlike although the effect was (and remains) patchy, because last fall’s newly planted fill-ins are in the usual way coming up later than the established clumps.
There are still plenty, all of them very attractive to the bees. We lost one hive over the winter, a loss rate of 50 % but better than a lot of the pros did. Bill picked up 2 new boxes yesterday. They’re in the basement keeping warm, and I’m baking some honey bars – just to inspire them.

Bill got this picture by putting his camera on one of those tiny tripods that looks like Mr. Gumby. There will be no crocus honey because honey is not being made yet. The first nectar all goes to feed the brood.
HONEY BARS
This is a close adaptation of the recipe for Candy Cake in the American Heritage Cookbook, published in 1964 and now out of print but widely available and worth having, for the wealth of historical photographs as well as the recipes.
½ cup butter
a scant ½ cup sugar
3 well-beaten eggs
½ cup mild honey
2 teaspoons vanilla
1 ½ cups all purpose flour
¼ teaspoon each salt and baking soda
1 cup coarsely chopped walnuts or black walnuts which are wonderful if you like them
1. Heat the oven to 350. Butter a 9 inch square 2 inch deep baking pan. (8 inch may be substituted, see note at end.)
2. In a large bowl, let the butter soften, then beat in the sugar. Beat in the eggs, honey and vanilla, then lightly stir in the flour, salt and soda. Add walnuts and stir/fold just enough to mix them through.
3. Turn the batter into the pan and bake until edges shrink and a toothpick comes out clean, about a half hour. Let cool in the pan, then cut into small bars.
Note: The original recipe calls for an 11 ¼ x 7 ½ x 1 ½ inch pan, which must once have been a common size, albeit I don’t think recently (ours was found in a junk store 25 years ago). 9x13x2 is too big. The only problem with an 8 inch square is that the edges usually overcook before the center is done. Solutions in order of hassle include: pretending you didn’t notice; slicing off edges and feeding to dog or edge-lover; and making the cake plus a cupcake: fill the pan about 2/3 full. Bake remaining batter in whatever small shallow ovenproof vessel you happen to have around.
Update: Shortly after writing this, I found an 11 ¼ x 7 ½ x 1 ½ pan in the not very well stocked equipment section of a local Hannaford. Don’t know what to make of this but will say that’s a very useful size for all sorts of 2-person cooking.
The plant breeder who creates a rhododendron that deer don’t like is going to be rich, but you don’t need to wait for this golden shrub if you have large old rhodies, which I wish I had but I don’t. What I do is nag all my friends and design clients: Think tall. Think sculpture. Think of Japan.
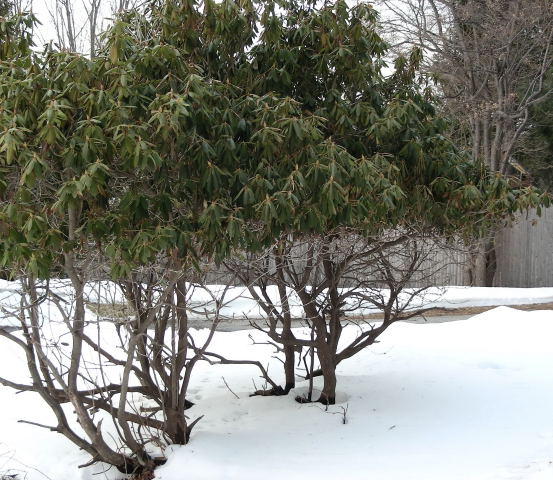
This clump grows about 1/3 mile from where the deer below were standing. Over and over in springtime those naked stems sprout healthy new growth, which sticks out randomly here and there in unhealthy-looking tufts. Over and over, the base fills out about halfway. Over and over, just when you’re starting to root for the thing and imagine it might manage to bush back out, Wham! Eaten again.
Mercifully, the owners do not encase the whole works in a gigantic net bag, but they also fail to see the obvious, which I would illustrate right here and now if I were adept with photoshop. Meanwhile, just look at those handsome trunks and the full green canopy of bud covered foliage. Imagine pruning out all but the strongest, most graceful wood. The easy, no-waiting deer-proof rhododendron is simply a multi-trunked tree. Hungry deer will stretch on tippy-hoofs, but they’re not goats. They don’t climb.
Some couples disagree about when to turn on the furnace in fall, others about the proper time to ask for directions or –– if partnered, you can no doubt fill the blank. With us, it’s a long-standing difference of opinion about when to prune the rescued old fruit trees in the New York yard. Bill wants to do it in late winter, when farmers have always pruned their trees. I want it done in summer, because I know there will be more flowers, less regrowth and fewer water sprouts.
He has the weight of tradition on his side; I have nothing except being right. And as “want it done” suggests, I have ( and should have) zero say, because he’s the one who does it.

If you’re serious about summer pruning, trying to produce good fruit or a well-behaved espalier, you follow some modified form of the Lorette system, developed in the early 20th century by Louis Lorette, a professor at the Lycee Agricole in Wagnonville, France. The process is briefly described by NAFEX member Mark Lee, gone into more deeply by a publication from New Mexico State University. M. Lorette’s book itself is out of print, but there are copies – both English and French – available through Bookfinder.
The climate of the Northern US having little in common with that of the Department du Nord, modified is the operative word; you can get into trouble treating your trees as though they were in France. But assuming you’re managing mature trees, not encouraging young ones, there’s much to be said for pruning that tends to stay put.
See all those useless, non-flowering water sprouts sticking straight up? That’s a present from last year’s dormant pruning. It’s not so bad on trees that have been kept in check from infancy, but it can still be a pain in the pruner.
The Argument, Short Version:
Advantages of dormant pruning:
Leafless branch structure is clear; you can see what you’re doing
Fungus diseases are dormant too, so there’s less danger of transmission
Tree is just about to start the active growth that promotes wound-healing
You are not doing the 30,000 other agricultural things that claim your time in midsummer
Advantages of summer pruning:
Vegetative growth is restricted. Tree stays smaller.
Tree does not send up a gazillion water sprouts that must in their turn be pruned.
Fruiting spurs develop closer to main branches, and there are often more of them.
It’s ( usually) more pleasant to be working outdoors
Last spring, we decided to go for — if not broke at least financially depleted – and plant the 700 hundred more bulbs required to fill the bare patches in the crocus carpet.
Essential to mark where they were needed. Didn’t want to make a map (lazy, mostly). Already knew big nails anchoring little bows of surveyor tape wouldn’t work because I tried it years ago. The tape disappeared into the grass, as planned, and then disappeared.
So THIS time I stuck the big nails through the centers of metal washers roughly the size of silver dollars. No way those big shiny disks were going to get lost…
You can perhaps guess the next part. It’s early November, no time to lose. Bill mows the grass and fallen leaves, using the bagger so no debris will obscure the view. I peer down. Nada. I rake , gently. Rien. I get down on my knees and claw with my fingertips, covering an area I KNOW must have at least one washer in it. Gone.
So we went next door and borrowed our neighbor’s metal detector and the moral of this little story is a giant reinforcement of the new(er) understanding of soil improvement: spread compost right at the surface, don’t dig it in deeply; it’s headed down fast enough as it is. The washers were buried almost an inch in just one season and the only thing that rises is rocks.

Bill finding the crocus planting spots and marking them with stakes.
(Please scroll down or click at right for coming attractions)
Upper garden, as you enter from the field:
Blue-purple spike flowers around right edge are Salvia transylvanica
Cobalt blue flowers are Salvia patens
Blue flowers with balck calyces are Salvia Guaranitica ‘Black and Blue’
Shrubs with gray foliage and long thorns are sea buckthorn, Hippophae rhamnoides
Foamy yellow flowers w/blue leaves are Thalictrum flavum ssp glaucum (yellow meadow rue)
Large vines framing greenhouse door are hardy kiwis (that refuse to bloom at the same time so I never get any fruit)
In iron urn opposite stone wall:
Vine with lavender-blue flowers is Thunbergia grandiflora
Sawtooth-leaves are Melianthus major ‘Purple Haze’
Big seed head is Star of Persia ( Allium christophii)
Giant hosta is ‘Sum and Substance’
Plant with long, narrow purple bells is Iochroma cyaneum ‘Royal Blue’ ( which only goes to show you)
Vine with purple flowers in clay pot is Asarina scandens
Plant in iron urn in front of lilac is Brilliantaisia subulugarica
All hollyhocks (including the dark magenta ones) are self-sown great-grandchildren of a yellow Alcea ficifolia
Vines in front of greenhouse:
Orange daisy-flowers: Senecio confusis ‘San Paulo’
Orange/pink/white flowers all together : Mina lobata ( Spanish flag)
Bright red trumpets: Ipomoea quamoclit ( Cypress vine)
Salvia w/yellow and purple flowers ( almost done) is S. bulleyana
Plant with long deep purple spikes (on right, in front of holyhocks) is a butterfly bush, Buddleia davidii ‘Black Knight’
Poppies by path on left are self-sown annual shirleys ( P. rhoeas). On right, a perennial sold to me as P. alpinum but I don’t think it is.
The red coleus is ‘Kingswood Torch’
The purple-brown grassy-looking thing is ornamental millet, ‘Purple Majesty’
Dark green leaves on black stems are Alocasia , cultivar name lost ( there are much larger ones in the white garden)
The orange Turk’s cap lilies are L. davidii
The yellow coneflower is E. ‘Big Sky Sunrise’
The yellow flowered bush at the very back (on the road side) is a heliopsis, cultivar name forgotten
White garden:
Vines on the entry arch are
Clematis virginiana (virgin’s bower) and
Lathyrus latifolius ‘White Pearl’
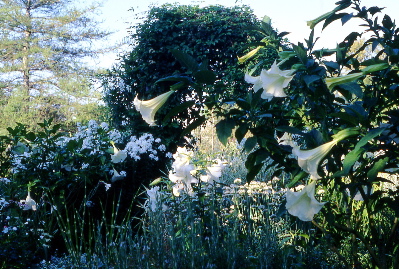
Plant in the middle with big white trumpets is a brugmansia
Low rosettes of big silvery leaves are Salvia argentea ( silver sage)
Striped Euphorbia ( ball on a stem) : ‘Tasmanian Tiger’
Tall stems with seed heads, Allium giganteum ‘White Giant’
Striped red and white rose is ‘Scentimental’
plant with tuft on top that looks like a pineapple is Eucomis bicolor (pineapple lily) There are other eucomis beside the path – including one with purple leaves – which have not yet bloomed.
Dark green leaves on black stems are Alocasia , cultivar name lost
Fragrant shrub near the path end, Aloysia triphylla (lemon verbena)
The hedge is Hydrangea tardiva
In windowbox:
the big tree is Acnistus australis. It has purple-blue flowers when it gets sun in spring.
The thing that looks like a little palm tree ( sort-of) is a begonia
In bathtub, vine with orange and yellow flowers is a leggy Abutilon megapotamicum that isn’t getting enough sun.
Lower garden:
Pink and yellow border – inspired by the Minton bowl in the picture posted underneath the birch

Pink cotton candy is Filipendula rubra (queen of the prairie)
Yellow scabiosa on steroids is Cephalaria gigantea
Large shrub at end is a golden elderberry, Sambucus nigra ‘Aurea’
Small shrub in center with long yellow leaves is a sumac, Rhus typhina ‘ Tiger eyes’
Annuals:
Purple brown trumpets in front are salpiglossis ‘Chocolate’
Self-sowns on left are calendula ( grandchildren of ‘Pink Surprise’); Bupleurum rotundifolium ( no common name that I know of), blue nigella (love in a mist) , silene (the screaming pink), and larkspur ‘Blue Cloud’.
Single cosmos are ‘Psyche, ‘ doubles are ‘Doubleclick’
Special thanks to assistant/garden-helper/friend Kristi Niedermann, without whom this garden could not exist.