Cakes, Pies, Cookies and Pastry
( for the pizzelle recipe, please scroll down)
‘Twould seem the night has come and gone; that it’s time to get out that pile of catalogs and start planning the gardens. But not quite yet; the midwinter jamboree extends at least until New Year if not Twelfth Night and for many of us there is still a week or more of socializing and present-giving to go.
* Last Minute Gifts
If you’ve had it to here with shopping and dread the post-Christmas sales, there’s a very strong temptation to shop among the presents you just got, moving the ones that make you sigh from the inbox to the outbox.
If only. Unless it’s something absolutely wonderful and completely understandable like a third copy of On food and Cooking, by Harold Magee, regifting is usually out. Completely apart from the hurt-feelings aspect, if you don’t like it enough to keep it and it comes from a store that offers nothing you’d like to exchange it for, how can you let it represent your taste?
Mercifully, the best present for many adults is something expendable like food or flowers – assuming you could find responsibly-raised flowers which you mostly can’t. A rant for another day. The gifted will probably enjoy anything from a generous hunk of local cheese to a plate of homemade Moth cookies ( see below), but the real present is that expendables cannot possibly be stored in a closet and dutifully trotted out whenever you come over.
Not sure about food or wine or eaux de vie made from American fruit? Candles should do nicely as long as they’re chaste in the perfume and dye departments. Fragrance is a minefield of individual preference, and no matter what they say about beige it goes with almost everything. Conveniently, this means it’s classiest as well as greenest to give a large bundle of unscented, uncolored pure beeswax candles. Too late now to mail order but some natural food stores sell them.
* Tips for stylish gift wrapping and present opening with the environment in mind are at All Wrapped Up.
* Last Minute Cookies

One dough, many choices
MOTH COOKIES
Aka Vienna crescents and vanilla crescents
I never knew these were classic Christmas cookies until I was an adult. In our family they were simply the family cookie. (Moth is short for mother; it has nothing to do with bugs.) They take almost no time to make; the dough is extremely versatile; the recipe makes a lot, and everybody loves them – everybody who likes almonds, anyway.
For roughly 60 to 80 cookies:
1 cup whole almonds
½ cup sugar
½ pound butter, at room temperature
pinch of salt
1 teaspoon vanilla ( I often use 2)
1 cup cake flour
1 ½ cups all purpose flour
confectioners sugar, optional
If you have a nut grater, use it on the almonds. If you don’t, put them in a processor with 2 tablespoons of the sugar and pulse until reduced to a mixture of almond meal and tiny crumbs. In a large mixing bowl, cream the butter with the rest of the sugar, then beat in the salt, vanilla and cake flour. Stir in the all purpose flour, then the almonds. Dough will be stiff; Moth’s recipe says “ knead in the almonds,” which gives you an idea. Shape as desired and place slightly separated on ungreased baking sheet or parchment paper. Bake at 325 degrees until just touched with gold – 8 to 15 minutes, depending. The hot cookies are supposed to be rolled in confectioners sugar but Moth seldom did and I never do – too sweet and too messy, especially since there are other classics that really need this treatment.
Shaping:
Crescents. Moth’s preferred shape. Use a scant tablespoon of dough for each; they’re easy to form and they have a distinctive taste because the thinner parts get browner. They also have the merit of fitting many on one cookie sheet. This becomes a fault if you forget and overbake them.
Icebox cookies. Form the dough into rolls or squares about 1 ½ inches across. Wrap tightly in plastic wrap and chill for 3 or 4 hours to 3 or 4 days. Slice about 3/16ths inch thick. Rolls cut in half the long way make pretty one bite half-circles when sliced.You can also slice them super-thin and sandwich them with jam. Leave plain or decorate with small amounts of icing or chocolate.
Applying chocolate

Deco-ish geometry is easy and fun. So is the Jackson Pollack effect.
Coarsely chop an ounce or two of high quality bittersweet chocolate ( at least 50 percent cocoa). Put it in a freezer-weight plastic bag and close the bag. Lay it flat on the turntable and microwave at half power until most of the chocolate is melted but there are still a few lumps, about 75 seconds. Push the chocolate around in the bag until the lumps melt and the chocolate is completely smooth. Use a razor blade or sharp scissors to cut a very small hole in the corner of the bag. Remember to squeeze from the top.
Those candies? Chocolate truffles. Chocolate truffles that are not offensively immense. Mark Bittman just published a basic recipe in the New York Times that’s pretty much like mine.
These happen to be flavored with Frangelico, a hazelnut cordial. The ones with the chocolate drizzle cage – the lazy person’s dipped-in-chocolate – are plain. The white ones have a toasted hazelnut inside and are rolled in crunchy pearl sugar, sold by King Arthur Flour, among others.
PS. If you happen to have the little molds used for Scandinavian sandbakkelse, moth cookie dough works great in them, too. The chocolate ones below have truffle filling; the jam is peach. Lemon curd is terrific. Needless to say these are not swift. Talk about fiddling! Good though.

Part 1: Heirloom Pizzelle
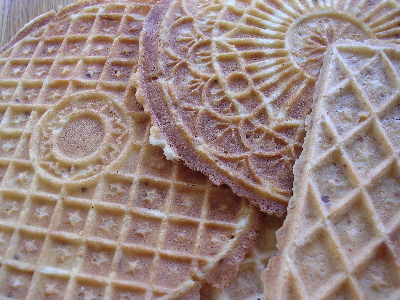
Most pizzelle baking irons are round, probably because it’s much easier to get lace-edged circles than any kind of rectangle. But regardless of shape or perfection thereof, these crisp, light not-too-sweet cookies look great on the plate – while they last. Scroll down to skip straight to the recipe.
In the middle of the Northeastern winter, when gardening consists largely of spraying insecticidal soap and looking out the window at the naked spot where you meant to plant a chamaecyparis ‘Filifera’ but didn’t, baking is a natural outlet for some of that thwarted creative energy, aka urge to potter around.
Said urge might be resistible if it weren’t for the Pavlovian aspect, but just as springtime is full of cues to get out there with trowel and pruning shears, the Let’s Banish Darkness season* is laden with near constant reminders that cookies should be made.
Some years we begin with gingerbread, adding the warm perfume of spices to old reliable butter + sugar + flour + oven = happiness; but we usually start with pizzelle, a family tradition from the Italian side of Bill, who arrived in my life equipped with his grandmother’s pizzelle iron.
That would be grandmother Josephine, the world’s greatest cook, born Giuseppa Cario in 1894, near Palermo, resident for most of her life in Washington, PA (near Pittsburgh).
The grandmotherly pizzelle iron IS iron, not the more modern cast aluminum. And it has both a very long handle and little feet, like the feet on old cast iron skillets, suggesting original design for use on an open hearth although they may simply be there to provide balance; the applied handle means the plates don’t lie flat.
Most importantly, the iron has grandma’s initials and those of grandpa Fidele engraved on one side. On the other is the date: 1931, the twentieth year of their marriage.
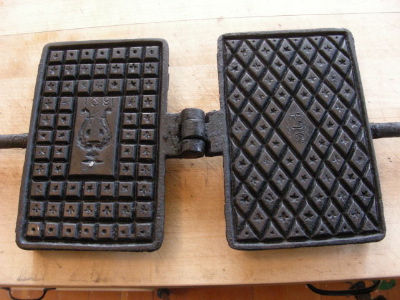
The personalized parts are not deeply cut, so they never show up as clearly as the patterns standard on the iron, but that just adds to the challenge. If the dough comes out just right, you can see ‘em. If it doesn’t, the pizzelle are still delicious and of course if you’ve gotten close enough to eat them, you don’t have to see the initials to know they’re there.
The basic batter is easy to make, and over the years I’ve tried many variations, some with vanilla, some with citrus rinds, some with crushed nuts and spices. Even chocolate, which is better than it sounds but not all that terrific unless you’re one of those people with a chocolate problem. Reception is always the same: Bill takes a bite and then says “My grandmother’s had anise in ‘em.”
E-bay is rich with vintage pizzelle irons, both stovetop and electric, but there are many modern versions, including several with non-stick coating (which is widely considered non-good). Fante’s in Philadelphia has a particularly broad selection, including a version of our family heirloom that you can engrave with YOUR initials and pass down to your grandchildren.

PIZZELLE
are ideally so thin they’re almost translucent, their intricate patterns picked out in the gold brown of perfect toast (middle top). But achieving this goal is not essential. Even when quite thick they’re still delicate, and tasty doneness can be anything from barely colored to almost burnt. In all of its manifestations homemade is so much better than commercial it’s like the difference between a twinkie and a Payard petit four.
What you’re making is basically a batch of extremely thin waffles and as with all waffles success is not instant; you generally have to discard the first couple. This was clearly no problem in former times; old fashioned recipes make 60 or more. This one yields far fewer, but it can be doubled effortlessly as long as you have a sturdy mixer.
For 18 to 24, depending on size:
2 large eggs, at room temperature
½ cup sugar
flavoring: either 1 1/2 teaspoons vanilla or the shredded rind of a lemon – or half orange – or about ¼ teaspoon anise oil (not anise extract) or for Bill a tablespoon of anise seeds
¼ pound butter, melted and cooled, plus more for the iron
1 heaping cup cake flour or 1 scant cup all purpose flour, plus a bit more if needed
1 teaspoon baking powder ( use only 1 ½ teaspoons if doubling the recipe)
½ teaspoon salt
a pizzelle iron is a must; a pastry brush (for buttering the iron) and a knife with a long narrow point (for cookie prying) are nice but not essential. A small wire brush is a good cleaning tool for vintage iron baking irons. Otherwise, consult instructions that come with the gizmo.
1. Beat the eggs and sugar at medium speed until the mixture is thick and pale and falls from the beaters in a fat ribbon. While this is happening, melt the butter and thoroughly mix the cup of flour with the baking powder and salt.
2. When the egg mixture is ready, beat in the flavoring, then slowly add the butter.
3. Gently fold in the flour mixture by hand and set the batter aside, loosely covered, for 15 to 30 minutes.
4. Heat the pizzelle iron on a medium flame until a drop of water sizzles vigorously, not quite dancing but almost. Brush the plates lightly with melted butter. ( Many recipes suggest cooking spray, not my idea of fun but if you use it all the time you probably like it).
5. Gently stir the batter/dough, which should be the texture of very stiff whipped cream. Add a bit more flour if it’s softer but err on the light side; it’s far easier to add more than try to compensate for too much. Put about a tablespoonful on the iron, spreading it out a bit as you deposit it. Slowly close the iron and use a table knife to remove anything that oozes out. Peek after about 30 seconds, the pizzelle should part from one side of the iron and the surface look dry. If it’s dark brown turn down the heat. Reclose iron (and turn if on stovetop) and cook about 30 seconds more.
6. Open iron, lift/pry off cookie and place on a cooling rack. If it’s too thin, add a bit more flour. If it doesn’t come off neatly, return iron to the heat to dry it out some more, then pry as necessary to clean the iron. Get the iron hotter and greasier next time; the pizzelle will tell you what it needs more succinctly than I can.
7. Attempt to prevent your husband from eating them all immediately. They keep well for 10 days or so in an airtight tin.
* The last time I addressed this subject I was in the throes of irritation at the people who are endlessly on about the meaning of Christmas trees and so neglected to mention things like Saturnalia and Hanukkah. Please consider them mentioned. That post also includes a recipe for shortbread, the world’s easiest holiday cookie and one of the very best.
Shopping Alert: If you love apples, it’s smart to see Thanksgiving as the deadline. Many orchard farmstands make that closing day and many more close soon after, shutting the window on neat choices for most of us.
We went on the annual stock-up outing about 10 days ago – across the river to New Paltz, to Jenkins-Lueken’s, where we’ve been going for years. But we didn’t notice until we got home that the cider is UV treated. That means we’re still on the hunt; you need raw cider to get fizzy cider. Next stop, the listings at pickyourown.org, a national orchard locator searchable by state.
Meanwhile, there is a big box in the barn containing about a bushel of apples and right here it should be admitted that the barn is our enabler. Apples MUST be stored very cold, nothing ruins quality as fast as warm temperatures. If all you have is a refrigerator, fill it with varieties that will not be found after the orchards close.
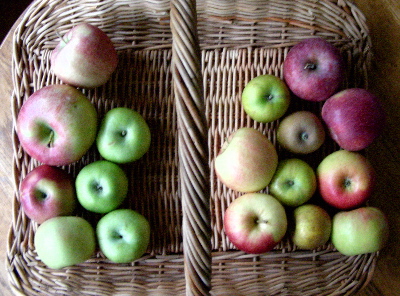
Representatives from our current stockpile. On the left of the handle, clockwise from green:(3)Rhode Island Greening, (2) Honeycrisp, (2) Cameo. Right of the handle, clockwise from red: (2) Stayman Winesap, (2) Northern Spy, (4) Golden Russet – in a line up the middle – and (2) Jonagold.
Golden Russet : Born in New York, already well known in 1848. Described by the invaluable Seed Savers Exchange Fruit, Berry and Nut Inventory as “ The champagne of cider apples,” it’s delicious for just about any use except (unless you peel it) eating out of hand. An excellent apple to stock up on; it keeps very well.
Jonagold: A marriage performed by New York’s Geneva experiment station, introduced in 1968. The sweetness of Golden Delicious combined with Jonathan’s size, juiciness and slightly sharper flavor. Not always as tart as ideal for best flavor but usually yummy. Tough skin, though.
Rhode Island Greening: ! Pie ! And thus it has been for about 400 years. A tad on the sharp side for fresh eating but ideal in savory applications such as sautéed apples and onions to go with winter’s roast pork.
Northern Spy: Can’t say I grew up with this; it’s more popular in New England than in Pennsylvania. But it has that remembered from childhood quality, fuller flavored than modern fruit – or so it seems. Both crisp and tender, both sweet and tart, good both fresh and cooked. My desert island “if you could only have one.”
Honeycrisp: New kid on the block ( 1991) cross of Macoun and Honeygold, from the University of Minnesota. A good compromise for fresh eating if your family is, like mine, divided on the sweet vs. sharp question.
Cameo : Also recent (1987), a lucky find chance seedling from Washington state. Crisp and balanced in the manner of Honeycrisp but more aromatic and frequently huge.
Stayman Winesap – labeled “Stamen” at the stand where we got it, with no indication which of the 4 variations on Stayman Winesap it might be. And I’m actually guessing at the Winesap since there is also a Stayman apple, grown mostly in the south and considerably less red if its pictures are any indication. Assuming they are some kind of Winesap they should make dandy applesauce.
The grumble and cake part
is because the New York Times magazine recently addressed the subject of apple cake with, I suppose not surprisingly, the mandate to be as contemporary and hip as possible. Net result, no fault of the Times’ sensible Amanda Hesser? A chef who was determined to improve an easy, tasty, but the recipe already exists cake, came up with a no doubt delicious but utterly uncakelike fruit-bottomed “soufflé crepe.” Shelf life of original cake, which could be eaten out of hand: a few days, and then toward the end you could probably toast it. Shelf life of chef’s goodie – several minutes; so be sure to have that plate and fork handy before you start.
Well ok, but was it really impossible to make an old fashioned everyday cake sort of cake that would be interesting to eat? And could one not make it with butter instead of oil?
Distantly remembered a long-ago struggle to find – and then when I couldn’t find, develop – a carrot cake based on butter instead of the usual oil. Checked out the recipe (it’s in Reading Between the Recipes). Unfortunately, it’s a layer cake, with frosting and other non-everyday aspects, and although the apple one could be a sheet cake something prettier would be nicer.

the experiment. Left to right: Cakes 2, 3 and 4
Four cakes ensued, one that we will not discuss and three that were different primarily because I kept screwing up. Cake # 2 was heavy and damp, because I couldn’t find the bundt pan and tried to bake it in a tube pan.
I know this was the problem because the bit of extra batter baked in a little glass bowl was very close to just fine. But did I pay attention? I did not. Cavalierly choosing to keep messing around I omitted the touch of oil, reduced the sugar, and upped the pecans for cake #3. And then, it being quite late by this time, just forged ahead after discovering the only white flour on hand was unbleached.
Commonly available unbleached flour makes tougher, heavier cakes than bleached flour. Simple fact. More nuts sat on the apple flavor; sugar and oil were both missed. Cake # 4 was back to formula #2, this time in the right pan with the right flour, for a long-keeping, velvety butter cake studded with apples and nuts. Big, too, so there’s plenty for all the relatives or you could freeze half and have it on hand for cake emergencies.
Chunky Apple Cake with Pecans
More like dice than chunks, truth be told, if you want the cake to resemble cake instead of steamed pudding. On the other hand, the rather steamed puddingy cake #2 was Bill’s favorite, so it’s hard to go completely wrong.
3 ½ cups roughly 1/2 inch dice or slightly larger chunks of peeled crisp tart cooking apple (see above for variety suggestions. Granny Smith will do in a pinch)
2 ¼ cups sugar
1 ½ tsp. kosher salt
3 1/4 cups bleached all purpose flour
1 tsp. baking soda
scant ½ tsp. baking powder
8 ounces unsalted high fat butter such as Plugra, at cool room temperature
3 eggs and 1 egg white
1 tbl. bland vegetable oil
2 teaspoons vanilla
½ cup sour cream
1 cup chopped pecans
1. In a non-reactive bowl, mix the apple dice with 1 cup of the sugar and 1 teaspoon of the salt. Set aside for an hour and a half. Stir when you think of it. (Pulling juice out ahead of time this way minimizes the holes-around-the-cooked-fruit effect that otherwise plagues these cakes.)
2. While apples sit, get everything else lined up. Let eggs and sour cream come to room temperature. Butter and flour a standard (10 cup) bundt pan. In a large bowl, thoroughly mix the flour with the remaining ½ tsp. salt, the soda and the baking powder, either by repeated siftings or much stirring with a wire whip. Heat the oven to 350.
3. When apple sitting time is about up, cream the butter, then add the remaining 1 ¼ cups sugar and cream again until pale and fluffy. Lightness of cake is directly related to whether you’re doing this with a stand mixer for about 8 minutes or your own personal arm ‘till you’ve had enough.
4. Beat in the eggs and white, one at a time, scraping the bowl from time to time. Beat in oil, vanilla and sour cream, again scraping right to the bottom of the bowl. Beat in free liquid from apples.
5. Make a well in the dry ingredients, scrape the wet mixture into it and stir together as gently and briefly as possible. Batter will be very thick. Stir in the apples and remaining juices and the pecans, then turn into the prepared pan. Thump the bottom of the pan on the work surface to reduce large air bubbles.
6. Bake until all the usual done signals: well risen, browned, pulling away from the sides of the pan and a toothpick comes out clean, anywhere from 55 to 70 minutes. Cool in the pan on a rack for 10 minutes, then turn out and cool completely before slicing. Cake will be most delicate and cakelike on the first day but still tender on days 2 and 3. Maybe more but I just made it 3 days ago so who knows?
That’s potato chip as in “ can’t eat just one, ” and cheese dollars is because my version of this killer pastry – first cousin to the ever-popular cheese straw – is a bit bigger than a silver dollar. Please note I say “my” advisedly; in versions too numerous to fully research, this recipe has been around for years. But having just served them to a bunch of highly appreciative cheese dollar virgins I know there are still plenty of people who can use to hear the good news.
Insofar as it’s good. Like potato chips, cheese dollars are a symphony of sins: white flour, high fat cheese, butter and salt. Also nuts. However, there is also a secret ingredient that – if you have a good imagination – mitigates the damage.
Actually, I doubt the inclusion of Rice Krispies does much to reduce the calorie load (sorry, Carol). What it does is make cheese dollars crunchy in a distressingly addictive way, especially if you use the real thing. As a veteran of oatmeal cookies I once assumed generic crisp rice cereal would be just as good. It isn’t.
CHEESE DOLLARS
¾ pound sharp cheddar cheese, coarsely grated
6 ounces ( 1 ½ sticks) butter
2 ½ cups all purpose flour, mixed with1 teaspoon cracked black pepper, ½ teaspoon baking powder, ½ teaspoon paprika and ½ teaspoon salt
1 heaping cup chopped walnuts. Pecans are traditional but that’s probably because the root recipe is (almost surely) southern.
2 cups Rice Krispies
optional: about ½ cup tiny cubes of super-aged Gouda
1. Let the cheddar and butter soften in a large shallow mixing bowl, then mix briefly; you just need an even combination, not a uniform paste.
2. Work in the flour mixture, then the nuts. Stop here if you want to freeze the dough or refrigerate it for longer than a few hours.
3. Add the cereal ( and Gouda); it’s okay to knead it in with your hands but try not to work the dough any more than necessary. Form into walnut sized balls and place 2 inches apart on parchment paper lined baking sheets. Flatten the balls with floured fork tines. It would be nice if you could give these the refrigerator cookie treatment, but slice and bake doesn’t work. Too crumbly.
4. Bake at 350 until light gold, anywhere from 12 to 20 minutes, reversing the sheets halfway through the baking. Cool on wire racks and store airtight.
The pumpkin pie came to light while I was cruising around looking for early cheese dollar recipes. It’s hand-written in the front of my copy of The Wise Encyclopedia of Cookery, published in 1949 by Wm. H. Wise & Co. Inc. , of New York.
A nifty book, btw, over 1200 pages of definitions and recipes, most of the latter from what might be called parties with an agenda: the National Dairy Council, the California Prune Marketing Program, the American Meat Institute. But the huge acknowledgements list also includes the US Army Quartermasters Corps, the American Limoges China Corporation and – I burn to know, I truly do – the American Badminton Association.
So of course then what about the origin of Mamie’s recipe and starting to try to track THAT down when the slippery slope aspect became clear and I went out to divide the overgrown Salvia transylvanica.

All those large leaves belong to the salvia. The yellow flower with blue stems and columbinelike leaves is Thalictrum flavuum glaucum and this one has rather fallen over; the plants are about 5 feet tall and vulnerable to wind.
MAMIE EISENHOWER’S PUMPKIN PIE
Exactly transcribed from the handwritten version.
Three beaten egg yolks, ¾ cup brown sugar, 1 ½ cups cooked pumpkin, ½ cup milk ½ tsp. salt, 1 tsp. cinnamon, ½ tsp. nutmeg.
Combine above ingredients and cook in double boiler until thick, stirring constantly. Soak 1 envelope gelatine in cold water and stir into hot mixture. Chill until fairly set. Beat 3 egg whites and ¼ cup granulated sugar, then beat until stiff. Fold into gelatine mixture. Pour into baked pie shell and chill until set. Garnish with whipped cream. Makes 1 big or 8 individual pies.
I wish she’d written her name in the book, but she didn’t. And she may have gotten it second hand herself. Although it appears to be a first printing , one of the handwritten recipes is for a “TV mix” quite similar to the mid-’60s version favored by my mother. That said, my mother’s didn’t include bacon drippings, which can sometimes be an indicator of (comparative) earliness.
Like most of the Northeast, we had a false alarm last Wednesday: it was actually warm out, almost balmy. The crocus in the crocus lawn was beginning to look carpetlike although the effect was (and remains) patchy, because last fall’s newly planted fill-ins are in the usual way coming up later than the established clumps.
There are still plenty, all of them very attractive to the bees. We lost one hive over the winter, a loss rate of 50 % but better than a lot of the pros did. Bill picked up 2 new boxes yesterday. They’re in the basement keeping warm, and I’m baking some honey bars – just to inspire them.

Bill got this picture by putting his camera on one of those tiny tripods that looks like Mr. Gumby. There will be no crocus honey because honey is not being made yet. The first nectar all goes to feed the brood.
HONEY BARS
This is a close adaptation of the recipe for Candy Cake in the American Heritage Cookbook, published in 1964 and now out of print but widely available and worth having, for the wealth of historical photographs as well as the recipes.
½ cup butter
a scant ½ cup sugar
3 well-beaten eggs
½ cup mild honey
2 teaspoons vanilla
1 ½ cups all purpose flour
¼ teaspoon each salt and baking soda
1 cup coarsely chopped walnuts or black walnuts which are wonderful if you like them
1. Heat the oven to 350. Butter a 9 inch square 2 inch deep baking pan. (8 inch may be substituted, see note at end.)
2. In a large bowl, let the butter soften, then beat in the sugar. Beat in the eggs, honey and vanilla, then lightly stir in the flour, salt and soda. Add walnuts and stir/fold just enough to mix them through.
3. Turn the batter into the pan and bake until edges shrink and a toothpick comes out clean, about a half hour. Let cool in the pan, then cut into small bars.
Note: The original recipe calls for an 11 ¼ x 7 ½ x 1 ½ inch pan, which must once have been a common size, albeit I don’t think recently (ours was found in a junk store 25 years ago). 9x13x2 is too big. The only problem with an 8 inch square is that the edges usually overcook before the center is done. Solutions in order of hassle include: pretending you didn’t notice; slicing off edges and feeding to dog or edge-lover; and making the cake plus a cupcake: fill the pan about 2/3 full. Bake remaining batter in whatever small shallow ovenproof vessel you happen to have around.
Update: Shortly after writing this, I found an 11 ¼ x 7 ½ x 1 ½ pan in the not very well stocked equipment section of a local Hannaford. Don’t know what to make of this but will say that’s a very useful size for all sorts of 2-person cooking.
This did not start out as a project – it was just one of those idle irritations. Bill, who eats granola for breakfast, came home with some that was truly dreadful, up to and including the very strange pink bits of freeze dried raspberry. We will not discuss why he bought it; suffice it to say that even he didn’t want to eat it and of course then we got talking about the old days when you made your own and then the very next Wednesday there was Mark Bittmann in the Times with a recipe for crunchy granola.
Rather than simply following it, I decided to look at some of the competition, always a danger now that we are in the age of Google. When I asked it to find “granola recipe”, it came back with “Results 1 – 10 of about 1,420,000. ”
Uh huh. But when would it stop being granola recipes or literary references to granola recipes and start being the usual outer reaches: strings of words that start with g; science fiction pornography; entries in what looks like Chinese but isn’t.
Plunged in, leaping the longest intervals offered. On page 30, there was a lowcarb granola, a thought too scary to explore further. On page 46, an excerpt suggesting that nuts “should be rinsed in cold tap water to which vitamin C powder has been added”. Page 65 was still recipes, including one for a “vegan fusion ” version called Marley’s Hemp Granola, which I should have looked at, I guess, since what I remember about cooking with hemp is that the results were generally – how shall I put this? – more functional than delicious.
The plan was to stop at page 100 but google’s ” that’s it, nothing after this but repetition” kicked in after only 810 hits, on page 81.
Give or take a few, I think 81 is about the number of granola items sold by my local Stop and Shop. They have granola stocked in 3 places: the health/ organic (pay more here) area; next to the whole nutmeats and rice cracker snacks at the end of the produce aisle; and of course in cereal, which had the smallest number of granolas but the largest number of granola bars: 60 running feet of shelf space. Not wishing to piss away the time required I didn’t count varieties, but did notice that many were chocolate covered and one contained m&m’s. The one with the m&m’s was not, by the way, on a low shelf where small children would be enticed by it.
I could go on, and probably will, since there is a food-historical black hole between J.H. Kellogg’s Granola, which sold by the ton in the 1880s , and the tidal rise of the 1960’s product that made “crunchy” an adjective applicable to human beings.
For today, I will only say it’s surprising, once you start tasting alertly, how many variables there are, that plenty of salt certainly helps, and that so far the Corsican special is my favorite but Bill prefers good old Honey Nut.
GOOD OLD HONEY NUT GRANOLA
1 cup whole almonds
1 cup pecans, whole or in large pieces
6 cups old fashioned rolled oats
1/3 cup sunflower seeds
¼ cup toasted wheat germ
½ cup mild honey
3 tablespoons walnut oil (or peanut oil, if there’s no walnut already in the fridge)
2 teaspoons vanilla
½ teaspoon salt
1. Heat the oven to 325 degrees. Spread almonds and pecans in separate pie tins and toast until a broken nut is very pale gold; about 12 minutes for pecans, 15 or longer for almonds. When nuts are done, reduce heat to 300.
2. Spread oats and sunflower seeds on a large jellyroll pan and parch in the 300 degree oven, stirring occasionally, for about 15 minutes. Oats should crisp while scarcely coloring.
3. Turn oat mixture into a large bowl and stir in the wheat germ. Combine honey, oil, salt and vanilla, heat just long enough to liquefy/thin honey, give it stir and pour it in. Stir until all dry matter is coated, then add nuts and stir again ditto.
4. Turn the whole works out onto the oat pan, spread to the edges and return to oven. At 5 to 8 minute intervals, use a flat pancake turner to lift the brown edges into the middle and spread the paler material. Keep it up until the granola is a rich dark gold and a cooled nugget is properly crunchy, anywhere from 20 to 40 minutes, depending on pan, oven and sugar content of honey.
5. Store airtight. If you want raisins or other dried fruit , the time to add it is right before eating. There’s no reason to pre-mix something you want to keep moist with something you want to keep crisp unless you’re going camping.
Variation: The Corsican Special, aka Double Chestnut
(which was originally known as Italian recipe fanatic – there’s no way you’d have these ingredients handy unless you were really into it)
5 cups rolled oats
¼ cup sunflower seeds
3 tablespoons chestnut flour
2 tablespoons wheat germ
scant half-cup chestnut honey
3 tablespoons grapeseed oil
1 ½ teaspoons vanilla
scant ½ teaspoon salt
1 ½ cups coarsely chopped pecans
1. Heat oven to 300 degrees and toast oats and seeds as in 2., above.
2. In a large bowl, mix oats and seeds with flour and wheat germ, then add remaining ingredients as in 3, above.
3. Very slowly toast the living bejeeziz out of it, lowering the heat if it starts browning before the first half hour is past. It’ll be done in 40 minutes to an hour.
I’ve spent years evangelizing, insisting that the fruitcake-resistant have never eaten the real thing, and given that “real thing” means “good candied fruit,” an item that pretty much must be home made if not purchased from purveyors like Fauchon ($60.00 per pound, not including shipping), I’m reasonably sure that’s true.
But perhaps you are saying, “no, no, for years home bakers and first-class commercial makers like good ol’ Alice Perron up there in Vermont at Bienfait have simply omitted the candied part. They just mix classic, no-fakery batter with lots and lots of succulent dried fruit and generous quantities of fresh nuts and …
Well, okay. It’s good. But it still lacks a certain chewy, aromatic, sweet but not too sweet component, a component that’s easy to make by defining “candied fruit” as “candied citrus peel”: lemon, orange, and grapefruit , each delicious in a slightly different way.
There’s a detailed step by step recipe here and about 8 zillion more floating around on the web ( see below for cautionary notes), but the bottom line is that candying peel is no more difficult than cooking pasta – and no more expensive, either, since the peels come free with the fruit.
After reading this introduction, you may be expecting a fruitcake recipe. But then who’d eat it besides you? Better to make the always popular
Universal Suit Yourself Fruit and Nut Bars
Everything that’s good about fruitcake but not so damned much of it, all on a buttery, crumbly crust that cuts the opulent sweetness.

Crust:
1 ¾ cup all purpose flour
1 tsp. baking powder
1/3 cup sugar
pinch salt
½ cup butter, plus more for the pan
1 lightly beaten egg
Topping:
2 ½ cups fruit, cut in @ 1/3 inch dice. Any combination of : raisins; currants; prunes; dates; dried apricots, pineapple, figs, or cherries; candied ginger and candied citrus peel.
½ cup rum or brandy
2 eggs
1/3 cup each white and dark brown sugar
2 tablespoons flour
½ teaspoon baking powder
1 teaspoon vanilla
1/2 teaspoon each cinnamon, cloves, ginger and nutmeg
2 ½ cups lightly toasted whole nutmeats. Any combination of: almonds, walnuts, pecans , hazelnuts, pistachios, pine nuts and macadamias. Cashews and peanuts overwhelm all else, so either eschew them or rename the bars.
1. Mix the topping fruits and alcohol in a small bowl, cover tightly and set aside in a warm place until all the liquid is absorbed, overnight, more or less.
2. Heat the oven to 350 (325 for a glass pan) and thickly butter a 9x13x2 inch baking pan.
3. Put crust dry ingredients in a shallow bowl and mix thoroughly with a wire whisk. Cut or pinch in the butter until you have coarse meal, then make a well in the center and add the egg.
4. Pinch in the egg – or stir with a fork – just until the mixture is clumpy and holds together when pressed (resist the impulse to keep squeezing). Dump it into the pan, gently spread it around, then press it into an even layer on the bottom. Bake until pale gold, 12 to 15 minutes.
5. While the crust is baking, beat the topping eggs until frothy, then beat in everything else except the fruit and nuts. Stir them in last.
6. When the crust is ready, recombine the topping and spread it evenly, being careful not to cheat the corners. Return to the oven and bake until set and browned on top, about 30 to 35 minutes. Let cool completely before cutting in small – @ 1.5 inch – squares.
Yield: about 30 squares, depending on your cutting and on the true measurements of your pan ( “9×13” is precise on the page, but it means quite different things to different pan-manufacturers).
Judging a candied peel recipe:
* It’s probably wise to choose organic citrus; just don’t assume – as I did for years – that certified organic citrus is innocent of wax.
* The thick white pith is essential. Recipes that tell you to remove it are actually recipes for candied zest.
* Bitterness varies, which should be noted/allowed for.
* not all recipes stress the necessity of having the peel completely tender before adding sugar, but if it isn’t tender before you add sugar it will be tough for all time.
As a gardener whose life is nurtured by, centered in , moored to the earth and the passing upon it of the seasons, I have to say all this flapdoodle over the name of the evergreen in the living room really rankles my curd. Here’s what: it’s a holiday tree; the holiday is the winter solstice; and people have been celebrating it with these trees for more millennia than Christianity can claim.
The decorated holiday tree is a symbol of life in the midst of darkness that belongs to everybody, atheists included. The only people who might reasonably claim it has been hijacked are Druids – and at least so far most of them have had the good sense to just keep quiet and eat cookies ( another aspect of the celebration that is WAY older than certain religions).
‘nough said. And since by now you probably have your tree if you’re planning to have one, I will say only don’t forget to keep it watered, to minimize the risk of fire and to make sure it smells good for as long as possible.
THE COOKIE PART – SHORTBREAD DIVISION
Shortbread is “cookie” reduced to the absolute basics, you can’t get any closer to eating sweetened butter unless you do it with a spoon. And recipes don’t get much easier, either. This one spends a lot of words on the fine points , but the bottom line is a short ingredient list and about 5 minutes of work.
Because the ideal texture is extremely tender and crumbly, recipes typically call for mixing all purpose flour with something like cornstarch or rice flour to lower the overall gluten content. It’s easier to just use cake flour, which every baker should keep a supply of for just these occasions. (The good side of its being devoid of any meaningful nutrient content is that it keeps forever).
For about 40 cookies, depending on how you shape them:
½ pound butter – freshness is more important than either salt or fat-content
¼ cup brown sugar
¼ cup white sugar
¼ teaspoon salt or a pinch more for unsalted butter
2 ½ – 3 cups cake flour ( amount needed will vary with the moisture content of the butter, the way you measure, and how rigid you want the finished cookies to be. The less you can get away with, the better – within reason, of course. )
ok,
1. Take the butter out of the fridge and let it soften until it is claylike, neither slump-squishy nor hard.
2. Put the sugars, salt and a few tablespoons of the flour in a processor fitted with the metal blade. Process until you don’t hear any brown sugar lumps. Add enough more flour bring the total up to 2 ½ cups. Give it another whirl or two.
3. Cut the butter into 8 or 10 pieces, scatter them over the flour, then pulse until the dough forms large clots and is just about to make a ball. This is lots of pulses.
4. Let the dough sit in a cool but not cold place for at least half an hour, up to half a day ( remove from processor and wrap in plastic if opting for the latter).
5. When ready to bake, heat the oven to 325. Roll about a tablespoon of dough into a ball, then lightly flatten it into a cookie. Put it on a piece of foil; put the foil in the center of a small, flat pan ( bottom of a pie tin works fine) and put it in to bake. Check after 6 or 7 minutes. It won’t be done yet, but it will have done enough of what it’s going to do so you will know whether to knead in more flour. Do so if necessary – freestanding shapes often need a bit more to avoid puddlehood.
6. Shape the dough (see below) on an ungreased cookie sheet, preferably the double kind with the air-layer in the middle. Bake until the shortbread is pale gold clear through , 15 minutes for pressed cookies, 20 to 30 minutes for classic wedges or little molds. Do not underbake; if it looks like the edges are browning too fast, just turn down the heat.
SHAPING SHORTBREAD DOUGH
Classic: Gently roll into balls the size of tennis balls. Flatten into circles a bit more than ¼ inch thick in the center, slightly thicker at the edges ( they get more heat). Circles should be about 5 to 6 inches in diameter. Use floured fork tines to punch into 8 wedges, then punch the center of each wedge. Leave everything attached. After baking, repunch wedges while the cookies are still hot, then separate when cold.
Molded: This is a good dough to use in the tiny fluted metal cups – about 1 inch across the top – intended for candies and Swedish sandbakkelsen. Roll teaspoon size pinches of dough into balls, put ’em in the ungreased cups, then go back and press down in the center with your thumb. Dough should come about ¾ of the way up the sides. ( It will smooth out in the baking but still be a bit dimpled.) Be sure to let them cool completely before trying to unmold. Serve as is or put a dollop of tart jam or chocolate ganache in the dimples.
Pressed: Standard advice for pressed cookies is to use a cold sheet and warm dough. With these, it works better to have both items at room temperature. If you can’t get the pressed shapes to stick, use the star opening and make rings.
(Shortbread-Molded: fancy cookware stores sell clay shortbread molds with elaborate patterns. For best results, use the recipes that come with them. )