baking
is the one making its debut in today’s New York Times , according to David Leite, who is responsible for it. Well, maybe. Although I prefer my own ( which include roasted cacao nibs), there is much baking wisdom in Leite’s story, including the use of high quality couverture chocolate disks, which really ARE the consummate chocolate chips.

Roasted cacao nibs, couverture chocolates from El Rey (round) and Valrhona (oval). The dusty coating on the nibs is just a bit of cocoa butter that rose to the surface in storage. Read More…

If you must store strawberries for more than a couple of hours, spread them out on a paper-towel lined plate so mold and bruises can’t travel.
The Theory Part
“ Doubtless God could have made a better berry, but doubtless God never did.” (Samuel Butler, at some point in the late 16th century.*)
“Doubtless the cooks who have gone before could have devised a better strawberry dessert, but doubtless they never did.” ( me, at this point in 2008, after trying many vintage recipes before settling on the shortcake that follows). Read More…
Is it just wishful thinking or are there really somewhat fewer green glitter shamrocks (and similar) this year? Not that I have anything against the good Saint, and I know Irish immigrants have made huge contributions. But it’s always seemed like a bit of a stretch to make the thing into a National Holiday. The only reason I can see is that, Easter being a movable feast, you have to be sure there’s something you can celebrate in March.
On the other hand, it’s useful to be reminded of soda bread and potatoes, two splendid foodstuffs that get a lot less respect than they should.

Soda bread fresh out of the oven. The funny looking butter pat is because the very good cultured butter is packaged in a fat plastic tube (the better to preserve its freshness, I assume), by Vermont Butter and Cheese.
SODA BREAD
Properly made, with a good proportion of fresh whole wheat flour, without any fat or sugar, this is probably the loveliest, most intensely bread-tasting bread you can make without yeast: crisp crusted, tender crumbed, the partner for which butter was invented – or so it seems when you have that first chunk. It takes less than 5 minutes to prepare and about 40 minutes to bake, so adding in oven heating time you arrive at a one hour wonder. Admittedly, it doesn’t stay wonderful too much longer than that; but omigod, what terrific toast.
A word about oven-enhancement: Putting this on a flat pan and baking it will produce delicious bread. Putting it in a heated iron kettle and covering same with a hot iron lid will produce bread that is delicious plus. (The cast iron evens out oven heat and the lid traps steam, enabling you to get a crust that’s crisp without being hard. ) This technique got a recent boost from Mark Bittman, who uses it to good effect for a no-knead “European-style boule”, but of course it’s nothing new. They don’t call those kettles Dutch ovens for nothin.’
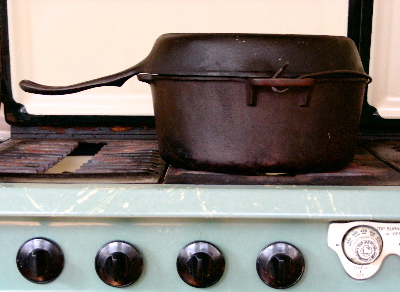
Actually, this is a chicken fryer – terrific pan, btw, just like a Dutch oven but shorter – given the necessary height with a make-do lid.
For one 8 to 9 inch round
1 ¼ cups unbleached flour
1 ½ tsp. salt
1 tsp baking soda
2 ¼ cups whole wheat flour*
@1 ½ cups buttermilk
cornmeal to sprinkle on the pan
1. Heat the oven to 425. If using an iron pot, put it and the lid in to heat up about 5 minutes before you start the dough.
2. Put the unbleached flour, soda and salt in a large bowl and stir with a wire whisk until well combined. Stir in the whole wheat flour.
3. Using a wooden spoon, make a well in the flour and pour in most of the buttermilk. Mix thoroughly, quickly, adding additional buttermilk as needed until you have a soft, slightly sticky dough. Lightly flour your hands, reach in and knead just enough to bring everything together, then form the dough into a round.
4. Sprinkle cornmeal on the baking sheet or the bottom of the hot heavy pot. Place the dough on it, seam side down. Use a sharp thin-bladed knife to cut a cross about ½ inch deep into the top of the bread. Put on the hot heavy lid, if using, and put the pan in the oven.

Ready to bake. You can’t really see it but the cornmeal is smoking slightly. Not to worry.
5. Check after 30 minutes. The bread should be well risen and brown. If it’s still on the pale gold side, give it a few more minutes, still under cover if you’re using a lid.
Tarting it up in traditional fashion: stir in 1 teaspoon caraway seeds when you stir in the whole wheat flour and stir in 3/4 cup of plump raisins when the dough is approaching complete but has not yet come together.

Eat it while it’s still hot, if possible
* Whole wheat flour is pretty much it in the flavoring department, so quality really matters. If yours has been sitting around for a while, treat yourself to a new sack. The bread in the picture was made with a combination of King Arthur Organic Whole Wheat, available ( mirabile dictu! Who’d have thought it in the old days) at large supermarkets, and Wild Hive Farm Wholegrain Soft White Winter Wheat, which we buy – along with the butter – at Adams.
POTATOES
A garden miracle, easy to plant, easy to care for, tremendous yields, and a terrific thing to plant with kids. More about planting at planting time ( soon but not yet) . Right now, the thing to know is that time is running out for ordering from one of my favorite sources, Moose Tubers (Fedco) 45 varieties to choose from but only until March 14th. After that, there’s always Wood Prairie Farm, a far slicker but no less trustworthy establishment.
( for the pizzelle recipe, please scroll down)
‘Twould seem the night has come and gone; that it’s time to get out that pile of catalogs and start planning the gardens. But not quite yet; the midwinter jamboree extends at least until New Year if not Twelfth Night and for many of us there is still a week or more of socializing and present-giving to go.
* Last Minute Gifts
If you’ve had it to here with shopping and dread the post-Christmas sales, there’s a very strong temptation to shop among the presents you just got, moving the ones that make you sigh from the inbox to the outbox.
If only. Unless it’s something absolutely wonderful and completely understandable like a third copy of On food and Cooking, by Harold Magee, regifting is usually out. Completely apart from the hurt-feelings aspect, if you don’t like it enough to keep it and it comes from a store that offers nothing you’d like to exchange it for, how can you let it represent your taste?
Mercifully, the best present for many adults is something expendable like food or flowers – assuming you could find responsibly-raised flowers which you mostly can’t. A rant for another day. The gifted will probably enjoy anything from a generous hunk of local cheese to a plate of homemade Moth cookies ( see below), but the real present is that expendables cannot possibly be stored in a closet and dutifully trotted out whenever you come over.
Not sure about food or wine or eaux de vie made from American fruit? Candles should do nicely as long as they’re chaste in the perfume and dye departments. Fragrance is a minefield of individual preference, and no matter what they say about beige it goes with almost everything. Conveniently, this means it’s classiest as well as greenest to give a large bundle of unscented, uncolored pure beeswax candles. Too late now to mail order but some natural food stores sell them.
* Tips for stylish gift wrapping and present opening with the environment in mind are at All Wrapped Up.
* Last Minute Cookies

One dough, many choices
MOTH COOKIES
Aka Vienna crescents and vanilla crescents
I never knew these were classic Christmas cookies until I was an adult. In our family they were simply the family cookie. (Moth is short for mother; it has nothing to do with bugs.) They take almost no time to make; the dough is extremely versatile; the recipe makes a lot, and everybody loves them – everybody who likes almonds, anyway.
For roughly 60 to 80 cookies:
1 cup whole almonds
½ cup sugar
½ pound butter, at room temperature
pinch of salt
1 teaspoon vanilla ( I often use 2)
1 cup cake flour
1 ½ cups all purpose flour
confectioners sugar, optional
If you have a nut grater, use it on the almonds. If you don’t, put them in a processor with 2 tablespoons of the sugar and pulse until reduced to a mixture of almond meal and tiny crumbs. In a large mixing bowl, cream the butter with the rest of the sugar, then beat in the salt, vanilla and cake flour. Stir in the all purpose flour, then the almonds. Dough will be stiff; Moth’s recipe says “ knead in the almonds,” which gives you an idea. Shape as desired and place slightly separated on ungreased baking sheet or parchment paper. Bake at 325 degrees until just touched with gold – 8 to 15 minutes, depending. The hot cookies are supposed to be rolled in confectioners sugar but Moth seldom did and I never do – too sweet and too messy, especially since there are other classics that really need this treatment.
Shaping:
Crescents. Moth’s preferred shape. Use a scant tablespoon of dough for each; they’re easy to form and they have a distinctive taste because the thinner parts get browner. They also have the merit of fitting many on one cookie sheet. This becomes a fault if you forget and overbake them.
Icebox cookies. Form the dough into rolls or squares about 1 ½ inches across. Wrap tightly in plastic wrap and chill for 3 or 4 hours to 3 or 4 days. Slice about 3/16ths inch thick. Rolls cut in half the long way make pretty one bite half-circles when sliced.You can also slice them super-thin and sandwich them with jam. Leave plain or decorate with small amounts of icing or chocolate.
Applying chocolate

Deco-ish geometry is easy and fun. So is the Jackson Pollack effect.
Coarsely chop an ounce or two of high quality bittersweet chocolate ( at least 50 percent cocoa). Put it in a freezer-weight plastic bag and close the bag. Lay it flat on the turntable and microwave at half power until most of the chocolate is melted but there are still a few lumps, about 75 seconds. Push the chocolate around in the bag until the lumps melt and the chocolate is completely smooth. Use a razor blade or sharp scissors to cut a very small hole in the corner of the bag. Remember to squeeze from the top.
Those candies? Chocolate truffles. Chocolate truffles that are not offensively immense. Mark Bittman just published a basic recipe in the New York Times that’s pretty much like mine.
These happen to be flavored with Frangelico, a hazelnut cordial. The ones with the chocolate drizzle cage – the lazy person’s dipped-in-chocolate – are plain. The white ones have a toasted hazelnut inside and are rolled in crunchy pearl sugar, sold by King Arthur Flour, among others.
PS. If you happen to have the little molds used for Scandinavian sandbakkelse, moth cookie dough works great in them, too. The chocolate ones below have truffle filling; the jam is peach. Lemon curd is terrific. Needless to say these are not swift. Talk about fiddling! Good though.

Part 1: Heirloom Pizzelle
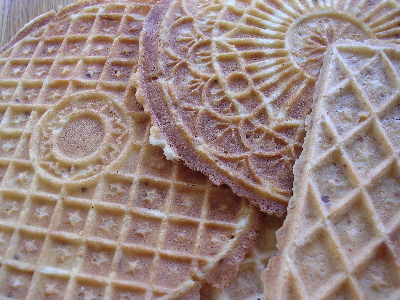
Most pizzelle baking irons are round, probably because it’s much easier to get lace-edged circles than any kind of rectangle. But regardless of shape or perfection thereof, these crisp, light not-too-sweet cookies look great on the plate – while they last. Scroll down to skip straight to the recipe.
In the middle of the Northeastern winter, when gardening consists largely of spraying insecticidal soap and looking out the window at the naked spot where you meant to plant a chamaecyparis ‘Filifera’ but didn’t, baking is a natural outlet for some of that thwarted creative energy, aka urge to potter around.
Said urge might be resistible if it weren’t for the Pavlovian aspect, but just as springtime is full of cues to get out there with trowel and pruning shears, the Let’s Banish Darkness season* is laden with near constant reminders that cookies should be made.
Some years we begin with gingerbread, adding the warm perfume of spices to old reliable butter + sugar + flour + oven = happiness; but we usually start with pizzelle, a family tradition from the Italian side of Bill, who arrived in my life equipped with his grandmother’s pizzelle iron.
That would be grandmother Josephine, the world’s greatest cook, born Giuseppa Cario in 1894, near Palermo, resident for most of her life in Washington, PA (near Pittsburgh).
The grandmotherly pizzelle iron IS iron, not the more modern cast aluminum. And it has both a very long handle and little feet, like the feet on old cast iron skillets, suggesting original design for use on an open hearth although they may simply be there to provide balance; the applied handle means the plates don’t lie flat.
Most importantly, the iron has grandma’s initials and those of grandpa Fidele engraved on one side. On the other is the date: 1931, the twentieth year of their marriage.
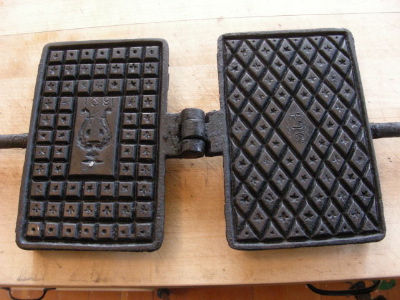
The personalized parts are not deeply cut, so they never show up as clearly as the patterns standard on the iron, but that just adds to the challenge. If the dough comes out just right, you can see ‘em. If it doesn’t, the pizzelle are still delicious and of course if you’ve gotten close enough to eat them, you don’t have to see the initials to know they’re there.
The basic batter is easy to make, and over the years I’ve tried many variations, some with vanilla, some with citrus rinds, some with crushed nuts and spices. Even chocolate, which is better than it sounds but not all that terrific unless you’re one of those people with a chocolate problem. Reception is always the same: Bill takes a bite and then says “My grandmother’s had anise in ‘em.”
E-bay is rich with vintage pizzelle irons, both stovetop and electric, but there are many modern versions, including several with non-stick coating (which is widely considered non-good). Fante’s in Philadelphia has a particularly broad selection, including a version of our family heirloom that you can engrave with YOUR initials and pass down to your grandchildren.

PIZZELLE
are ideally so thin they’re almost translucent, their intricate patterns picked out in the gold brown of perfect toast (middle top). But achieving this goal is not essential. Even when quite thick they’re still delicate, and tasty doneness can be anything from barely colored to almost burnt. In all of its manifestations homemade is so much better than commercial it’s like the difference between a twinkie and a Payard petit four.
What you’re making is basically a batch of extremely thin waffles and as with all waffles success is not instant; you generally have to discard the first couple. This was clearly no problem in former times; old fashioned recipes make 60 or more. This one yields far fewer, but it can be doubled effortlessly as long as you have a sturdy mixer.
For 18 to 24, depending on size:
2 large eggs, at room temperature
½ cup sugar
flavoring: either 1 1/2 teaspoons vanilla or the shredded rind of a lemon – or half orange – or about ¼ teaspoon anise oil (not anise extract) or for Bill a tablespoon of anise seeds
¼ pound butter, melted and cooled, plus more for the iron
1 heaping cup cake flour or 1 scant cup all purpose flour, plus a bit more if needed
1 teaspoon baking powder ( use only 1 ½ teaspoons if doubling the recipe)
½ teaspoon salt
a pizzelle iron is a must; a pastry brush (for buttering the iron) and a knife with a long narrow point (for cookie prying) are nice but not essential. A small wire brush is a good cleaning tool for vintage iron baking irons. Otherwise, consult instructions that come with the gizmo.
1. Beat the eggs and sugar at medium speed until the mixture is thick and pale and falls from the beaters in a fat ribbon. While this is happening, melt the butter and thoroughly mix the cup of flour with the baking powder and salt.
2. When the egg mixture is ready, beat in the flavoring, then slowly add the butter.
3. Gently fold in the flour mixture by hand and set the batter aside, loosely covered, for 15 to 30 minutes.
4. Heat the pizzelle iron on a medium flame until a drop of water sizzles vigorously, not quite dancing but almost. Brush the plates lightly with melted butter. ( Many recipes suggest cooking spray, not my idea of fun but if you use it all the time you probably like it).
5. Gently stir the batter/dough, which should be the texture of very stiff whipped cream. Add a bit more flour if it’s softer but err on the light side; it’s far easier to add more than try to compensate for too much. Put about a tablespoonful on the iron, spreading it out a bit as you deposit it. Slowly close the iron and use a table knife to remove anything that oozes out. Peek after about 30 seconds, the pizzelle should part from one side of the iron and the surface look dry. If it’s dark brown turn down the heat. Reclose iron (and turn if on stovetop) and cook about 30 seconds more.
6. Open iron, lift/pry off cookie and place on a cooling rack. If it’s too thin, add a bit more flour. If it doesn’t come off neatly, return iron to the heat to dry it out some more, then pry as necessary to clean the iron. Get the iron hotter and greasier next time; the pizzelle will tell you what it needs more succinctly than I can.
7. Attempt to prevent your husband from eating them all immediately. They keep well for 10 days or so in an airtight tin.
* The last time I addressed this subject I was in the throes of irritation at the people who are endlessly on about the meaning of Christmas trees and so neglected to mention things like Saturnalia and Hanukkah. Please consider them mentioned. That post also includes a recipe for shortbread, the world’s easiest holiday cookie and one of the very best.
Shopping Alert: If you love apples, it’s smart to see Thanksgiving as the deadline. Many orchard farmstands make that closing day and many more close soon after, shutting the window on neat choices for most of us.
We went on the annual stock-up outing about 10 days ago – across the river to New Paltz, to Jenkins-Lueken’s, where we’ve been going for years. But we didn’t notice until we got home that the cider is UV treated. That means we’re still on the hunt; you need raw cider to get fizzy cider. Next stop, the listings at pickyourown.org, a national orchard locator searchable by state.
Meanwhile, there is a big box in the barn containing about a bushel of apples and right here it should be admitted that the barn is our enabler. Apples MUST be stored very cold, nothing ruins quality as fast as warm temperatures. If all you have is a refrigerator, fill it with varieties that will not be found after the orchards close.
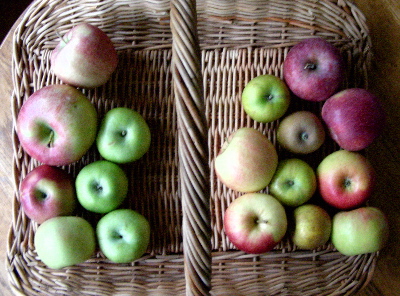
Representatives from our current stockpile. On the left of the handle, clockwise from green:(3)Rhode Island Greening, (2) Honeycrisp, (2) Cameo. Right of the handle, clockwise from red: (2) Stayman Winesap, (2) Northern Spy, (4) Golden Russet – in a line up the middle – and (2) Jonagold.
Golden Russet : Born in New York, already well known in 1848. Described by the invaluable Seed Savers Exchange Fruit, Berry and Nut Inventory as “ The champagne of cider apples,” it’s delicious for just about any use except (unless you peel it) eating out of hand. An excellent apple to stock up on; it keeps very well.
Jonagold: A marriage performed by New York’s Geneva experiment station, introduced in 1968. The sweetness of Golden Delicious combined with Jonathan’s size, juiciness and slightly sharper flavor. Not always as tart as ideal for best flavor but usually yummy. Tough skin, though.
Rhode Island Greening: ! Pie ! And thus it has been for about 400 years. A tad on the sharp side for fresh eating but ideal in savory applications such as sautéed apples and onions to go with winter’s roast pork.
Northern Spy: Can’t say I grew up with this; it’s more popular in New England than in Pennsylvania. But it has that remembered from childhood quality, fuller flavored than modern fruit – or so it seems. Both crisp and tender, both sweet and tart, good both fresh and cooked. My desert island “if you could only have one.”
Honeycrisp: New kid on the block ( 1991) cross of Macoun and Honeygold, from the University of Minnesota. A good compromise for fresh eating if your family is, like mine, divided on the sweet vs. sharp question.
Cameo : Also recent (1987), a lucky find chance seedling from Washington state. Crisp and balanced in the manner of Honeycrisp but more aromatic and frequently huge.
Stayman Winesap – labeled “Stamen” at the stand where we got it, with no indication which of the 4 variations on Stayman Winesap it might be. And I’m actually guessing at the Winesap since there is also a Stayman apple, grown mostly in the south and considerably less red if its pictures are any indication. Assuming they are some kind of Winesap they should make dandy applesauce.
The grumble and cake part
is because the New York Times magazine recently addressed the subject of apple cake with, I suppose not surprisingly, the mandate to be as contemporary and hip as possible. Net result, no fault of the Times’ sensible Amanda Hesser? A chef who was determined to improve an easy, tasty, but the recipe already exists cake, came up with a no doubt delicious but utterly uncakelike fruit-bottomed “soufflé crepe.” Shelf life of original cake, which could be eaten out of hand: a few days, and then toward the end you could probably toast it. Shelf life of chef’s goodie – several minutes; so be sure to have that plate and fork handy before you start.
Well ok, but was it really impossible to make an old fashioned everyday cake sort of cake that would be interesting to eat? And could one not make it with butter instead of oil?
Distantly remembered a long-ago struggle to find – and then when I couldn’t find, develop – a carrot cake based on butter instead of the usual oil. Checked out the recipe (it’s in Reading Between the Recipes). Unfortunately, it’s a layer cake, with frosting and other non-everyday aspects, and although the apple one could be a sheet cake something prettier would be nicer.

the experiment. Left to right: Cakes 2, 3 and 4
Four cakes ensued, one that we will not discuss and three that were different primarily because I kept screwing up. Cake # 2 was heavy and damp, because I couldn’t find the bundt pan and tried to bake it in a tube pan.
I know this was the problem because the bit of extra batter baked in a little glass bowl was very close to just fine. But did I pay attention? I did not. Cavalierly choosing to keep messing around I omitted the touch of oil, reduced the sugar, and upped the pecans for cake #3. And then, it being quite late by this time, just forged ahead after discovering the only white flour on hand was unbleached.
Commonly available unbleached flour makes tougher, heavier cakes than bleached flour. Simple fact. More nuts sat on the apple flavor; sugar and oil were both missed. Cake # 4 was back to formula #2, this time in the right pan with the right flour, for a long-keeping, velvety butter cake studded with apples and nuts. Big, too, so there’s plenty for all the relatives or you could freeze half and have it on hand for cake emergencies.
Chunky Apple Cake with Pecans
More like dice than chunks, truth be told, if you want the cake to resemble cake instead of steamed pudding. On the other hand, the rather steamed puddingy cake #2 was Bill’s favorite, so it’s hard to go completely wrong.
3 ½ cups roughly 1/2 inch dice or slightly larger chunks of peeled crisp tart cooking apple (see above for variety suggestions. Granny Smith will do in a pinch)
2 ¼ cups sugar
1 ½ tsp. kosher salt
3 1/4 cups bleached all purpose flour
1 tsp. baking soda
scant ½ tsp. baking powder
8 ounces unsalted high fat butter such as Plugra, at cool room temperature
3 eggs and 1 egg white
1 tbl. bland vegetable oil
2 teaspoons vanilla
½ cup sour cream
1 cup chopped pecans
1. In a non-reactive bowl, mix the apple dice with 1 cup of the sugar and 1 teaspoon of the salt. Set aside for an hour and a half. Stir when you think of it. (Pulling juice out ahead of time this way minimizes the holes-around-the-cooked-fruit effect that otherwise plagues these cakes.)
2. While apples sit, get everything else lined up. Let eggs and sour cream come to room temperature. Butter and flour a standard (10 cup) bundt pan. In a large bowl, thoroughly mix the flour with the remaining ½ tsp. salt, the soda and the baking powder, either by repeated siftings or much stirring with a wire whip. Heat the oven to 350.
3. When apple sitting time is about up, cream the butter, then add the remaining 1 ¼ cups sugar and cream again until pale and fluffy. Lightness of cake is directly related to whether you’re doing this with a stand mixer for about 8 minutes or your own personal arm ‘till you’ve had enough.
4. Beat in the eggs and white, one at a time, scraping the bowl from time to time. Beat in oil, vanilla and sour cream, again scraping right to the bottom of the bowl. Beat in free liquid from apples.
5. Make a well in the dry ingredients, scrape the wet mixture into it and stir together as gently and briefly as possible. Batter will be very thick. Stir in the apples and remaining juices and the pecans, then turn into the prepared pan. Thump the bottom of the pan on the work surface to reduce large air bubbles.
6. Bake until all the usual done signals: well risen, browned, pulling away from the sides of the pan and a toothpick comes out clean, anywhere from 55 to 70 minutes. Cool in the pan on a rack for 10 minutes, then turn out and cool completely before slicing. Cake will be most delicate and cakelike on the first day but still tender on days 2 and 3. Maybe more but I just made it 3 days ago so who knows?
That’s potato chip as in “ can’t eat just one, ” and cheese dollars is because my version of this killer pastry – first cousin to the ever-popular cheese straw – is a bit bigger than a silver dollar. Please note I say “my” advisedly; in versions too numerous to fully research, this recipe has been around for years. But having just served them to a bunch of highly appreciative cheese dollar virgins I know there are still plenty of people who can use to hear the good news.
Insofar as it’s good. Like potato chips, cheese dollars are a symphony of sins: white flour, high fat cheese, butter and salt. Also nuts. However, there is also a secret ingredient that – if you have a good imagination – mitigates the damage.
Actually, I doubt the inclusion of Rice Krispies does much to reduce the calorie load (sorry, Carol). What it does is make cheese dollars crunchy in a distressingly addictive way, especially if you use the real thing. As a veteran of oatmeal cookies I once assumed generic crisp rice cereal would be just as good. It isn’t.
CHEESE DOLLARS
¾ pound sharp cheddar cheese, coarsely grated
6 ounces ( 1 ½ sticks) butter
2 ½ cups all purpose flour, mixed with1 teaspoon cracked black pepper, ½ teaspoon baking powder, ½ teaspoon paprika and ½ teaspoon salt
1 heaping cup chopped walnuts. Pecans are traditional but that’s probably because the root recipe is (almost surely) southern.
2 cups Rice Krispies
optional: about ½ cup tiny cubes of super-aged Gouda
1. Let the cheddar and butter soften in a large shallow mixing bowl, then mix briefly; you just need an even combination, not a uniform paste.
2. Work in the flour mixture, then the nuts. Stop here if you want to freeze the dough or refrigerate it for longer than a few hours.
3. Add the cereal ( and Gouda); it’s okay to knead it in with your hands but try not to work the dough any more than necessary. Form into walnut sized balls and place 2 inches apart on parchment paper lined baking sheets. Flatten the balls with floured fork tines. It would be nice if you could give these the refrigerator cookie treatment, but slice and bake doesn’t work. Too crumbly.
4. Bake at 350 until light gold, anywhere from 12 to 20 minutes, reversing the sheets halfway through the baking. Cool on wire racks and store airtight.
The pumpkin pie came to light while I was cruising around looking for early cheese dollar recipes. It’s hand-written in the front of my copy of The Wise Encyclopedia of Cookery, published in 1949 by Wm. H. Wise & Co. Inc. , of New York.
A nifty book, btw, over 1200 pages of definitions and recipes, most of the latter from what might be called parties with an agenda: the National Dairy Council, the California Prune Marketing Program, the American Meat Institute. But the huge acknowledgements list also includes the US Army Quartermasters Corps, the American Limoges China Corporation and – I burn to know, I truly do – the American Badminton Association.
So of course then what about the origin of Mamie’s recipe and starting to try to track THAT down when the slippery slope aspect became clear and I went out to divide the overgrown Salvia transylvanica.

All those large leaves belong to the salvia. The yellow flower with blue stems and columbinelike leaves is Thalictrum flavuum glaucum and this one has rather fallen over; the plants are about 5 feet tall and vulnerable to wind.
MAMIE EISENHOWER’S PUMPKIN PIE
Exactly transcribed from the handwritten version.
Three beaten egg yolks, ¾ cup brown sugar, 1 ½ cups cooked pumpkin, ½ cup milk ½ tsp. salt, 1 tsp. cinnamon, ½ tsp. nutmeg.
Combine above ingredients and cook in double boiler until thick, stirring constantly. Soak 1 envelope gelatine in cold water and stir into hot mixture. Chill until fairly set. Beat 3 egg whites and ¼ cup granulated sugar, then beat until stiff. Fold into gelatine mixture. Pour into baked pie shell and chill until set. Garnish with whipped cream. Makes 1 big or 8 individual pies.
I wish she’d written her name in the book, but she didn’t. And she may have gotten it second hand herself. Although it appears to be a first printing , one of the handwritten recipes is for a “TV mix” quite similar to the mid-’60s version favored by my mother. That said, my mother’s didn’t include bacon drippings, which can sometimes be an indicator of (comparative) earliness.
We New Englanders always have a good time excoriating the so-called shortcake that has been made with sponge cake, but not all of us go as far as John Thorne, who is on record as saying “unpleasant stuff, spongecake. It tastes like its namesake without the redeeming scrubbing power.” I consider this unfair to Génoise, which when well made is delicious and very good with strawberries.
But sponge cake + strawberries doesn’t = shortcake, supposedly named for the way solid fat (shortening) keeps dough tender and flaky. Spongecake also fails to be shortcake because it’s too sweet. Strawberry shortcake does not come at the end of the meal; it IS the meal. Or at least it was in the days when the big dinner was at midday and all you wanted in the evening was something light and pleasant * . Being a full summer supper, shortcake should get its sweetness mostly from the fruit, with the “cake” part right next door to bread and crisp enough around the edges to provide textural contrast to the pudding-soft center.
It should also be served with a pitcher of unsweetened heavy cream, but so many do like to have the cream whipped I guess all I can say is please go easy on the sugar, and don’t add vanilla unless the strawberries really need a lot of help — in which case it would be better to add the vanilla directly to the sweetened strawberries along with a good slug of triple sec and a squeeze of lemon. Pour the result over vanilla ice cream and call it a day.
Strawberry Shortcake
If you haven’t already, please read Setting Up for Strawberry Shortcake. It discusses most of the fine points but fails to mention that shortcake has about the same shelf life as a soufflé and should be served as soon as the biscuits come out of the oven. It’ll still be delicious if you prep the components before dinner and assemble the shortcake after, but if you want to roll around on the floor in ecstasy you have to eat it before the biscuits cool.
Serves 6 for dessert, 3 for supper
2 quarts fully ripe, juicy strawberries
¼ cup sugar, or a bit more
2 c. all purpose flour unless you have some cake flour handy in which case use 1 1/2c. all-purpose and 1/2 cup plus 1 tbl. ( I know, I know) cake.
2 tbl. sugar
1 tbl. baking powder
1 tsp salt
6 tbl. ( 3 oz) frozen butter
¼ c yogurt in a 2 cup measuring cup, which then fill with milk to the 1 ¼ cup line. If you don’t have any yogurt, use 1 cup milk
additional butter for assemblage is traditional but optional
heavy cream to accompany
1. Put a rack in the middle of the oven and heat same to 425 degrees. Put a wide, shallow mixing bowl into the refrigerator to chill. Cut half of the strawberries into small chunks and mix them with the ¼ c. sugar in a non-reactive bowl. Mash to release juice. Slice remaining berries into the bowl, cutting them about ¼ inch thick. Stir well and set aside in a cool but not refrigerated place.
2. Put the flour in the bowl of a food processor fitted with a steel blade; add the other dry ingredients and pulse briefly to mix. Cut the butter into 10 pieces and add 4 of them. Pulse until the butter disappears. Add the rest of the butter and pulse only until pieces are the size of peas.
3. Turn the mixture into the cold bowl and add the liquid all at once. Stir only until combined, then flour your hand and knead 6 or 8 times, until the dough is almost but not completely smooth.
4. Turn the dough onto a lightly floured surface and pat it out a bit more than ½ inch thick. Pat it gently into a shape that will allow you to cut 6 roughly 3” biscuits. Using a biscuit cutter, stamp them out and transfer to an ungreased baking sheet, keeping them at least 2 inches apart. There will be very little left over dough and re-rolled scraps are never as good, so just gather the odd bits and gently press them into biscuit sized collections. They’ll come together as they bake.
5. Bake until risen and richly browned on top, about 15 minutes depending on your oven. While biscuits are baking, taste the strawberries. They should be as sweet as you’d want them if you were eating a bowl of strawberries and cream; add more sugar if they need it.
6. When biscuits are done, put them on dessert plates or in shallow soup bowls. Split with a fork and butter the bottom halves lightly if feeling traditional. Using about 2/3 of the strawberries, ladle them over the biscuit bottoms and gently press on the tops. For maximum deliciousness, top with remaining strawberries. For prettier presentation, put the remaining fruit in a bowl and pass it at the table with the jug of heavy cream.
Other shortcakes: Well of course, as long as the fruit is soft, sweet and juicy it’s hard to miss. Raspberries and peaches are wonderful. Blueberries can be very good if they’re the semi-tart wild kind, but they don’t yield when crushed. Cook half of them with the sugar until they’re juicy, then let cool before combining with the rest. I’ve never made mango, but it would probably be delicious if you could get good mangoes. A mighty big if, but maybe somebody in India wants to try fusion food.
* More about the history of shortcake for supper next post. This one is long enough as it is.
The recipe for historically and gastronomically correct strawberry shortcake IS coming, I swear, and in plenty of time for the 4th of July ( I also swear). But in the meantime this is a heads-up that you will need 3 things that may take some looking to find.
1. Good strawberries. After giving fairly detailed directions about getting good strawberries I had to buy some ( recipe research!). Went to two farmers’ markets in search of a variety as fragrant as Karen’s. Should have gone to three; but the berries I bought were really quite good and by then market hours were almost over. Also bought supermarket plastic clamshell California ones, just for comparison and without any hope they would actually be edible. They were certainly cheap: $2.79 per quart , as opposed to $4.50 and $5.00 from the farmers – though if you costed it out per fruit they were about 30 cents each. And honesty compels me to report they were a bit sweeter than one of the local offerings. But they were far less strawberry tasting, so I’m guessing there are now “supersweet” strawberries analogous to supersweet corn, in which high sugar content develops early and does not fade but the flavor of corn is faint. And they made a substantial noise when sliced that reminded me of the sound of a good apple.
2. A genuine biscuit cutter – this shortcake is of course made with biscuits, and biscuits do not rise high and flaky unless the thick dough is cut with a tall, sharp cutter designed for the job.

Jamie MacMillan
This cutter belongs to food historian Sandy Oliver, of Islesboro, Maine, about whom there will be more one of these days. For now suffice it to say this is your model, though there is no reason to buy an antique one – a new one would really be better if it were sharper which you would think would be a no-brainer but given the quality of some modern tools…
3. Heavy Cream. Pasteurized is fine but ultra-pasteurized is not. Even I who feel strongly about this cannot say the stuff is truly dreadful but it sure as hell is second rate, and the mono and diglycerides, vegetable gums and other substances added to disguise the cooked flavor and diminished whipping power certainly don’t help. “Organic” may be marginally more healthful but usually isn’t any better otherwise; all the industrial-organic national brands are ultra-pasteurized too. Try calling around to co-ops, natural food stores, and the office of a dairy itself should there be one near you. Chefs often have access to food products not routinely retailed and old fashioned heavy cream is one of them.

Bill Bakaitis
This is raw organic cream from White Orchard Farm, in Frankfort, Maine. I asked Bill to take the picture when I went to pour some and realized it was too thick to come out of the bottle until prodded.
Like most of the Northeast, we had a false alarm last Wednesday: it was actually warm out, almost balmy. The crocus in the crocus lawn was beginning to look carpetlike although the effect was (and remains) patchy, because last fall’s newly planted fill-ins are in the usual way coming up later than the established clumps.
There are still plenty, all of them very attractive to the bees. We lost one hive over the winter, a loss rate of 50 % but better than a lot of the pros did. Bill picked up 2 new boxes yesterday. They’re in the basement keeping warm, and I’m baking some honey bars – just to inspire them.

Bill got this picture by putting his camera on one of those tiny tripods that looks like Mr. Gumby. There will be no crocus honey because honey is not being made yet. The first nectar all goes to feed the brood.
HONEY BARS
This is a close adaptation of the recipe for Candy Cake in the American Heritage Cookbook, published in 1964 and now out of print but widely available and worth having, for the wealth of historical photographs as well as the recipes.
½ cup butter
a scant ½ cup sugar
3 well-beaten eggs
½ cup mild honey
2 teaspoons vanilla
1 ½ cups all purpose flour
¼ teaspoon each salt and baking soda
1 cup coarsely chopped walnuts or black walnuts which are wonderful if you like them
1. Heat the oven to 350. Butter a 9 inch square 2 inch deep baking pan. (8 inch may be substituted, see note at end.)
2. In a large bowl, let the butter soften, then beat in the sugar. Beat in the eggs, honey and vanilla, then lightly stir in the flour, salt and soda. Add walnuts and stir/fold just enough to mix them through.
3. Turn the batter into the pan and bake until edges shrink and a toothpick comes out clean, about a half hour. Let cool in the pan, then cut into small bars.
Note: The original recipe calls for an 11 ¼ x 7 ½ x 1 ½ inch pan, which must once have been a common size, albeit I don’t think recently (ours was found in a junk store 25 years ago). 9x13x2 is too big. The only problem with an 8 inch square is that the edges usually overcook before the center is done. Solutions in order of hassle include: pretending you didn’t notice; slicing off edges and feeding to dog or edge-lover; and making the cake plus a cupcake: fill the pan about 2/3 full. Bake remaining batter in whatever small shallow ovenproof vessel you happen to have around.
Update: Shortly after writing this, I found an 11 ¼ x 7 ½ x 1 ½ pan in the not very well stocked equipment section of a local Hannaford. Don’t know what to make of this but will say that’s a very useful size for all sorts of 2-person cooking.