There’s a big turf war going on in New York City: Natural versus Artificial. You can read all about it in the New York Times, but the short version is that playing fields made of genuine grass cannot be played upon constantly and that means there aren’t enough of them to go around. How much this is due to population pressures and how much to the fact that ‘“New Yorkers expect to play where they want, when they want,” ’ as the Parks and Recreation Commissioner put it, is not revealed in the story.
But the commissioner, Adrian Benepe, sees it as part of his mission to fight childhood obesity, and making sure children can run around as much as possible is a very good way to do it. That being the case, there is much to be said for the artificial stuff: you can put it on places like asphalt-covered lots where grass would never grow; it’s in place year round yet costs less to maintain. And as the commisioner did not say, you can install it without running afoul of the junk food lobby.
The natural camp argues that urban children need more contact with nature, not less. And they add that while playing is certainly healthy the artificial turf is not. It’s rife with personal and environmental hazards from excess heat absorption to carcinogenic chemicals.

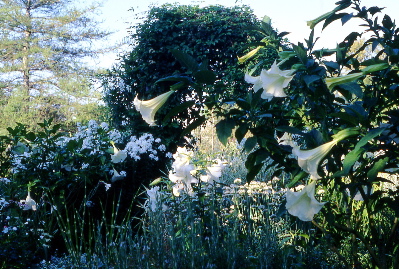
The real deal. Those ragged pale tips, to my shame, reveal that our mower blade needs sharpening.
My sympathies lie – naturally – with the natural grass camp, but I wish this were not being cast as an either-or choice. The city has more empty asphalt than one might think, especially in the outer boroughs. So why can’t the places that can support grass be encouraged to do just that while places that can’t grow grass anyway are covered with the artificial turf ?
But lets not keep calling it “artificial turf” or even worse, just “turf,” as the article does repeatedly. And let’s stop dyeing it grass green as though it were some kind of equivalent. It isn’t. It’s Plastic Play Surface, and if a concerted effort were made to create some that was more benign, it would be a win-win for everyone. New York is not the only city that’s short of playing fields.
Why couldn’t the stuff be made from old soda bottles, say, and tinted against glare in a very pale blue, pink or yellow? It wouldn’t match grass as a natural air conditioner, but the lighter color would make fewer heat problems. And the fact that it was absolutely not green would be a reminder that it was, however useful, absolutely not grass.
( Please don’t remind me a pale rug would show the dirt. Maybe showing that dirt deposited on plastic cannot return to the earth would be a good idea.)
It’s been a mighty long wait, but at last we’re rolling in Sugar Snaps, grabbing handfuls when we pass the basket on the kitchen table, slicing them superfine to make snap slaw, stir-frying them with summer mushrooms, dipping them in everything from guacamole to tunafish salad.
Sugarsnaps take longer than other peas, about 75 days, and they make enormous vines that need serious trellises. But once they get going they bear for well over a month, offering pounds and pounds of easily picked, crisp, juicy, sweet intensely pea-flavored pods that are as the saying goes “ not sold in stores.”
Sugar Snaps climb 8 feet and more if given support – which we provided until I got sick of dragging a stepladder into the garden. Now they’re supported to 6 feet and then let flop back into picking range. The pole on the left is wound with an 8-footer, the brown spot about ¼ of the way up is a patch of dry grass. You may notice many weeds in this picture. We will discuss that some other time.
A wimpy imitation of Sugar Snaps, grown mostly in Mexico and Guatemala, is now available at upscale greengrocers’ for a good part of the year. And in late spring many farmers markets offer decent snap peas. But almost none of them are realio-trulio Sugar Snaps: adequate-but-unwonderful bush snap peas make a lot more sense for commercial growers.*
Home gardeners prefer bush snaps too, if the catalogs are any indication. Although we have not grown Sugar Pop, Sugar Rae or Sugar Gem, we have tried Sugar Ann, Sugar Daddy, Sugar Bon, and Sugar Mel. None, unfortunately, are anywhere near as tasty as the original and that goes also for Super Sugar Snap, a vine almost as large as Sugar Snap but supposedly earlier, heavier-yielding and more resistant to pea afflictions, especially powdery mildew.
It isn’t. Or at least it wasn’t for us. In fact, the only snap pea that comes close is Amish Snap, an heirloom variety sold by Seed Savers Exchange. It’s a little shorter than Sugar Snap and doesn’t bear for quite as long, but it is substantially earlier, and the peas inside the pale green pods are uniquely sweet and full-flavored.

Setup for an informal taste-test ( pod ends are broken off because you can pick and string them in the same motion if you leave the stem end behind). Amish Snap is the one on the left.
Many food writers think snap peas are a recent development. Not so. A curved snap pea called sickle pea shows up in garden literature in the late 17th century. It faded from view in the mid 1800’s, replaced by straighter podded varieties known as butter peas and butter sugar peas. Butter peas were still around as recently as the 1950’s, when you could get the seed at Agway. But then somehow they became so rare that when Dr. Calvin Lamborn’s Sugar Snap was released in 1979, everyone thought it was a brand new vegetable.
Many sources explain that snap peas differ from flat-podded snow peas because the snap pea pod wall is much thicker. True, but far more to the point – at least the point of tastiness – is that snap peas taste best when the peas inside are full size. Snow peas must be eaten while still almost flat; the peas in those pods taste dreadful.

This is Carouby de Maussane, the only snow pea I know that still tastes good after the peas start to swell. The vines are even taller than Sugar Snaps and they bear vast quantities of enormous pods; the ones in this picture are babies. They also have exquisite edible flowers:

So why the seed is getting hard to find is a mystery. Last time I looked, Pinetree Garden Seeds was still selling Caroubys, but I’m thinkin’ next year we’d better start saving our own.
The twig and branch arch that divides the main upper garden from the white/herb garden near the house looks almost as though it grew there naturally, and every time there’s a garden tour it gets more comment from visitors than most of the plants. For years I have been promising to explain how Bill builds them, so here finally is the how-to.
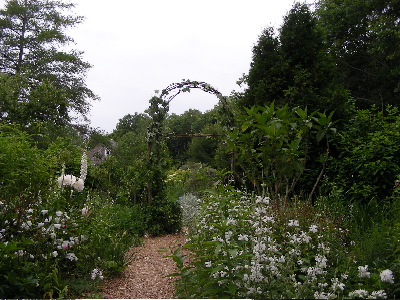
our new arch, right after completion
You will notice I called the arch “them” even though there is only one. That’s because structures like these biodegrade pretty quickly. The corner posts are durable – ours have been in place for 15 years and show no signs of declining – but the lacy branch work that makes the arch lasts only about 5 years, at least here in the Northeast where it’s exposed to pretty fierce weather.
This is a good thing. Whether you let it go as long as possible or decide to take it down earlier, everything will return to the earth without leaving paint residues, major quantities of rusting metal or other unpleasantness. There is no debris to dispose of except a little bit of wire and a few screws.
When I had Bill proofread these instructions to be sure I hadn’t missed anything, he said “This sounds complicated! If I had to read all this I’d never build anything.” It sounds more complicated than it is, but if you are as handy as Bill ( and as disinclined to read directions before plunging into projects), all you have to do is scroll through the pictures and you will know all you need to.
For those who would prefer a bit more guidance, I’ve written it up like a recipe. But please think of it as a recipe for stew, not a recipe for cake; it’s just a way to get you started. Bill can build an arch from posts to completion in an afternoon. You might want to spread it out, scouting for saplings and setting the posts on day one, building the arch on day two. Just don’t cut the saplings until you’re ready to use them; they stiffen up quickly and you want them to be as flexible as possible.
Materials (For an arch 6 feet wide, 20 inches deep and 9 or 10 feet tall) :
4 4-inch diameter 8-foot length cedar or locust posts, available at lumber yards
4 12-14 foot willow, oak or maple saplings, roughly 1.5 inches in diameter at the base. The ones that grow deep in the woods are more likely to be tall and straight because they’re reaching for the light. Make sure the main trunk is flexible from about 5 feet on up; sometimes skinny trees are older and stiffer than they look.
2 straight(ish) branches roughly 6.5 feet long and a generous inch in diameter .
12 to 15 straight(ish) branch pieces, each about ¾ inch in diameter and 19 inches long. This sounds like a lot, but most if not all of them can be gleaned from sapling branches you will be removing. It’s ok if 5 of them are only about ½ inch thick.
An assortment of different length screws: 1 to 2.5 inches long ( You won’t know exactly what sizes you need until you have the saplings and branches).
A roll of the thickest wire you can easily use as though it were string: 14 to 16 gauge probably.
Tools:
Shovel and trowel ( a post hole digger is better, should you happen to have one lying around. These instructions assume you don’t)
a pruning saw
Pair of pruners
Cordless drill
Wire cutter ( some pruners have one built in)
A ladder
Method:
1. Set the posts in pairs, 18 inches from center to center, the pairs 6 feet apart on centers. Bases should be buried 14 to 16 inches deep. If the soil is loose you can dig narrow holes using nothing but the trowel. If it isn’t, you’ll have to go at least partway down with the shovel, then backfill.
2. Cut the saplings. If you can’t get the 6 foot pieces from their side branches, cut lower branches from other trees. ( they don’t have to be the same kind of tree).
3. Bring the harvest to a spot where there is plenty of room to work, i.e. the lawn. Remove all branches from the bottom 6 feet of the saplings, so you have very skinny poles with very branchy tops. Bill just leaves the leaves in place; they fall off after a few weeks. You can remove them if you are a neat freak but then I take it back about one afternoon.
4. Prune side branches and twigs from the prunings to get the short pieces.
5. You are now going to tie the posts together with short pieces and build a ladder across the top of the arch to stabilize it. Use the hunkiest short pieces near the bottoms of the posts, the thinnest ones across the top. Let everything overlap a little. (Screws should be at least ¾ inch in from the ends or they’re likely to split the wood. And you need overlap to make tying things together easy.)

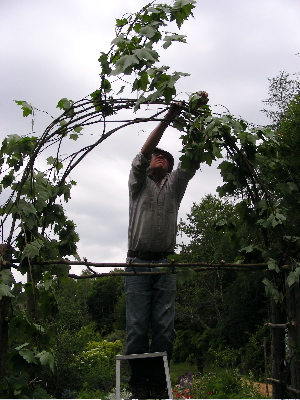
Bill trying out a cross piece
Okay. Attach the short pieces to the posts at regular intervals, screwing them to the inside faces. Attach the 6 foot pieces to the insides of the posts, around 2 inches down from the tops. Get up on the ladder and lash the cross-pieces to the tops of the 6-footers. ( You would think this would be easier to do on the ground, but everything is so irregular it doesn’t work out that way.)
6. Set the sapling bases against the outsides of the posts, starting about a foot off the ground, butting them up to the cross-pieces. Screw them into place.
7. Now comes the interesting part. Get up on the ladder and bend the saplings down to form the arch. They can go in parallel or be crossed kitty-corner, whichever is easiest and most attractive. Tie them to the tops of the posts, weaving the wire in and out around the cross piece ends to keep everything secure.

8. The arch is still having a bad hair day. Weave the branches in and out around each other until the shape is under control.
There; that’s it. Plant some vines. Clematis, perennial sweet peas and annuals like cup and saucer vine and Spanish flag work well, or you can plant climbing roses and pray they make their own woody frame before the arch gives out.
The previous arch, covered with Clematis virginiana and doing fine until this year’s Patriots Day Storm.
It’s nice to learn that a respectable, long-term study has confirmed that organic tomatoes contain far more beneficial flavonoids than the conventional kind, but this news won’t be much of a surprise to people who value true organic produce* for its (frequently) superior flavor. Other things like variety, climate and distance-from-farm being equal, good taste and high nutrient content are both results of a growing method that works in partnership with plants instead of treating them like machines for turning synthetic fertilizers into edible widgets.
Tomato plants grown the conventional way get frequent doses of those fertilizers and of powerful pesticides that provide blanket protection. Organic feeding is slower and steadier; and the permitted pesticides are usually less speedy and less lingering. That means organically grown plants must be able to stand up for themselves, and one of the ways they do it is with the antioxidants that look so promising for fighting human disease. Plants that have all their needs met in advance produce far less of these compounds.
And plants have evolved to use solar power. Sun on leaves is what makes flavor, especially when there is a high ratio of leaves to fruit. Heavy jolts of fertilizer can goose the plants into making more fruit, but fertilizer can’t make more sunshine. Result according to people with taste buds: pallid flavor. Result according to the scientists: “nutrient dilution.”
Meanwhile, back in the garden:
* be sure your tomato plants are getting enough water and getting it consistently. The stress of alternating drought and deluge prevents plants from taking up calcium; calcium deficiency leads to blossom end rot.
* if you have an eye on the county fair, consider sacrificing part of the crop. Remove all but one baby tomato from each truss of fruit and the survivor will grow far larger than it would have otherwise. ( Same goes for your dahlias, by the way. )
* if you are growing beefsteak type heirloom tomatoes like Brandywine and Georgia Streak, it’s best to harvest them before they’re completely ripe. I’m not talking about green ( at least not until frost) but just barely on the pale side of fully colored – 2 or 3 days in front of vine ripe. Picking before the fruit is ripe may seem counter to the whole point of growing your own, but unlike strawberries tomatoes do continue to improve after they leave the vine. Taking them indoors while they’re still slightly firm lessens the chances they’ll crack from a late rain or, as far as I can tell, just natural cussedness.
This is sort of cheating because it was taken in late fall and some of these were rather green when they left the vine. Note that they are in single layers, which helps prevent rot – among other things because we can’t help keeping an eye on them. Anything nasty gets removed promptly, before problems can spread. Flavonoid content of tomatoes like these has not been studied, as far as I know. But I do know that only the red ones contain significant amounts of lycopene (another, quite different, antioxidant that’s also much in the news) and that if you want to load up it’s best to cook and concentrate ‘em. Cup for cup, old fashioned Jersey-Italian tomato sauce will deliver a lot more lycopene than Southwestern salsa.
* I say “true organic” because sustainability matters. Spinach grown without conventional pesticides is a better choice than spinach grown with them (especially if you’re feeding children) . But if the organic spinach was grown on a monocropped 1000 acre field; tended and harvested by underpaid itinerant workers and then shipped clear across the country in something that burns petroleum, it still has a way to go before it’s organic by me, and it may also fall short in the flavor department.
We New Englanders always have a good time excoriating the so-called shortcake that has been made with sponge cake, but not all of us go as far as John Thorne, who is on record as saying “unpleasant stuff, spongecake. It tastes like its namesake without the redeeming scrubbing power.” I consider this unfair to Génoise, which when well made is delicious and very good with strawberries.
But sponge cake + strawberries doesn’t = shortcake, supposedly named for the way solid fat (shortening) keeps dough tender and flaky. Spongecake also fails to be shortcake because it’s too sweet. Strawberry shortcake does not come at the end of the meal; it IS the meal. Or at least it was in the days when the big dinner was at midday and all you wanted in the evening was something light and pleasant * . Being a full summer supper, shortcake should get its sweetness mostly from the fruit, with the “cake” part right next door to bread and crisp enough around the edges to provide textural contrast to the pudding-soft center.
It should also be served with a pitcher of unsweetened heavy cream, but so many do like to have the cream whipped I guess all I can say is please go easy on the sugar, and don’t add vanilla unless the strawberries really need a lot of help — in which case it would be better to add the vanilla directly to the sweetened strawberries along with a good slug of triple sec and a squeeze of lemon. Pour the result over vanilla ice cream and call it a day.
Strawberry Shortcake
If you haven’t already, please read Setting Up for Strawberry Shortcake. It discusses most of the fine points but fails to mention that shortcake has about the same shelf life as a soufflé and should be served as soon as the biscuits come out of the oven. It’ll still be delicious if you prep the components before dinner and assemble the shortcake after, but if you want to roll around on the floor in ecstasy you have to eat it before the biscuits cool.
Serves 6 for dessert, 3 for supper
2 quarts fully ripe, juicy strawberries
¼ cup sugar, or a bit more
2 c. all purpose flour unless you have some cake flour handy in which case use 1 1/2c. all-purpose and 1/2 cup plus 1 tbl. ( I know, I know) cake.
2 tbl. sugar
1 tbl. baking powder
1 tsp salt
6 tbl. ( 3 oz) frozen butter
¼ c yogurt in a 2 cup measuring cup, which then fill with milk to the 1 ¼ cup line. If you don’t have any yogurt, use 1 cup milk
additional butter for assemblage is traditional but optional
heavy cream to accompany
1. Put a rack in the middle of the oven and heat same to 425 degrees. Put a wide, shallow mixing bowl into the refrigerator to chill. Cut half of the strawberries into small chunks and mix them with the ¼ c. sugar in a non-reactive bowl. Mash to release juice. Slice remaining berries into the bowl, cutting them about ¼ inch thick. Stir well and set aside in a cool but not refrigerated place.
2. Put the flour in the bowl of a food processor fitted with a steel blade; add the other dry ingredients and pulse briefly to mix. Cut the butter into 10 pieces and add 4 of them. Pulse until the butter disappears. Add the rest of the butter and pulse only until pieces are the size of peas.
3. Turn the mixture into the cold bowl and add the liquid all at once. Stir only until combined, then flour your hand and knead 6 or 8 times, until the dough is almost but not completely smooth.
4. Turn the dough onto a lightly floured surface and pat it out a bit more than ½ inch thick. Pat it gently into a shape that will allow you to cut 6 roughly 3” biscuits. Using a biscuit cutter, stamp them out and transfer to an ungreased baking sheet, keeping them at least 2 inches apart. There will be very little left over dough and re-rolled scraps are never as good, so just gather the odd bits and gently press them into biscuit sized collections. They’ll come together as they bake.
5. Bake until risen and richly browned on top, about 15 minutes depending on your oven. While biscuits are baking, taste the strawberries. They should be as sweet as you’d want them if you were eating a bowl of strawberries and cream; add more sugar if they need it.
6. When biscuits are done, put them on dessert plates or in shallow soup bowls. Split with a fork and butter the bottom halves lightly if feeling traditional. Using about 2/3 of the strawberries, ladle them over the biscuit bottoms and gently press on the tops. For maximum deliciousness, top with remaining strawberries. For prettier presentation, put the remaining fruit in a bowl and pass it at the table with the jug of heavy cream.
Other shortcakes: Well of course, as long as the fruit is soft, sweet and juicy it’s hard to miss. Raspberries and peaches are wonderful. Blueberries can be very good if they’re the semi-tart wild kind, but they don’t yield when crushed. Cook half of them with the sugar until they’re juicy, then let cool before combining with the rest. I’ve never made mango, but it would probably be delicious if you could get good mangoes. A mighty big if, but maybe somebody in India wants to try fusion food.
* More about the history of shortcake for supper next post. This one is long enough as it is.
The recipe for historically and gastronomically correct strawberry shortcake IS coming, I swear, and in plenty of time for the 4th of July ( I also swear). But in the meantime this is a heads-up that you will need 3 things that may take some looking to find.
1. Good strawberries. After giving fairly detailed directions about getting good strawberries I had to buy some ( recipe research!). Went to two farmers’ markets in search of a variety as fragrant as Karen’s. Should have gone to three; but the berries I bought were really quite good and by then market hours were almost over. Also bought supermarket plastic clamshell California ones, just for comparison and without any hope they would actually be edible. They were certainly cheap: $2.79 per quart , as opposed to $4.50 and $5.00 from the farmers – though if you costed it out per fruit they were about 30 cents each. And honesty compels me to report they were a bit sweeter than one of the local offerings. But they were far less strawberry tasting, so I’m guessing there are now “supersweet” strawberries analogous to supersweet corn, in which high sugar content develops early and does not fade but the flavor of corn is faint. And they made a substantial noise when sliced that reminded me of the sound of a good apple.
2. A genuine biscuit cutter – this shortcake is of course made with biscuits, and biscuits do not rise high and flaky unless the thick dough is cut with a tall, sharp cutter designed for the job.

Jamie MacMillan
This cutter belongs to food historian Sandy Oliver, of Islesboro, Maine, about whom there will be more one of these days. For now suffice it to say this is your model, though there is no reason to buy an antique one – a new one would really be better if it were sharper which you would think would be a no-brainer but given the quality of some modern tools…
3. Heavy Cream. Pasteurized is fine but ultra-pasteurized is not. Even I who feel strongly about this cannot say the stuff is truly dreadful but it sure as hell is second rate, and the mono and diglycerides, vegetable gums and other substances added to disguise the cooked flavor and diminished whipping power certainly don’t help. “Organic” may be marginally more healthful but usually isn’t any better otherwise; all the industrial-organic national brands are ultra-pasteurized too. Try calling around to co-ops, natural food stores, and the office of a dairy itself should there be one near you. Chefs often have access to food products not routinely retailed and old fashioned heavy cream is one of them.

Bill Bakaitis
This is raw organic cream from White Orchard Farm, in Frankfort, Maine. I asked Bill to take the picture when I went to pour some and realized it was too thick to come out of the bottle until prodded.
July 12 – 15, Rockland Maine : Maine Gardens, Nature and Design –
A celebration of Maine gardens, gardening, gardens in art, landscape design, flower-arranging, talks, photo-workshops, a garden fair and more (much more). Assorted large names including Patrick Chasse, Page Dickey, Nancy Harmon Jenkins and Tovah Martin. I’ll be talking about “ The Writer in the Garden” on Saturday morning. Schedule and ticket details here.
August 23 – 26, Moodus, Connecticut: 2007 Clark Rogerson Foray
( not me, Bill, but he doesn’t have a website)
The Connecticut-Westchester Mycological Association’s annual big foray. Three days of walking around in beautiful parks, looking for and collecting mushrooms. Three evenings of learning what those mushrooms are – and eating the ones that are safe and delicious. Full description and reservation form here. Schedule still being set up, but we know Bill Bakaitis will be giving a talk on boletes (porcini are probably the best-known boletes, in case you were wondering).
September 14 – 16, Camden, Maine: Maine Fare
The second annual food-lovers’ extravaganza , showcasing Maine’s incredible bounty and unique culinary identity : tastings, seminars, cooking classes and demonstrations, a marketplace filled with local products and a gala opening benefit for The Maine Organic Farmers and Gardeners Association, a powerhouse of support for sustainable agriculture (among their many services, an incredibly useful website).
Mainefare.com is still under re-construction but you can get a taste of it here. Schedule also under construction so all I know at this point is that I’ll be talking – and cooking! – on the subject of “Putting Food By – the key to eating well locally when the locale has a long hard winter.”
October 11, Bangor Maine: The Maine Herb Society
Illustrated talk , probably about herbs (although you never know). Details coming presently.
In the market, at pick-your-owns and in plant catalogs.
Fair warning: I’m in strawberry delirium at the moment. We (well, Bill actually) got a big bowl of them for Father’s Day from Karen, Celia’s mother, and they were the Platonic ideal: firm but tender, very juicy, flavorful, sweet, and FRAGRANT? Omigosh. They perfumed the entire kitchen all afternoon, until I made them into shortcake – a subject about which I feel strongly – recipe coming next post. Biscuits, only biscuits, do not talk to me about cake.

Karen with home-grown gift
Or don’t bother to talk about making anything. When you get strawberries this good all you need to do is eat them. The part that takes effort is acquisition.
Getting industrial strawberries is easy; like industrial tomatoes they’re available everywhere always. And all of the tomato wisdom about far tastier when fresh and local certainly applies. But with strawberries ” vine-ripened” matters far more because strawberries – unlike tomatoes – cannot continue to ripen after they leave the plant.
They do get softer as they age ( except the gigantic iron strawberries sold for chocolate-dipping). But they don’t get any sweeter or more intensely flavorful. Whatever goodness they have when they’re picked, that’s all they’ll ever have.
Yet ripe strawberries are fragile and short-lived. Result: only berries that need not travel far or change hands often can be allowed to ripen fully. And only growers who sell locally can risk growing “home garden” varieties known more for flavor than durability.
So if you crave strawberry delerium – and don’t happen to know Karen – the places to get fruit are farmers markets, pick-your-own farms, and your own back yard.

Karen got her plants from a friend and doesn’t know their name, but these look a lot like Sparkle, a home garden variety introduced in 1942 and still popular in the Northeast, the region where it does best.
At the Market: go for sprightly green calyces ( the cap of leaves at the top) and stems that are fresh-looking. Don’t be put off by small berries or berries that aren’t all the same size; many of the tastiest varieties are neither large nor uniform. Some very sweet berries are not dark red, but if they’re light it doesn’t hurt to ask for a taste. And beware of super deep color too; the berries may be so close to overripe they’ll melt before you get them home.
At Pick-your-own farms: Try to get there either at the beginning or toward the end of the day. In many places people make side money picking at these farms and selling the fruit for a small profit. They show up early; they know what they’re doing; and they’re fast. By the time they leave, a lot of the fruit that was ripe at daybreak will be leaving with them. Fortunately, they seldom come back for a second round and strawberries can ripen in a matter of hours. On hot days late afternoon can offer great picking, especially when the weather is so brutal it discourages the competition.
In the Garden: Strawberries are already among the easiest fruits to grow, and if Colony Collapse Disorder continues they’re going to be an even better bet. In contrast to most other soft fruits, strawberries don’t rely primarily on honey bees; our native wild bees pollinate a lot of them and can continue to do so – assuming, of course, our native bees are still around themselves…
A disquisition for another day. To return to our berries,
Choosing plants:
Leaving aside specialty berries like fraises des bois, there are 3 types to consider: June bearers, everbearers and day neutrals. For descriptions of individual varieties consult plant sellers like Nourse Farms and Daisy Farms.
June Bearers – might better be called “once bearers.” They make a single large crop in spring and that’s it. They’re the original “garden strawberry,” the tastiest of the large-fruited types, and the one that offers far and away the widest choice of varieties.
Everbearers – their better name is “twice bearers,” one crop in spring and another, smaller crop in fall, with only a few berries here and there in between. Quality varies widely and is strongly climate dependant. Be sure you choose one that’s right for your region.
Day Neutrals – keep fruiting from spring to fall, with the largest and tastiest fruit often coming as the weather cools down. Berries tend to be on the small side but there are a lot when you add up a whole season’s worth.

Strawberry shortcake, made with biscuits. Recipe coming soon to a blog near you.
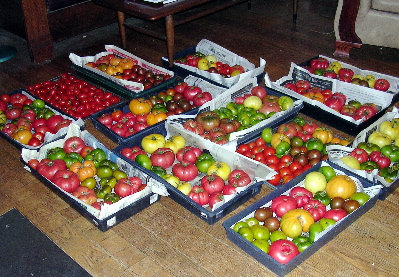
Because heirloom tomatoes are delicious; because they come in so many flavors, colors, shapes and sizes and because buying the seeds helps keep regional seed companies in business, heirlooms are what we mostly grow. There are about 150 possibilities, so we try a few new ones every year. Only a few; lion’s share of the space goes to essentials like Brandywine, the tomato that (deservedly) put heirlooms on the map.
The essentials list is rich with possessives: Pruden’s Purple – Brandywine-ish, but earlier and usually smaller; Kellogg’s Breakfast – fat, juicy and orange, named for a railroad man, not Mr. Cereal; and Aunt Ruby’s German Green, which after trying many ripe-when-green tomatoes we have concluded is best.
There is also a must-have hybrid: Sun Gold, a yellow cherry tomato unmatched for sweet fruit, disease resistance and mind-bending productivity. One plant could feed the multitudes if it were happy and given free rein to grow as large as it wanted ( and if rain didn’t crack all the fruit, a very common misfortune)
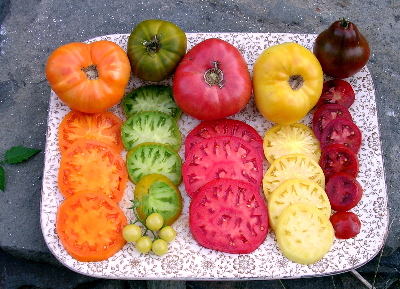
left to right: Kellogg’s Breakfast, Aunt Ruby’s German Green, Pruden’s Purple, White Wonder, Japanese Black Trifele. The little guys are White Currant
Where does the terroir come in? Because we grow the same varieties in both gardens but they don’t taste the same. The New York Brandywines, for instance, are sweeter than the Maine ones, while the Maine Green Grapes are swoonworthy compared to those from New York.
We’ve never tried a blindfold test and they do vary from year to year, but you can usually taste when you taste them the elusive “somewhereness” that wine writer Matt Kramer has used as a rough translation of “gout de terroir,” a staple term in winespeak. It can refer only to mineral flavors but just as often means “everything about a place that affects taste in ways that make that taste unique.”
The more literal translation is “taste of earth ( or soil),” though how and why – and if – it exists is a subject of some contention, especially in the wake of a debunking story in the New York Times ( Talk Dirt to Me) by Harold McGee
and Daniel Patterson.
To me it seems like a no-brainer, given all the ways – completely apart from the genetics of regional adaptation – that place matters to the taste of fruit: differences in soil lead to differences in nutrient uptake; differences in climate affect not only the plants themselves but also the likely assortment of pests and diseases and by extension the steps taken to combat them – or not.
The problem may be that in most cases you can’t compare growing places without comparing growers and the differences between them can easily trump everything else.
But not in our case. We are us in both places and our plants are as close to being the same plants as non-hybrid plants can be: all 70 of the seedlings we start with come from the same set of seeds and are grown by the same person at the same place (Jan MacDonald, at Barley Joe Farm in Warren Maine).

Maine babies about to hit the road for New York.
Oh, one more very important thing: we don’t make tomato wine and introduce all those variables, so my use of terroir for tomatoes can ( and no doubt will) be dismissed as apples and oranges. But if the taste of the fruit matters that little to the taste of wine, the dismissers are in a lot bigger trouble than anything I can cause.
Maps that divide the country into cold-hardiness zones are the tools you love to hate. The more experience you have, the less faith you put in those numbers and yet some belief is essential; no way to predict unknown-plant survival without some guidelines, be they ever so crude.
I’ve been reading reports ( both scientific and anecdotal ) on this ever-vexing subject for about 35 years now. And for the last 15 of those years I’ve been tending two gardens, one 400 miles Northeast of the other , both of them in the same zone: 5, according to the old fashioned USDA map – or 6 if you go by the more up to date Arbor Day Foundation version . Insights gained are below.

This is just to keep you amused; it has nothing to do with climate zones except that being a daylily (Hemerocallis spp) it’ll grow almost anywhere.
Rules that help:
a) Allow for 1 zone on each side of the one you’re allotted. If the map says you are in zone 5 you can probably grow a Zone 6 plant, but on the other hand your winter may kill something that has Zone 5 as its permitted lower limit.
b) Do the same thing with plant labels; they tend to be either overcautious or overhopeful, or (on those that offer a range of zones) both.
c). Learn your garden – if it’s big enough to call a garden, it’s probably big enough to have warm and cool spots, windy and sheltered ones, and quite possibly different soils within 10 feet of one another.
Hardiness Maps that attempt to Improve things:
By refining the description of the plants –
The American Horticultural Society has created a HEAT zone map, which makes a great deal of sense; most plants have death points at both ends of the thermometer. This map made its debut in 1960, but like the metric system it hasn’t made much headway.
It is used by the society’s magazine, where spicebush, for instance, is referred to as “Lindera benzoin, Zones 4-9, 8-1″. The first set of numbers are the cold zones, by the way, should you happen to run into a pair like this on a plant label somewhere and if you do please write and tell me about it.
By refining the description of the Zones:
Sunset Publishing offers – and works from – a national map that includes not only heat and cold but also length of growing season, humidity, rainfall and rainfall patterns. It is silent on the subject of soils, probably just as well given that there are 45 zones as it is.