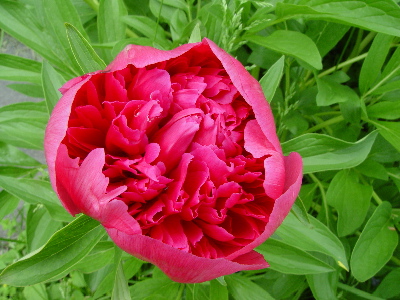
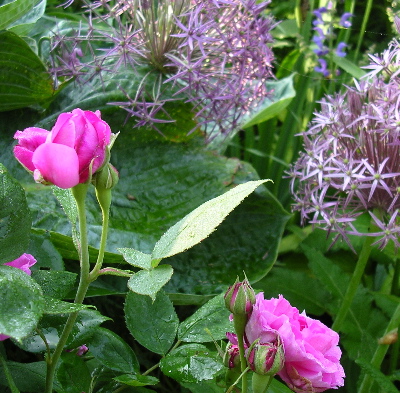
The asparagus soup is below. But first, a word from our peony. Having extolled the early one while whining that it is very magenta and then showing nothing but a bud with an illustrative ant , it seems only fair to display a flower. Bill took this picture at my request, both because I was in Maine at the time and because he is a better photographer.
Bill Bakaitis
The ( neglected ) asparagus part.
It never fails. You read a recipe for asparagus and no matter what kind of recipe it is: steamed, grilled, stir-fried, whatever, you will be instructed to break off the tough ends and ” save them for soup.”
End of story. Nobody ever tells you how to make this kind of asparagus soup. And you know if you’ve ever tried it that soups that are not asparagus soup are not improved by having a few asparagus ends thrown in.
So. The following recipe is made – primarily – from tough asparagus ends. It’s easy, inexpensive and delicious hot or cold. Because asparagus ends are tough and stringy even after they’ve been cooked to death, you do have to use a food mill to get a velvety puree, but that’s the price of frugality. If you want to just throw it into a processor, you have to use tender asparagus (see note at end of the post).
Cream of Asparagus Soup
1 ½ pounds of asparagus ( roughly 2 bunches) is usually enough to make 4 servings of soup and 4 servings of asparagus-as-veg. , but the recipe works with whatever quantity you’ve got.
asparagus
sweet onion such as Vidalia
basmati or other flavorful white rice
heavy cream, preferably not ultra pasteurized although at this point that’s wishful thinking in a lot of places
1. Break the asparagus spears where they break naturally and set the tough ends aside. Divide the tender ends into 2 piles, one a little more than twice as big as the other. Refrigerate the larger pile until you want it for vegetable purposes. Chop the smaller pile into 1 inch chunks and set aside.
2. Trim off and discard any really hard white ends of the tough ends. Chop the remainder into ½ inch chunks and measure into a large saucepan.
3. Add 1/2 cup coarsely chopped onion, 1 ½ tablespoons rice, and 2 cups water per cup of ends.
4. Cover and cook over low heat until the vegetables are soft and the rice is fully cooked, about 40 minutes. Add the chopped tender asparagus, recover the pan and cook until vegetables are very soft and the rice is a fluffy mush, about 20 minutes more.
5. Put the whole works through a food mill into a clean saucepan ( for hot soup) or a heatproof bowl (for cold). Stir in 1/3 cup cream for each cup of asparagus ends. Reheat the hot. Chill the cold. Taste. Add salt as needed. That’s it.
Bill Bakaitis
Who wants to look at a picture of a bowl of cream soup? Suffice it to say it’s celadon with darker speckles and always reminds me of this lovely image from Elizabeth David:
” … soups delicately coloured like summer dresses, coral, ivory, or pale green…”
(French Provincial Cooking, British Penguin edition 1973)
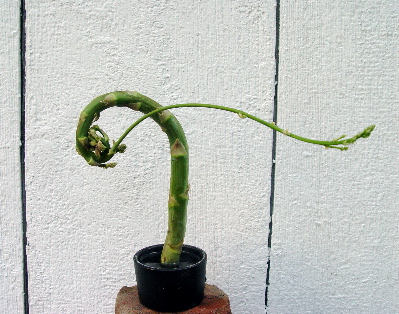
Curling of the sort in the picture is caused by damage to the spear as it was emerging from the ground. Usually , a cutworm tried and failed to sever it but sometimes you nicked it with your knife while harvesting an adjacent spear.
To make the soup using a processor or blender: Follow the proportions in the recipe, using tender asparagus uppers instead of ends. The only thing that changes is timing: Cook the onions and rice in the water for 20 minutes or so before adding the first batch of chopped asparagus. After that, it’s exactly the same except a processor is marginally easier to wash than a food mill and takes less manual effort to employ.
Tips on Choosing, Storing, Preparing and Growing Asparagus are here.
Our old house came with a yard full – and I do mean full – of old fashioned plants, things like yews and lilacs and peonies, a big magnolia and a truly hideous orange azalea that has long since gone to its just reward.
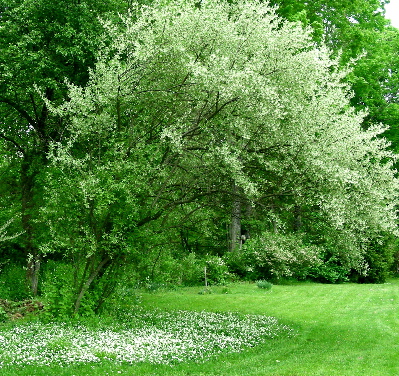
Among the plants we class as riches is a tree-sized autumn olive, Elaeagnous umbellata. It may have been planted when they were still on the OK list. Or, in the manner of autumn olives it may have arrived naturally, delivered by a passing bird.
In any event it’s here now, a late spring star whose clouds of starry white flowers perfume the entire lower yard. Beneath it, looking like fallen petals, is a carpet of tender white violets. Pick a bouquet of both and you see the olive blossoms are in fact pale cream.
Both plants are invasive weeds, though only the olive seems to excite strong passions among preservationists. ( Plenty of people hate violets in the lawn. Another whole story.)
Because it is now tree-size, we thought for years it was a Russian olive, E. angustifolia. This made us feel slightly less guilty: the Russian kind seems marginally less inclined to cover the earth.
But only slightly, both olives are on the don’t plant this list and any day now we will cut ours down. Right after we fertilize the poison ivy, an unimpeachably native vine of which we have a great deal more than either Elaeagnous.
In the meantime, we’ll remember that these “olives” feed many wild creatures including but by no means limited to: Ruffed Grouse, Wild Turkey, Cedar Waxwing, Northern Mockingbird, Cardinal, Wood Thrush, Yellow-rumped Warbler, assorted sparrows, Black Bear, opossum and skunk).
Of course they also feed fellow-invasives like starlings. And deer are fond of them. These things are never simple.

These are the flowers that convinced me it was E. umbellata, after I read about the difference here.
As lilac lovers go, I’m a very small timer: there are 8 of them in the New York yard; 10 in Maine, a mere token compared to big public collections like Highland Park, in Rochester NY, where 500 different lilacs – 1200 plants – are blooming right this minute.
But even our tiny assortment gives us a full six weeks of fragrant delight because it includes a few season stretchers: bushy, pale purple ‘Miss Kim’ (Syringa patula), pink-flowered ‘James Macfarlane’ (S. x prestoniae) and a 20 foot tall pair of Japanese tree lilacs (S. reticulata), all of which bloom later than the old fashioned French kind (S. vulgaris).

I wish I could tell you. I bought it at a clearance sale at an Agway now long gone and it was supposed to be a plain old single flowered purple lilac, the sort used for hedging in an ampler age.
Hence this bit of lilac advice: keep the sales slip until you see flowers. Mislabeling is fairly common and it’s vexing – take it from my experience – to get a dark purple-red that looks like ‘Charles Joly’ when you thought you bought a white ‘Miss Willmott’.
One way to know what you’re getting is to join up with the National Phenology Network and request one of their lilac clones. Follow the” submit data” links and you’ll be sent to the application form.
The lilac will be a ‘Red Rothomagensis’ (S. x chinensis) a somewhat gangly, fragrant early bloomer with reddish buds that open to dark pink flowers. There is a picture of one here.
And why is the National Phenology Network sending you this present? Because they want your help. Phenology is the art/science of measuring climate with biological events like frog song, fish migration and plant bloom; and lilacs were chosen, way back in the 1950’s, to be standard measuring instruments. Gardeners all over the country have been watching lilacs, sending in data and, as citizen scientists, helping to document the process of climate change. (In the Midwest, where the Network was born, spring – as measured by lilac – is now almost a week earlier than it was 50 years ago).

For now, we’re watching this common lilac, which is already in place in Maine. As long as you monitor the same plant, year after year, you can contribute useful data by watching any lilac you choose. But we will ask for a ‘Red Rothomagensis’ and start watching that one too, because that’s even better. By eliminating the variations of species, cultivar and individual plant, clones make it easier to measure accurately.
For more on this communal effort, read the short history of the project that was broadcast on National Public Radio or go directly to Project Budburst, where there are full instructions and a long list of alternate watch plants. If lilacs aren’t your thing – and for some reason you’re still reading – the list includes ocotillo, redbud, wild strawberry and many other common plants.
One warning about the clone: Can’t say for sure about RR, but most Chinese lilacs are very mildew prone, and although the fungus does no long-term harm it isn’t very attractive. Try to plant your contribution to science in an inconspicuous place.
PS: Losing your local Agway isn’t phenological, but it’s just as reliable as a measure of change. Our county in Maine ( Knox) has fewer and fewer farms and truck gardens, more and more suburban sprawl.
And their sisters and their cousins whom they reckon up by dozens… no, no, just joking, but there are all kinds of nifty peonies.
And all of them have ants. Long ago, some observant gardener noticed that ants on peony buds always meant the flowers would open soon. Always. And so a bit of folk wisdom was born: Peonies cannot open until ants eat away the seal that keeps the buds closed.
I grew up believing this, my mother went to her grave believing it, and just the other day I heard it repeated again. But it isn’t true. The thing the ants are eating is nectar, not glue, and what this does for the peony is make sure there are plenty of ants around to eat any soft-bodied insects that might like to eat peonies.

This bud belongs to a super-early short peony that opens almost a month before the common (lactiflora) kind. It was here when we got the house and all we know about it is that it’s tough. The double flowers last a long time, too, a mixed blessing given that they are – to put it kindly – magenta.

When these fern leaf peony buds open the flowers will be single, in a clear true red. They’ll last about 35 seconds. And that nifty foliage will disappear by midsummer. Catalogs that describe fern leafs ( P. tenuifolia ) as rare and special seldom mention these attributes, but it’s something to bear in mind before plunking down large dollars. Oh, also they take several years to settle in and start blooming well. On the good side, they’re indestructible, even in acid soil that gets only a few hours of sun. And once you have them, you have them. Even small bits of root make new plants.

Ok, ok, here’s a picture of an actual peony, probably Queen Victoria, one of the antique varieties that came with the place.
Peony Tips Worth Repeating:
*They do need sun, but not that much; with most varieties you can get decent flowers from a half day’s worth and the farther south you are, the more the peonies can use a break from broiling afternoons.
* Be sure to plant shallowly – those fat growth buds should be no more than an inch and a half below ground. The number one cause of bloom failure is over-deep planting… or, over time, the gradual movement of compost and mulch that buries those buds as effectively as if you had done it yourself.
* They don’t like acid soil; if rhododendrons are doing great, better you add some lime to the peony bed before you start planting.
* Fall is the best time to plant. Potted peonies can go in the ground now, but the bare root kind – the kind with all the dazzling choices – must be planted in fall.
* No peony parts in the compost! The Botrytis blight that plagues them – their own personal fungus: Botrytis paeoniae – is ever present, even on apparently healthy growth, so everything that leaves the peony bed should stay gone: discarded bouquets , the fall cleanup pile, Everything. Burn it if you can, toss it deep into the woods where no peonies will ever grow, or be deeply retrogressive and send it to the landfill.
* Peonies last a long time as cut flowers and can be held in bud stage for a month or more – if you have the room in the refrigerator. For an exhaustive and very useful treatment of cut-flower choices and procedures, download Fresh Cut Peonies, from Kansas State University.
Here we go again; it never fails. On the news just yesterday morning – “asparagus is the first vegetable of spring.”
NO! dammit. Dandelions are the first vegetable of spring, or rather they are the first green vegetable. Parsnips that have overwintered (” spring dugs”) are even earlier, but by spring one has had enough roots for a while no matter how sweet they may be.
What dandelions are: delicious. Tender and fresh-tasting, with a pleasantly bitter endive edge and an earthy greenness that has no analogy. They’re low in calories, high in vitamin A , lutein and beta-carotene – look out carrots, you’ve got competition – and absolutely free.
What dandelions are not: instant. On account of the picking and cleaning. But picking is pleasant, a good chance to get outside, and a great activity to share with kids; anybody over about 3 knows what a dandelion looks like. And cleaning goes fairly quickly if you use the greens washing trick that works for anything wrinkled and sandy.
Cooking takes about 5 minutes, so once you’ve got cleaned greens you’ve got fast food.

Greens must be gathered before the flower bud starts pushing up or they will be tough and unpleasantly bitter. Greens from shady places (left) are usually wider, flatter, and milder than greens grown in full sun (right)
Mediterranean Dandelions with olive oil, garlic and lemon.
Fine hot or cold as a vegetable dish, easily expanded into Dandelions with Pasta and Prosciutto, a one-dish supper for spring. Measurements are given mostly for the form of the thing. Please for the love of heaven don’t bother to follow them to the letter.
For 4 servings:
a basketball-sized heap of cleaned dandelion greens, well drained but not dried:
¼ cup olive oil
3 large cloves garlic, minced
2 tablespoons lemon juice; about half a lemon if it’s a decent lemon
salt to taste
Heat the oil in a wide sauté pan over medium-high heat. Add garlic and sizzle until pale gold. Add greens, standing back to avoid the spatter when water hits the hot oil. Stir, cover, turn heat to medium low. Cook about a minute, stir again, recover and cook 2 or 3 minutes more. As soon as they’re all wilted, they’re done.
Dandelions with Pasta and Prosciutto

For 4 servings:
6 ounces thick pasta ( about 2 ½ cups dry)
1/3 cup olive oil
4 or 5 large cloves garlic
about 2/3 cup prosciutto, cut into small dice. *
¼ cup currants
3 tablespoons lemon juice
1 batch cleaned dandelions ( see above)
lemon wedges
Hard grating cheese to accompany **
Get the pasta cooking. When it’s about half done, heat the oil in a wide skillet, sizzle the garlic and prosciutto dice until both start to brown on the edges. Stir in the currants, cover and turn off the heat.
When the pasta is barely cooked, stir the dandelions into the pasta pot. They will wilt instantly. Drain at once and return to the pot. Stir in the prosciutto mixture , taste, add salt if necessary and serve garnished with lemon wedges. Pass the cheese and a grater at the table.
* We use “prosciutto ends,” the bit at the tip that’s too small to slice neatly, chunks our local market obligingly sells at a bargain price. Failing that, start with a single thick slab roughly 1/3 inch thick or substitute some other strong-flavored ham. It won’t taste the same, but it won’t taste bad. Or switch gears completely and use toasted pine nuts instead of the meat.
** last time I made this we used Magic Mountain, a sheep cheese from Woodcock Farm, in Vermont. Parmesan is fine, but why not experiment with alternatives made closer to home? The American Cheese Society has accomplished members in almost every state.
“The rose and herb garden outside our kitchen door” sounds poetic, but it’s really just a small sloping rectangle with a row of old roses at the bottom and a middle full of thyme and sage, cilantro, chives, tarragon, basil, parsley, oregano, lovage, fennel – and quite a few more roses. It was planted (in the Hudson Valley) in 1994, has always been managed organically, and has turned out to be quite a teacher.
Big lesson number 1: herbs do not repel pests as well as organic gardening advisors would have you believe. This includes garlic, unfortunately.
2: Some roses really are tougher than others and there are many to choose from besides the squatty, bland, scentless “foolproof” types (Knockout, I’m talking about you) that offer so little of roses’ splendor you might as well grow something else and be done with it. See below for sources that offer hundreds of handsome, hardy roses that can thrive without noxious chemicals.
3. There will always be at least one “must have” that’s a challenge to earth-friendly ideals. Mine is Reine des Violettes, an antique beauty (introduced in 1860) that cannot endure both crowded conditions and the Hudson Valley’s hot summers.
Here she is in Maine, where the cool summers we used to enjoy made it easy to grow even fussbudgets with relative ease. The fragrant flowers open dusky pink, then fade to the pale purple of the name, and the foliage has a distinct smell of pepper. The hosta in the background is Sum and Substance, unfazed by our current plague of imported snails, which brings us to
4. Japanese beetles, perhaps the greatest test of will in the organic rose department. Not counting milky spore, there are basically two ways to deal: with products derived from the tropical neem tree, or with calm acceptance and screening.
A) Neem: Attacks on mulitple fronts, discouraging beetles from feeding, interfering with their growth chemistry, and with !hooray! their mating behaviour. It only works when applied biweekly, but then it works very well indeed , as proved not only by us but also by a study done at Perdue and reported in the invaluable Hortideas newsletter. Insects must eat it to be affected; it seldom kills beneficials; and it’s relatively harmless to other creatures – except fish. But too much neem coated pollen can hurt bees, so we try not to spray open flowers.
B) That would be open flowers of potatoes. The roses we enjoy in spring before the beetles emerge, and in fall after they’re gone. In between, we let the garden go wild. Not so good for low-growing herbs, but excellent for drawing the eye away from devastated roses.

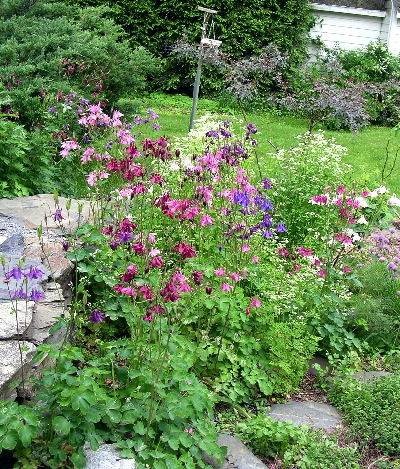
In person, columbines are not blurry. And because they cross so freely, new colors are always opening up, the gift of surprise every year.
Shopping for low-input roses:
Most of them are modern developments like hybrid rugosas, the Canadian Explorer and Parkland series, and recent introductions from Kordes. But there are also antiques, including beauties like Mutabilis, as changeable (from pale yellow through orange-pink to red) as its name suggests, and thornless, super-perfumed Zepherine Drouhin, a deep pink with no candy in it. Roses are highly climate sensitive – I’ve been tripped up more than once by the optimistic words “hardy to zone 5.” But that’s because I didn’t talk to the rose grower before placing my order; all the good ones are glad to help you fall in love with something you can actually live with.
North Creek Farm- run by Suzy Verrier, an expert in all things Rugosa
Antique Rose Emporium – exactly what its name promises
High Country Roses – for a large assortment of tough roses both elderly and brand new
Roses Unlimited – a good selection of modern Kordes roses, which until recently have been difficult to find in the US. Growers in the know have been ordering from Palatine, up in Ontario.
Once more, the adage is proven: complain that something doesn’t exist and whammo! It appears. No sooner did I announce – at the end of last week’s Honey Bar recipe – that 11 ¼ x7 ½ x 1 ½ inch baking pans seemed to be pans from the past than there they were in the new supermarket (our neighborhood’s first Hannaford’s), in the not terribly well stocked housewares aisle. Not exactly, but 11 x 7 x 2, which is close enough.
Now the question is what inspired the manufacturer; very few modern recipes specify a pan of this size: google offers a paltry 1,760 hits when asked for the for roll-the-dice size, versus 102,000 for an 8 inch square.
So evidently the pans are out there, but why buy new when it’s so much fun ( and so environmentally preservational) to collect and use pre-owned models – the ones that are “vintage” in age and attractiveness but not yet “vintage” in price. There’s a ton of terrific tin out there; glass that’s not jadeite is still inexpensive, and yard sale season will be starting soon (if it ever stops raining).
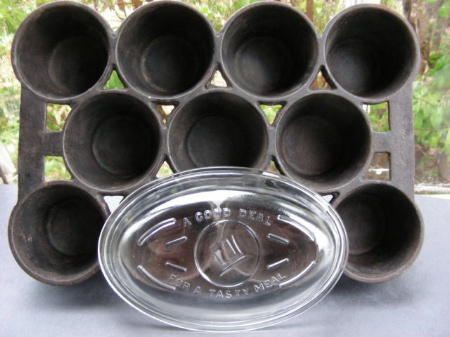
The tasty meal casserole (roughly 6 1/2x 4 ½ ) is, I just learned by looking on e-bay, a Planters peanut collectible… shoulda known from the hat. Ignorance has been useful, though, because I’ve been using them for years for things like custards and potpies. Had their serving-dish nature been known they’d probably never have gone in the oven, even though they’re thick as Pyrex. The popover pan is Griswold cast iron but not the kind collectors chase, so examples can still be found for no more than new pans that aren’t nearly as good. It’s HEAVY, as a popover pan should be; and because there are air spaces between cups the popovers can do just that and still stay crisp and separate.
Like most of the Northeast, we had a false alarm last Wednesday: it was actually warm out, almost balmy. The crocus in the crocus lawn was beginning to look carpetlike although the effect was (and remains) patchy, because last fall’s newly planted fill-ins are in the usual way coming up later than the established clumps.
There are still plenty, all of them very attractive to the bees. We lost one hive over the winter, a loss rate of 50 % but better than a lot of the pros did. Bill picked up 2 new boxes yesterday. They’re in the basement keeping warm, and I’m baking some honey bars – just to inspire them.

Bill got this picture by putting his camera on one of those tiny tripods that looks like Mr. Gumby. There will be no crocus honey because honey is not being made yet. The first nectar all goes to feed the brood.
HONEY BARS
This is a close adaptation of the recipe for Candy Cake in the American Heritage Cookbook, published in 1964 and now out of print but widely available and worth having, for the wealth of historical photographs as well as the recipes.
½ cup butter
a scant ½ cup sugar
3 well-beaten eggs
½ cup mild honey
2 teaspoons vanilla
1 ½ cups all purpose flour
¼ teaspoon each salt and baking soda
1 cup coarsely chopped walnuts or black walnuts which are wonderful if you like them
1. Heat the oven to 350. Butter a 9 inch square 2 inch deep baking pan. (8 inch may be substituted, see note at end.)
2. In a large bowl, let the butter soften, then beat in the sugar. Beat in the eggs, honey and vanilla, then lightly stir in the flour, salt and soda. Add walnuts and stir/fold just enough to mix them through.
3. Turn the batter into the pan and bake until edges shrink and a toothpick comes out clean, about a half hour. Let cool in the pan, then cut into small bars.
Note: The original recipe calls for an 11 ¼ x 7 ½ x 1 ½ inch pan, which must once have been a common size, albeit I don’t think recently (ours was found in a junk store 25 years ago). 9x13x2 is too big. The only problem with an 8 inch square is that the edges usually overcook before the center is done. Solutions in order of hassle include: pretending you didn’t notice; slicing off edges and feeding to dog or edge-lover; and making the cake plus a cupcake: fill the pan about 2/3 full. Bake remaining batter in whatever small shallow ovenproof vessel you happen to have around.
Update: Shortly after writing this, I found an 11 ¼ x 7 ½ x 1 ½ pan in the not very well stocked equipment section of a local Hannaford. Don’t know what to make of this but will say that’s a very useful size for all sorts of 2-person cooking.
It’s not puddle-wonderful yet; but we’re gainin.’ About a third of the crocus are up; almost all of the snow is gone and Bill is starting to make fly-casting gestures as we walk over the hill to the broad meadow threaded by Sprout Creek.
And once we’re there the creekside trees are filled with red-winged blackbirds, the birds that mean spring to me. Never mind the robins; they’re around all winter now, and though geese on the move are still distantly evocative, the reality of geese on the ground is too painful for them to have much spring cred left.
The forecast is for April showers all week – until Thursday, when snow is predicted. Doesn’t matter, the red-winged blackbirds are here, trilling and burbling and rasping over the water. Better days are coming.

Red-wings do sometimes come to the feeder, but Mr. Earl is actually looking at a house finch. It’s clinging to a native wisteria (W. frutescens) that will eventually – we hope – provide summer shade.
Blackbird tidbit from the terrific Cornell bird site: The males fight mega for territory and each usually has multiple females resident in his real estate. But the females seem to be no boundaries types: from a quarter to half of their offspring are sired by the neighbors.
The plant breeder who creates a rhododendron that deer don’t like is going to be rich, but you don’t need to wait for this golden shrub if you have large old rhodies, which I wish I had but I don’t. What I do is nag all my friends and design clients: Think tall. Think sculpture. Think of Japan.
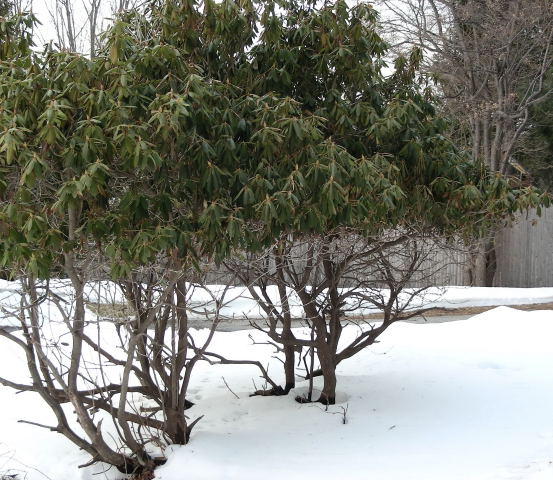
This clump grows about 1/3 mile from where the deer below were standing. Over and over in springtime those naked stems sprout healthy new growth, which sticks out randomly here and there in unhealthy-looking tufts. Over and over, the base fills out about halfway. Over and over, just when you’re starting to root for the thing and imagine it might manage to bush back out, Wham! Eaten again.
Mercifully, the owners do not encase the whole works in a gigantic net bag, but they also fail to see the obvious, which I would illustrate right here and now if I were adept with photoshop. Meanwhile, just look at those handsome trunks and the full green canopy of bud covered foliage. Imagine pruning out all but the strongest, most graceful wood. The easy, no-waiting deer-proof rhododendron is simply a multi-trunked tree. Hungry deer will stretch on tippy-hoofs, but they’re not goats. They don’t climb.