Vegetables

people waiting for something besides food, please be patient. I’ll be with you in a minute, but right now
It’s Tomato Time!
although only because we have two gardens. The plants in Maine are pathetic – it was just too cold, too dry for too long when they were young. But the tomatoes in New York. Omigosh.

Bill ( 5’ 9 or so) in the tomato patch. Note the naked bases, disease-prevention at work.

heirloom tomatoes and mozzarella, with lettuce leaf basil
The summer classic, with Pruden’s Purple (red), Malakhitovaya Shkatulla (green), and Hillbilly Potato Leaf (yellow with red streaks)
They’re all different sizes, as usual, but a larger number than usual are larger than usual
Read More…

aka Chenopodium album, tender, nutlike, easy to cook — and of course very easy to grow. All you need to do is stop pulling it up and start harvesting the tender stems and leaves to sauté in olive oil with garlic, steam in lemony chicken stock, cream just like creamed spinach or make killer lambsquarter quesadillas.

Read More…

A smooth puree, accented with tender-crisp asparagus coins. Just the thing for these oxymoronic hot spring days, when it’s officially asparagus season but experientially August. We’ve stopped cutting but I see there’s still reasonably local asparagus in the stores. Read More…
and a great deal else in a minute (famous last words). For now, the recipes for an omnium-gatherum vegetable soup and a freezer friendly pesto as promised to everyone at MaineFare!
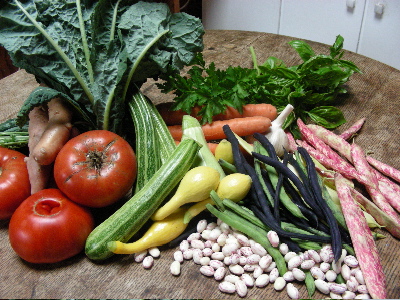
Incipient minestrone, partly gathered from my garden but not all of it because I don’t grow kale, potatoes, shell beans or carrots.
SEPTEMBER SUNSHINE MINESTRONE (aka) Harvest Vegetable Soup
This is a very general guideline; as long as you start with the flavored broth, include both starchy and delicate vegetables and use enough of them to make the soup hearty without turning it into stew, you’re in business.
Classic recipes include pasta or rice and I used to too. But now I don’t, because flexibility trumps the tiny gain in convenience you get from freezing the soup “complete.” There’s usually leftover cooked pasta or rice lying around in the fridge and when there isn’t we just use more good bread – French or Italian, generally – which IS always lying around and may be the most delicious choice anyway.
For about 12 main dish ( large ) servings:
1/3 pound lean salt pork or fatty bacon, cut in 1 inch chunks
3 large cloves garlic
½ loosely-piled cup flat-leaf parsley, leaves and tender stems
grated zest of 1 lemon
1 large onion, cut in small dice
3 quarts water – quality matters. Use filtered if your tap is chlorinated
3-4 cups root vegetables, cut in roughly ¾ inch chunks. Carrots and potatoes mostly, some parsnip and/or turnip if you like but not too much as both of these are rather aggressive.
2 cups fresh shell beans
½ cup celery in medium slices. Not thin. Not chunks.
2 cups firm summer squash, crookneck or small zucchini, cut in roughly ½ inch slices . Halve the squash the long way first if they’re more than about an inch thick.
1 ½ cups snap beans ( Romanos are lovely if you can find them) cut in 1 inch lengths.
3 cups ripe tomatoes, peeled and coarsely chopped
About 3 cups chopped kale or savoy cabbage
A good sized handful each chopped Italian parsley and basil
1. Chop pork, garlic and the half-cup parsley until it looks like hamburger – the processor is fastest ( if you don’t have to wash it by hand).
2. Put the olive oil in a heavy kettle over low heat, add the pork mixture and lemon rind and cook, stirring, until most of the pork fat is released. Add the onion and keep cooking until it is wilted and starting to turn gold.
3. Add the water and bring to a boil. Put in the root vegetables and shell beans, adjust the heat so the liquid just simmers and cook until the vegetables are about half done – no longer crisp but still somewhat tooth-resistant, 15 to 20 minutes.
4. Add celery, squash, snap beans and tomatoes and cook until the roots are tender and the snap beans are al dente, about 20 minutes more.
5. Now the kale and cooking until it’s tender, 10 to 15 minutes. Add the herbs. Let them wilt, then taste and adjust the salt.
6. Serve with pesto – your own, pistachio (scroll down to find it) or Toasted Almond (below), a better choice for freezing. Freshly grated Parmesan is traditional but if you have good local hard cheese why not experiment? You can also skip the cheese entirely or switch it 180 for an entirely new taste treat. Sprinkle some small chunks of young mozzarella over the hot soup as soon as you ladle it into the bowls. It should be somewhere between soft and melted when everyone starts eating.
Note: this produces a soup that’s just barely done, on the theory that it is going to be frozen, which softens things, then reheated, which softens them some more. If you’re planning to eat it right away, cook until the kale is almost falling apart before you add the herbs.
TOASTED ALMOND PESTO
As usual, quantities are just guidelines. Even more than usual, actually, given the difficulty of measuring fresh leaves and the enormous variability of fresh herbs. The goal is to have a fairly even mixture of almond and parsley flavors, with a strong accent of basil and a mild accent of garlic.
To make lots of this for freezing, make multiple batches; the processor heats up the pesto if you ask it to grind too much. The multiples go very fast since you don’t have to wash the processor between them.
For a scant cup, about 8 servings depending on what you’re doing with it:
1/3 cup toasted almonds. (see note about skins)
2 medium sized cloves of garlic – use large if it’s hardneck.
1/3 cup olive oil
2 loosely packed cups chopped Italian parsley, leaves and tender stems.
1 loosely packed cup basil leaves
2 or 3 leaves of sorrel or a squeeze of lemon
pinch of salt
1. Put almonds and garlic in a processor and grind, scraping down the sides from time to time, until you have fine meal. Add about a third of the oil and a teaspoon of water and grind again until you have a paste – it won’t be smooth, but it will be cohesive.
2. Add the herbs (lemon juice) and salt and about a tablespoon of water. Grind to puree. Add the remaining oil and puree again. The pesto should have the texture of thick mayonnaise. If it’s still too solid, add water in very small amounts until it’s right. The more water you add, the more beautiful the color will be. Try not to get too carried away.
Note: The most delicious way to make this is to toast the almonds in their skins; dump them into boiling water; simmer for about 3 minutes, then leave them in the hot water while you work with small batches at a time, pinching the skins off. The boiling not only loosens the skins but also softens the nuts so they grind to a smoother paste. This is not fast work.
In theory, you could buy blanched almonds, toast them, then just give them a brief swim to soften, but blanched almonds – including those hotsy totsy Marcona almonds – don’t taste as good as almonds in the skins. Must be something about the industrial blanching process. I just use the toasted almonds and leave it at that. (If you soften the almonds in their skins and then try to grind them without peeling, the skins don’t grind smoothly with the nuts).
Don’t panic. It’s only summer we’re coming to the end of. Even here in the far Northeast there’s still at least a month of delicious Romanesco zucchini, pale-skinned Middle Eastern cousa and the buttery old fashioned yellow crookneck that’s now almost exclusively a home garden delight.
At first glance, this may seem like no big deal. Zucchini and straight necked yellow squash are year-round supermarket staples, and most winter versions of these vegetables are – unlike winter tomatoes – edible. But they are also edible as in “ eat your vegetables” rather than edible as in “oh YUM! How do you make this thing?
(Squash Tortilla. See below.)
Long about now you may be thinking you’ve totally had it with zucchini, even absolutely perfect zucchini, and that if you find under the leaves or are given by an evil friend one more dark green baseball bat, you will subsist henceforth on potato chips.
But stay! There are two things to consider:
1) There’s no point in trying to stay ahead by harvesting the babies. Tiny squash with the blossoms still attached don’t taste like much of anything no matter how fresh they are.

The one on the left is about 1 day from perfect; the flower is just opening and has not yet been pollinated. The one on the right – I really have seen them this size in stores – is ridiculous. It would also be ridiculous if it were a crookneck or Cousa. The potential for flavor is there, but flavor itself is not.
2. You will not easily tire of zucchini if it’s Romanesco, aka Costata Romanesco, a uniquely firm and nutty variety. This one does taste good when it’s quite small and, even more astonishing, the not-seedy part will still be worth eating when the thing’s the size of your forearm.
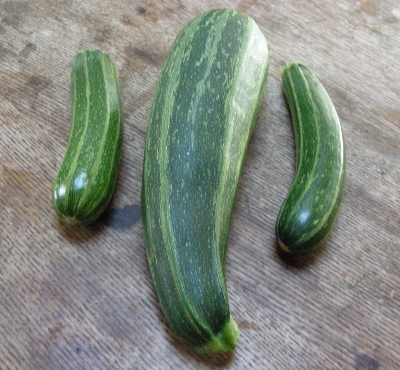
The one in the middle looks suspiciously robust, and as a general rule it’s wise to avoid any summer squash (or eggplant) so mature it has matte rather than shiny skin. But Romanesco, sold by Johnny’s and by Renee’s, among others, is the exception.
Plus it’s deeply ribbed ( usually) so the slices have beautifully scalloped edges. It’s not yet common at farmstands and greenmarkets, but it’s showing up more and more often as growers and customers alike discover its virtues.
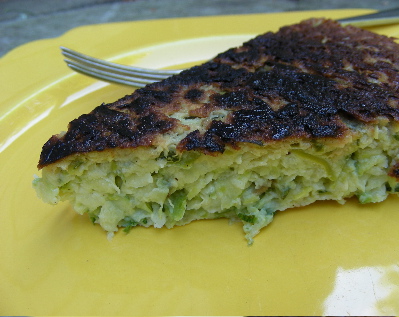
Squash Tortilla
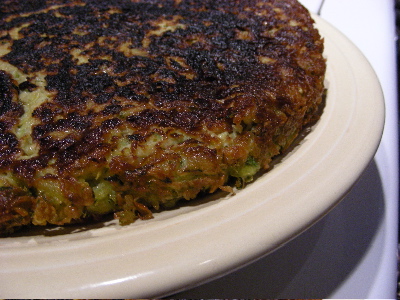
This has nothing to do with tacos. It’s named for the famous Spanish dish of potatoes, eggs and olive oil; and although it’s made somewhat similarly the main reason I’m calling it a tortilla is that I was scared if I called it a squash cake you’d expect it to be sweet.
It’s not. It’s essence of toothsome squash, with a soft pale green or gold-flecked center and deeply olive oil browned crust, equally good hot and cold, as an appetizer, side dish or main course. And making it is simplicity itself, assuming you have a processor with a shredding attachment and that you allow enough time (at least an hour) for the squash to sit there and drain.
For a 9 or 10 inch tortilla: 4 main dish, 6 side dish or 8 tapa servings :
3 – 4 lbs. summer squash: zucchini, Middle-East , crookneck or pattypan in any combination. Use the larger amount if squash are large; they shrink more in preparation.
1 medium onion
2 heaping tablespoons of salt (fear not, it comes back out)
3 extra large eggs or 4 smaller ones
about ¼ cup of flour
olive oil
1. If the squash is large, cut it in quarters and slice out the seedy soft center material. Otherwise just make it small enough to go through the feed tube. Shred about half of it, then shred the onion, then shred the rest. Put all the shredded material in a large bowl.
Old ironstone washbowls are ideal for mixing large quantities. They’re a much better shape than most mixing bowls, which are too narrow and deep.
2. Add the salt and mix thoroughly – your hands are the best tool for this. Put the squash in a colander over the sink or or a bowl, fit a non-reactive bowl or pan on top and weight it with something like a 5 pound sack of flour. Leave it for an hour or so, during which vast quantities of liquid will come out, reducing the squash volume by 1/3 to ½, depending.
3. Rinse the drained squash with cold running water, press out excess liquid with your palm, then repeat the weighted drain routine for 5 or 10 minutes. If you’re cooking this for someone you want to impress with your world-class cooking skills, turn the shreds into a towel and squeeze out even more moisture. Otherwise don’t bother.
4. Beat the eggs just until loosened in a large bowl, then stir in the squash. Add enough flour to turn the mixture into something the texture of cake batter, very soft and loose but with no free liquid. Pause between additions to let the flour swell, the less you use the better but if you don’t use enough the bottom crust won’t be crisp.
5. Put a heavy 9 or 10 inch skillet over medium heat and add a generous layer of olive oil. How generous is up to you but there has to be more than a slick and this would actually be good deep fried, so it’s hard to use too much.
6. When the oil just starts to smoke, turn in the squash and smooth the top. Cook until the edges start to draw in and if you lift an edge with a spatula you can see things are pretty brown at the bottom. This should take about 10 minutes.
7. Turn on the broiler, put the skillet 3 (or so ) inches under it and broil until the cake top is flecked with brown, about 5 minutes more.
8. Loosen the cake with a wide spatula. Put a large plate over the pan and – holding both firmly with protected hands – flip the tortilla out. That’s it. You could garnish it with sprigs of basil or bouquets of cherry tomatoes or whatever. Or not.
Looking Ahead: There aren’t many vegetables worth freezing plain as ingredients for later use; but if you get a good buy on good summer squash or have a bumper crop, preparing it through step 3 and then freezing it sets you up for making the tortilla (or individual squash pancakes) with lightening speed, even in the dead of winter. Double bag the shreds so the onion aroma doesn’t spread itself around and expect to drain out even more liquid after the mixture thaws.
The asparagus soup is below. But first, a word from our peony. Having extolled the early one while whining that it is very magenta and then showing nothing but a bud with an illustrative ant , it seems only fair to display a flower. Bill took this picture at my request, both because I was in Maine at the time and because he is a better photographer.

Bill Bakaitis
The ( neglected ) asparagus part.
It never fails. You read a recipe for asparagus and no matter what kind of recipe it is: steamed, grilled, stir-fried, whatever, you will be instructed to break off the tough ends and ” save them for soup.”
End of story. Nobody ever tells you how to make this kind of asparagus soup. And you know if you’ve ever tried it that soups that are not asparagus soup are not improved by having a few asparagus ends thrown in.
So. The following recipe is made – primarily – from tough asparagus ends. It’s easy, inexpensive and delicious hot or cold. Because asparagus ends are tough and stringy even after they’ve been cooked to death, you do have to use a food mill to get a velvety puree, but that’s the price of frugality. If you want to just throw it into a processor, you have to use tender asparagus (see note at end of the post).
Cream of Asparagus Soup
1 ½ pounds of asparagus ( roughly 2 bunches) is usually enough to make 4 servings of soup and 4 servings of asparagus-as-veg. , but the recipe works with whatever quantity you’ve got.
asparagus
sweet onion such as Vidalia
basmati or other flavorful white rice
heavy cream, preferably not ultra pasteurized although at this point that’s wishful thinking in a lot of places
1. Break the asparagus spears where they break naturally and set the tough ends aside. Divide the tender ends into 2 piles, one a little more than twice as big as the other. Refrigerate the larger pile until you want it for vegetable purposes. Chop the smaller pile into 1 inch chunks and set aside.
2. Trim off and discard any really hard white ends of the tough ends. Chop the remainder into ½ inch chunks and measure into a large saucepan.
3. Add 1/2 cup coarsely chopped onion, 1 ½ tablespoons rice, and 2 cups water per cup of ends.
4. Cover and cook over low heat until the vegetables are soft and the rice is fully cooked, about 40 minutes. Add the chopped tender asparagus, recover the pan and cook until vegetables are very soft and the rice is a fluffy mush, about 20 minutes more.
5. Put the whole works through a food mill into a clean saucepan ( for hot soup) or a heatproof bowl (for cold). Stir in 1/3 cup cream for each cup of asparagus ends. Reheat the hot. Chill the cold. Taste. Add salt as needed. That’s it.

Bill Bakaitis
Who wants to look at a picture of a bowl of cream soup? Suffice it to say it’s celadon with darker speckles and always reminds me of this lovely image from Elizabeth David:
” … soups delicately coloured like summer dresses, coral, ivory, or pale green…”
(French Provincial Cooking, British Penguin edition 1973)
Curling of the sort in the picture is caused by damage to the spear as it was emerging from the ground. Usually , a cutworm tried and failed to sever it but sometimes you nicked it with your knife while harvesting an adjacent spear.
To make the soup using a processor or blender: Follow the proportions in the recipe, using tender asparagus uppers instead of ends. The only thing that changes is timing: Cook the onions and rice in the water for 20 minutes or so before adding the first batch of chopped asparagus. After that, it’s exactly the same except a processor is marginally easier to wash than a food mill and takes less manual effort to employ.
Tips on Choosing, Storing, Preparing and Growing Asparagus are here.
Here we go again; it never fails. On the news just yesterday morning – “asparagus is the first vegetable of spring.”
NO! dammit. Dandelions are the first vegetable of spring, or rather they are the first green vegetable. Parsnips that have overwintered (” spring dugs”) are even earlier, but by spring one has had enough roots for a while no matter how sweet they may be.
What dandelions are: delicious. Tender and fresh-tasting, with a pleasantly bitter endive edge and an earthy greenness that has no analogy. They’re low in calories, high in vitamin A , lutein and beta-carotene – look out carrots, you’ve got competition – and absolutely free.
What dandelions are not: instant. On account of the picking and cleaning. But picking is pleasant, a good chance to get outside, and a great activity to share with kids; anybody over about 3 knows what a dandelion looks like. And cleaning goes fairly quickly if you use the greens washing trick that works for anything wrinkled and sandy.
Cooking takes about 5 minutes, so once you’ve got cleaned greens you’ve got fast food.

Greens must be gathered before the flower bud starts pushing up or they will be tough and unpleasantly bitter. Greens from shady places (left) are usually wider, flatter, and milder than greens grown in full sun (right)
Mediterranean Dandelions with olive oil, garlic and lemon.
Fine hot or cold as a vegetable dish, easily expanded into Dandelions with Pasta and Prosciutto, a one-dish supper for spring. Measurements are given mostly for the form of the thing. Please for the love of heaven don’t bother to follow them to the letter.
For 4 servings:
a basketball-sized heap of cleaned dandelion greens, well drained but not dried:
¼ cup olive oil
3 large cloves garlic, minced
2 tablespoons lemon juice; about half a lemon if it’s a decent lemon
salt to taste
Heat the oil in a wide sauté pan over medium-high heat. Add garlic and sizzle until pale gold. Add greens, standing back to avoid the spatter when water hits the hot oil. Stir, cover, turn heat to medium low. Cook about a minute, stir again, recover and cook 2 or 3 minutes more. As soon as they’re all wilted, they’re done.
Dandelions with Pasta and Prosciutto

For 4 servings:
6 ounces thick pasta ( about 2 ½ cups dry)
1/3 cup olive oil
4 or 5 large cloves garlic
about 2/3 cup prosciutto, cut into small dice. *
¼ cup currants
3 tablespoons lemon juice
1 batch cleaned dandelions ( see above)
lemon wedges
Hard grating cheese to accompany **
Get the pasta cooking. When it’s about half done, heat the oil in a wide skillet, sizzle the garlic and prosciutto dice until both start to brown on the edges. Stir in the currants, cover and turn off the heat.
When the pasta is barely cooked, stir the dandelions into the pasta pot. They will wilt instantly. Drain at once and return to the pot. Stir in the prosciutto mixture , taste, add salt if necessary and serve garnished with lemon wedges. Pass the cheese and a grater at the table.
* We use “prosciutto ends,” the bit at the tip that’s too small to slice neatly, chunks our local market obligingly sells at a bargain price. Failing that, start with a single thick slab roughly 1/3 inch thick or substitute some other strong-flavored ham. It won’t taste the same, but it won’t taste bad. Or switch gears completely and use toasted pine nuts instead of the meat.
** last time I made this we used Magic Mountain, a sheep cheese from Woodcock Farm, in Vermont. Parmesan is fine, but why not experiment with alternatives made closer to home? The American Cheese Society has accomplished members in almost every state.
For a delicious, versatile, inexpensive vegetable that has “winter” right in its name, hard-shelled squash gets surprisingly little seasonal respect. Dedicated foodies who can wax eloquent over the respective merits of yellow-eye beans and Jacob’s cattle seldom discuss the much larger differences between, say, the dry-fleshed, nutty-flavored Tetsukabuto and the creamy, well-named Sweet Dumpling.
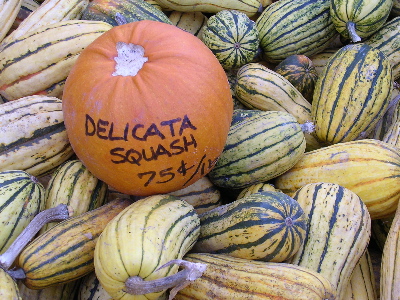
The sign-squash is a rejected pumpkin. No stem, no sale.
Think I’m exaggerating? Have a squash tasting, using at least 3 varieties and preferably 3 species. That might be delicata (Cucurbita pepo), buttercup (C. maxima ) and butternut (C. moschata), but if you range beyond the supermarket, you can probably put together a more exotic assortment. Either way, you will be amazed, and unless there are a lot of you you will also wind up with quite a bit of extra cooked squash. Terrific! Just freeze it in meal-sized packets and you’ve got a stockpile of nearly-instant great food.
When the basic ingredient is ready to roll, it’s only minutes to warming cream of squash and orange soup, with or without a sprinkle of Aleppo pepper; baked squash under a blanket of crisp crumbs flavored with olive oil and lemon zest; or utterly simple broiled squash, spread in a shallow buttered pan and broiled until the top is dotted with flavorful, caramelized brown spots. This is also tasty with store cheese grated over it at the last minute. Also salsa. Also parsley pesto… you get the drift; if you want it even sweeter, the thing to make is pie.
To Prepare Squash for a Tasting ( or almost anything else): Heat the oven to 375 degrees. Rinse any clinging dirt from the squash and whack off the stem with the back of your heavy knife. Cut squash in half as evenly as possible and scrape out the seeds. Oil the cut surfaces with olive oil and put the squash cut side down on a sheet pan or jellyroll pan. Bake until a thin-bladed knife sides in easily, anywhere from a half hour (Sweet Dumpling) to about an hour and a half ( Marina di Chioggia), depending on the thickness of the squash meat and the variety of squash. Turn it right side up and use a sharp-edged spoon to scrape the squash meat away from the rind.
Our bright lights chard is still going strong in the cold room, and last time I went shopping the commercial stuff looked pretty good ( for a change), so if you have become tired of cabbage, consider

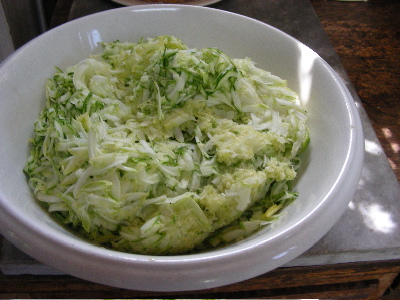
Rainbow Slaw
Every measurement in this so-called recipe is “about,” “to taste,” “use what you’ve got,” ” fiddle,” because all three of the vegetables vary enormously in sweetness and flavor-strength. Plus it would be a shame not to enjoy it just because you were almost out of celery and didn’t realize it until a half-hour before dinner.
For 6 servings
Toss 1 ½ cups each julienned celery, fennel, and rainbow chard stems with a dressing of
¼ cup rice vinegar
1 tablespoon toasted sesame oil
1 teaspoon sugar
½ teaspoon salt
let it sit about 5 minutes, then taste and adjust.
At this point, you’ll have a very light, clear-flavored salad that goes well with almost everything, especially winter’s rich brown braises and stews. To jazz it up, add finely-minced jalapeno and coarsely-chopped cilantro. Shreds of Peking duck from the Chinese grocery are a nice addition, if you happen to have it ( either the duck or the grocery) handy.
At Seed Savers, it’s 5 Color Silverbeet. At Johnny’s, which got an AAS award for it in 1998, it’s Bright Lights. At our place, it’s just rainbow chard, a must-plant delight: easy to grow, easy to cook, beautiful all summer long and long into the fall.
Bill insists it’s sweeter after frost; I think he’s simply confusing it with cole crops like kale and collards, which are sweeter, because temperatures below 40 destroy sulfur compounds. Sweetened or not, rainbow is slightly less frost hardy than regular chard, so we dug it up when temperatures started going way down – way back in early November there actually were a couple of nights when it hit the mid-teens.
The plants were set upright in a big pot lined with a thick plastic bag, with no more dirt than what was left clinging to the substantial roots. The pot was stored in an unheated enclosed porch , aka our well-lit walk-in. Every once in a while, I pour some water over the bases, but not very much.

chard plant, out of pot for photographic purposes
We have been harvesting regularly, breaking off leaves as needed as though the plants were still in the ground. When all have been eaten, we’ll compost the stumps. They could be replanted in mid-spring, if we wanted to save seed, but we’re not that dedicated. (Colors cross, so the pros grow each one in isolation and mix the seeds at packaging. )
Some say the different colors taste different, a lot to assert given that the colors include pink, red, purple, magenta, orange, yellow, white, white with pink stripes and some extremely zingy mixtures of pink and tangerine. All I can say is that none of them are as good as plain old white-stemmed Lucullus. But gorgeousness counts, even if the colors don’t stand up all that well when cooked.
Cooking Swiss Chard
is sort of like cooking chickens and turkeys – it helps to remember that cooking the thing whole is likely to be unkind to one part. Instead of light and dark meat, chard has stems (petioles) and leaves.

Chard Stems appear almost celerylike, very sturdy and crisp when raw. But at least when the chard is freshly harvested, they get tender quickly and tend to end up unpleasantly flabby if cooked for more than a few minutes. Most recipes say the stems are tougher than the leaves and should be cooked longer, but when we cook the chard from the garden we add the chopped stems near the end, shortly before the leaves have cooked through.
In Europe , stems are as highly prized as the leaves and those from varieties like Blonde de Lyon and Monstruoso are frequently cooked solo. Standard advice is to cook them like asparagus , which I take to mean “like asparagus the old-fashioned way: briefly blanched, thoroughly drained, then finished with a rich sauce such as browned butter or hollandaise.” You’d think boiling would be ill-advised with something so watery, but in my experience it works as well or better than steaming and stir-frying.
The alternative, especially when you want to preserve the bright colors of Rainbow types, is not to cook the stems at all. Just slice thinly crosswise (longitudinal julienne can be stringy) and sprinkle over hot cooked greens, toss into salad or add to a slaw of fennel and celery.
Not much needs saying about the Chard Leaves, except that they’re delicious prepared any way you’d prepare spinach and most of the ways you’d prepare stronger greens like kale and broccoli raab. Also nice stuffed and stewed, just sub pairs of them for the single cabbage leaves in your favorite stuffed cabbage recipe.