All Recipes
The recipe for historically and gastronomically correct strawberry shortcake IS coming, I swear, and in plenty of time for the 4th of July ( I also swear). But in the meantime this is a heads-up that you will need 3 things that may take some looking to find.
1. Good strawberries. After giving fairly detailed directions about getting good strawberries I had to buy some ( recipe research!). Went to two farmers’ markets in search of a variety as fragrant as Karen’s. Should have gone to three; but the berries I bought were really quite good and by then market hours were almost over. Also bought supermarket plastic clamshell California ones, just for comparison and without any hope they would actually be edible. They were certainly cheap: $2.79 per quart , as opposed to $4.50 and $5.00 from the farmers – though if you costed it out per fruit they were about 30 cents each. And honesty compels me to report they were a bit sweeter than one of the local offerings. But they were far less strawberry tasting, so I’m guessing there are now “supersweet” strawberries analogous to supersweet corn, in which high sugar content develops early and does not fade but the flavor of corn is faint. And they made a substantial noise when sliced that reminded me of the sound of a good apple.
2. A genuine biscuit cutter – this shortcake is of course made with biscuits, and biscuits do not rise high and flaky unless the thick dough is cut with a tall, sharp cutter designed for the job.

Jamie MacMillan
This cutter belongs to food historian Sandy Oliver, of Islesboro, Maine, about whom there will be more one of these days. For now suffice it to say this is your model, though there is no reason to buy an antique one – a new one would really be better if it were sharper which you would think would be a no-brainer but given the quality of some modern tools…
3. Heavy Cream. Pasteurized is fine but ultra-pasteurized is not. Even I who feel strongly about this cannot say the stuff is truly dreadful but it sure as hell is second rate, and the mono and diglycerides, vegetable gums and other substances added to disguise the cooked flavor and diminished whipping power certainly don’t help. “Organic” may be marginally more healthful but usually isn’t any better otherwise; all the industrial-organic national brands are ultra-pasteurized too. Try calling around to co-ops, natural food stores, and the office of a dairy itself should there be one near you. Chefs often have access to food products not routinely retailed and old fashioned heavy cream is one of them.

Bill Bakaitis
This is raw organic cream from White Orchard Farm, in Frankfort, Maine. I asked Bill to take the picture when I went to pour some and realized it was too thick to come out of the bottle until prodded.
In the market, at pick-your-owns and in plant catalogs.
Fair warning: I’m in strawberry delirium at the moment. We (well, Bill actually) got a big bowl of them for Father’s Day from Karen, Celia’s mother, and they were the Platonic ideal: firm but tender, very juicy, flavorful, sweet, and FRAGRANT? Omigosh. They perfumed the entire kitchen all afternoon, until I made them into shortcake – a subject about which I feel strongly – recipe coming next post. Biscuits, only biscuits, do not talk to me about cake.

Karen with home-grown gift
Or don’t bother to talk about making anything. When you get strawberries this good all you need to do is eat them. The part that takes effort is acquisition.
Getting industrial strawberries is easy; like industrial tomatoes they’re available everywhere always. And all of the tomato wisdom about far tastier when fresh and local certainly applies. But with strawberries ” vine-ripened” matters far more because strawberries – unlike tomatoes – cannot continue to ripen after they leave the plant.
They do get softer as they age ( except the gigantic iron strawberries sold for chocolate-dipping). But they don’t get any sweeter or more intensely flavorful. Whatever goodness they have when they’re picked, that’s all they’ll ever have.
Yet ripe strawberries are fragile and short-lived. Result: only berries that need not travel far or change hands often can be allowed to ripen fully. And only growers who sell locally can risk growing “home garden” varieties known more for flavor than durability.
So if you crave strawberry delerium – and don’t happen to know Karen – the places to get fruit are farmers markets, pick-your-own farms, and your own back yard.

Karen got her plants from a friend and doesn’t know their name, but these look a lot like Sparkle, a home garden variety introduced in 1942 and still popular in the Northeast, the region where it does best.
At the Market: go for sprightly green calyces ( the cap of leaves at the top) and stems that are fresh-looking. Don’t be put off by small berries or berries that aren’t all the same size; many of the tastiest varieties are neither large nor uniform. Some very sweet berries are not dark red, but if they’re light it doesn’t hurt to ask for a taste. And beware of super deep color too; the berries may be so close to overripe they’ll melt before you get them home.
At Pick-your-own farms: Try to get there either at the beginning or toward the end of the day. In many places people make side money picking at these farms and selling the fruit for a small profit. They show up early; they know what they’re doing; and they’re fast. By the time they leave, a lot of the fruit that was ripe at daybreak will be leaving with them. Fortunately, they seldom come back for a second round and strawberries can ripen in a matter of hours. On hot days late afternoon can offer great picking, especially when the weather is so brutal it discourages the competition.
In the Garden: Strawberries are already among the easiest fruits to grow, and if Colony Collapse Disorder continues they’re going to be an even better bet. In contrast to most other soft fruits, strawberries don’t rely primarily on honey bees; our native wild bees pollinate a lot of them and can continue to do so – assuming, of course, our native bees are still around themselves…
A disquisition for another day. To return to our berries,
Choosing plants:
Leaving aside specialty berries like fraises des bois, there are 3 types to consider: June bearers, everbearers and day neutrals. For descriptions of individual varieties consult plant sellers like Nourse Farms and Daisy Farms.
June Bearers – might better be called “once bearers.” They make a single large crop in spring and that’s it. They’re the original “garden strawberry,” the tastiest of the large-fruited types, and the one that offers far and away the widest choice of varieties.
Everbearers – their better name is “twice bearers,” one crop in spring and another, smaller crop in fall, with only a few berries here and there in between. Quality varies widely and is strongly climate dependant. Be sure you choose one that’s right for your region.
Day Neutrals – keep fruiting from spring to fall, with the largest and tastiest fruit often coming as the weather cools down. Berries tend to be on the small side but there are a lot when you add up a whole season’s worth.

Strawberry shortcake, made with biscuits. Recipe coming soon to a blog near you.
The asparagus soup is below. But first, a word from our peony. Having extolled the early one while whining that it is very magenta and then showing nothing but a bud with an illustrative ant , it seems only fair to display a flower. Bill took this picture at my request, both because I was in Maine at the time and because he is a better photographer.

Bill Bakaitis
The ( neglected ) asparagus part.
It never fails. You read a recipe for asparagus and no matter what kind of recipe it is: steamed, grilled, stir-fried, whatever, you will be instructed to break off the tough ends and ” save them for soup.”
End of story. Nobody ever tells you how to make this kind of asparagus soup. And you know if you’ve ever tried it that soups that are not asparagus soup are not improved by having a few asparagus ends thrown in.
So. The following recipe is made – primarily – from tough asparagus ends. It’s easy, inexpensive and delicious hot or cold. Because asparagus ends are tough and stringy even after they’ve been cooked to death, you do have to use a food mill to get a velvety puree, but that’s the price of frugality. If you want to just throw it into a processor, you have to use tender asparagus (see note at end of the post).
Cream of Asparagus Soup
1 ½ pounds of asparagus ( roughly 2 bunches) is usually enough to make 4 servings of soup and 4 servings of asparagus-as-veg. , but the recipe works with whatever quantity you’ve got.
asparagus
sweet onion such as Vidalia
basmati or other flavorful white rice
heavy cream, preferably not ultra pasteurized although at this point that’s wishful thinking in a lot of places
1. Break the asparagus spears where they break naturally and set the tough ends aside. Divide the tender ends into 2 piles, one a little more than twice as big as the other. Refrigerate the larger pile until you want it for vegetable purposes. Chop the smaller pile into 1 inch chunks and set aside.
2. Trim off and discard any really hard white ends of the tough ends. Chop the remainder into ½ inch chunks and measure into a large saucepan.
3. Add 1/2 cup coarsely chopped onion, 1 ½ tablespoons rice, and 2 cups water per cup of ends.
4. Cover and cook over low heat until the vegetables are soft and the rice is fully cooked, about 40 minutes. Add the chopped tender asparagus, recover the pan and cook until vegetables are very soft and the rice is a fluffy mush, about 20 minutes more.
5. Put the whole works through a food mill into a clean saucepan ( for hot soup) or a heatproof bowl (for cold). Stir in 1/3 cup cream for each cup of asparagus ends. Reheat the hot. Chill the cold. Taste. Add salt as needed. That’s it.

Bill Bakaitis
Who wants to look at a picture of a bowl of cream soup? Suffice it to say it’s celadon with darker speckles and always reminds me of this lovely image from Elizabeth David:
” … soups delicately coloured like summer dresses, coral, ivory, or pale green…”
(French Provincial Cooking, British Penguin edition 1973)
Curling of the sort in the picture is caused by damage to the spear as it was emerging from the ground. Usually , a cutworm tried and failed to sever it but sometimes you nicked it with your knife while harvesting an adjacent spear.
To make the soup using a processor or blender: Follow the proportions in the recipe, using tender asparagus uppers instead of ends. The only thing that changes is timing: Cook the onions and rice in the water for 20 minutes or so before adding the first batch of chopped asparagus. After that, it’s exactly the same except a processor is marginally easier to wash than a food mill and takes less manual effort to employ.
Tips on Choosing, Storing, Preparing and Growing Asparagus are here.
Here we go again; it never fails. On the news just yesterday morning – “asparagus is the first vegetable of spring.”
NO! dammit. Dandelions are the first vegetable of spring, or rather they are the first green vegetable. Parsnips that have overwintered (” spring dugs”) are even earlier, but by spring one has had enough roots for a while no matter how sweet they may be.
What dandelions are: delicious. Tender and fresh-tasting, with a pleasantly bitter endive edge and an earthy greenness that has no analogy. They’re low in calories, high in vitamin A , lutein and beta-carotene – look out carrots, you’ve got competition – and absolutely free.
What dandelions are not: instant. On account of the picking and cleaning. But picking is pleasant, a good chance to get outside, and a great activity to share with kids; anybody over about 3 knows what a dandelion looks like. And cleaning goes fairly quickly if you use the greens washing trick that works for anything wrinkled and sandy.
Cooking takes about 5 minutes, so once you’ve got cleaned greens you’ve got fast food.

Greens must be gathered before the flower bud starts pushing up or they will be tough and unpleasantly bitter. Greens from shady places (left) are usually wider, flatter, and milder than greens grown in full sun (right)
Mediterranean Dandelions with olive oil, garlic and lemon.
Fine hot or cold as a vegetable dish, easily expanded into Dandelions with Pasta and Prosciutto, a one-dish supper for spring. Measurements are given mostly for the form of the thing. Please for the love of heaven don’t bother to follow them to the letter.
For 4 servings:
a basketball-sized heap of cleaned dandelion greens, well drained but not dried:
¼ cup olive oil
3 large cloves garlic, minced
2 tablespoons lemon juice; about half a lemon if it’s a decent lemon
salt to taste
Heat the oil in a wide sauté pan over medium-high heat. Add garlic and sizzle until pale gold. Add greens, standing back to avoid the spatter when water hits the hot oil. Stir, cover, turn heat to medium low. Cook about a minute, stir again, recover and cook 2 or 3 minutes more. As soon as they’re all wilted, they’re done.
Dandelions with Pasta and Prosciutto

For 4 servings:
6 ounces thick pasta ( about 2 ½ cups dry)
1/3 cup olive oil
4 or 5 large cloves garlic
about 2/3 cup prosciutto, cut into small dice. *
¼ cup currants
3 tablespoons lemon juice
1 batch cleaned dandelions ( see above)
lemon wedges
Hard grating cheese to accompany **
Get the pasta cooking. When it’s about half done, heat the oil in a wide skillet, sizzle the garlic and prosciutto dice until both start to brown on the edges. Stir in the currants, cover and turn off the heat.
When the pasta is barely cooked, stir the dandelions into the pasta pot. They will wilt instantly. Drain at once and return to the pot. Stir in the prosciutto mixture , taste, add salt if necessary and serve garnished with lemon wedges. Pass the cheese and a grater at the table.
* We use “prosciutto ends,” the bit at the tip that’s too small to slice neatly, chunks our local market obligingly sells at a bargain price. Failing that, start with a single thick slab roughly 1/3 inch thick or substitute some other strong-flavored ham. It won’t taste the same, but it won’t taste bad. Or switch gears completely and use toasted pine nuts instead of the meat.
** last time I made this we used Magic Mountain, a sheep cheese from Woodcock Farm, in Vermont. Parmesan is fine, but why not experiment with alternatives made closer to home? The American Cheese Society has accomplished members in almost every state.
Like most of the Northeast, we had a false alarm last Wednesday: it was actually warm out, almost balmy. The crocus in the crocus lawn was beginning to look carpetlike although the effect was (and remains) patchy, because last fall’s newly planted fill-ins are in the usual way coming up later than the established clumps.
There are still plenty, all of them very attractive to the bees. We lost one hive over the winter, a loss rate of 50 % but better than a lot of the pros did. Bill picked up 2 new boxes yesterday. They’re in the basement keeping warm, and I’m baking some honey bars – just to inspire them.

Bill got this picture by putting his camera on one of those tiny tripods that looks like Mr. Gumby. There will be no crocus honey because honey is not being made yet. The first nectar all goes to feed the brood.
HONEY BARS
This is a close adaptation of the recipe for Candy Cake in the American Heritage Cookbook, published in 1964 and now out of print but widely available and worth having, for the wealth of historical photographs as well as the recipes.
½ cup butter
a scant ½ cup sugar
3 well-beaten eggs
½ cup mild honey
2 teaspoons vanilla
1 ½ cups all purpose flour
¼ teaspoon each salt and baking soda
1 cup coarsely chopped walnuts or black walnuts which are wonderful if you like them
1. Heat the oven to 350. Butter a 9 inch square 2 inch deep baking pan. (8 inch may be substituted, see note at end.)
2. In a large bowl, let the butter soften, then beat in the sugar. Beat in the eggs, honey and vanilla, then lightly stir in the flour, salt and soda. Add walnuts and stir/fold just enough to mix them through.
3. Turn the batter into the pan and bake until edges shrink and a toothpick comes out clean, about a half hour. Let cool in the pan, then cut into small bars.
Note: The original recipe calls for an 11 ¼ x 7 ½ x 1 ½ inch pan, which must once have been a common size, albeit I don’t think recently (ours was found in a junk store 25 years ago). 9x13x2 is too big. The only problem with an 8 inch square is that the edges usually overcook before the center is done. Solutions in order of hassle include: pretending you didn’t notice; slicing off edges and feeding to dog or edge-lover; and making the cake plus a cupcake: fill the pan about 2/3 full. Bake remaining batter in whatever small shallow ovenproof vessel you happen to have around.
Update: Shortly after writing this, I found an 11 ¼ x 7 ½ x 1 ½ pan in the not very well stocked equipment section of a local Hannaford. Don’t know what to make of this but will say that’s a very useful size for all sorts of 2-person cooking.
For a delicious, versatile, inexpensive vegetable that has “winter” right in its name, hard-shelled squash gets surprisingly little seasonal respect. Dedicated foodies who can wax eloquent over the respective merits of yellow-eye beans and Jacob’s cattle seldom discuss the much larger differences between, say, the dry-fleshed, nutty-flavored Tetsukabuto and the creamy, well-named Sweet Dumpling.
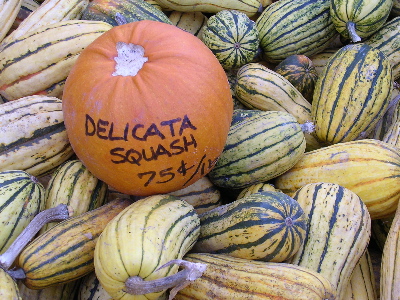
The sign-squash is a rejected pumpkin. No stem, no sale.
Think I’m exaggerating? Have a squash tasting, using at least 3 varieties and preferably 3 species. That might be delicata (Cucurbita pepo), buttercup (C. maxima ) and butternut (C. moschata), but if you range beyond the supermarket, you can probably put together a more exotic assortment. Either way, you will be amazed, and unless there are a lot of you you will also wind up with quite a bit of extra cooked squash. Terrific! Just freeze it in meal-sized packets and you’ve got a stockpile of nearly-instant great food.
When the basic ingredient is ready to roll, it’s only minutes to warming cream of squash and orange soup, with or without a sprinkle of Aleppo pepper; baked squash under a blanket of crisp crumbs flavored with olive oil and lemon zest; or utterly simple broiled squash, spread in a shallow buttered pan and broiled until the top is dotted with flavorful, caramelized brown spots. This is also tasty with store cheese grated over it at the last minute. Also salsa. Also parsley pesto… you get the drift; if you want it even sweeter, the thing to make is pie.
To Prepare Squash for a Tasting ( or almost anything else): Heat the oven to 375 degrees. Rinse any clinging dirt from the squash and whack off the stem with the back of your heavy knife. Cut squash in half as evenly as possible and scrape out the seeds. Oil the cut surfaces with olive oil and put the squash cut side down on a sheet pan or jellyroll pan. Bake until a thin-bladed knife sides in easily, anywhere from a half hour (Sweet Dumpling) to about an hour and a half ( Marina di Chioggia), depending on the thickness of the squash meat and the variety of squash. Turn it right side up and use a sharp-edged spoon to scrape the squash meat away from the rind.
This did not start out as a project – it was just one of those idle irritations. Bill, who eats granola for breakfast, came home with some that was truly dreadful, up to and including the very strange pink bits of freeze dried raspberry. We will not discuss why he bought it; suffice it to say that even he didn’t want to eat it and of course then we got talking about the old days when you made your own and then the very next Wednesday there was Mark Bittmann in the Times with a recipe for crunchy granola.
Rather than simply following it, I decided to look at some of the competition, always a danger now that we are in the age of Google. When I asked it to find “granola recipe”, it came back with “Results 1 – 10 of about 1,420,000. ”
Uh huh. But when would it stop being granola recipes or literary references to granola recipes and start being the usual outer reaches: strings of words that start with g; science fiction pornography; entries in what looks like Chinese but isn’t.
Plunged in, leaping the longest intervals offered. On page 30, there was a lowcarb granola, a thought too scary to explore further. On page 46, an excerpt suggesting that nuts “should be rinsed in cold tap water to which vitamin C powder has been added”. Page 65 was still recipes, including one for a “vegan fusion ” version called Marley’s Hemp Granola, which I should have looked at, I guess, since what I remember about cooking with hemp is that the results were generally – how shall I put this? – more functional than delicious.
The plan was to stop at page 100 but google’s ” that’s it, nothing after this but repetition” kicked in after only 810 hits, on page 81.
Give or take a few, I think 81 is about the number of granola items sold by my local Stop and Shop. They have granola stocked in 3 places: the health/ organic (pay more here) area; next to the whole nutmeats and rice cracker snacks at the end of the produce aisle; and of course in cereal, which had the smallest number of granolas but the largest number of granola bars: 60 running feet of shelf space. Not wishing to piss away the time required I didn’t count varieties, but did notice that many were chocolate covered and one contained m&m’s. The one with the m&m’s was not, by the way, on a low shelf where small children would be enticed by it.
I could go on, and probably will, since there is a food-historical black hole between J.H. Kellogg’s Granola, which sold by the ton in the 1880s , and the tidal rise of the 1960’s product that made “crunchy” an adjective applicable to human beings.
For today, I will only say it’s surprising, once you start tasting alertly, how many variables there are, that plenty of salt certainly helps, and that so far the Corsican special is my favorite but Bill prefers good old Honey Nut.
GOOD OLD HONEY NUT GRANOLA
1 cup whole almonds
1 cup pecans, whole or in large pieces
6 cups old fashioned rolled oats
1/3 cup sunflower seeds
¼ cup toasted wheat germ
½ cup mild honey
3 tablespoons walnut oil (or peanut oil, if there’s no walnut already in the fridge)
2 teaspoons vanilla
½ teaspoon salt
1. Heat the oven to 325 degrees. Spread almonds and pecans in separate pie tins and toast until a broken nut is very pale gold; about 12 minutes for pecans, 15 or longer for almonds. When nuts are done, reduce heat to 300.
2. Spread oats and sunflower seeds on a large jellyroll pan and parch in the 300 degree oven, stirring occasionally, for about 15 minutes. Oats should crisp while scarcely coloring.
3. Turn oat mixture into a large bowl and stir in the wheat germ. Combine honey, oil, salt and vanilla, heat just long enough to liquefy/thin honey, give it stir and pour it in. Stir until all dry matter is coated, then add nuts and stir again ditto.
4. Turn the whole works out onto the oat pan, spread to the edges and return to oven. At 5 to 8 minute intervals, use a flat pancake turner to lift the brown edges into the middle and spread the paler material. Keep it up until the granola is a rich dark gold and a cooled nugget is properly crunchy, anywhere from 20 to 40 minutes, depending on pan, oven and sugar content of honey.
5. Store airtight. If you want raisins or other dried fruit , the time to add it is right before eating. There’s no reason to pre-mix something you want to keep moist with something you want to keep crisp unless you’re going camping.
Variation: The Corsican Special, aka Double Chestnut
(which was originally known as Italian recipe fanatic – there’s no way you’d have these ingredients handy unless you were really into it)
5 cups rolled oats
¼ cup sunflower seeds
3 tablespoons chestnut flour
2 tablespoons wheat germ
scant half-cup chestnut honey
3 tablespoons grapeseed oil
1 ½ teaspoons vanilla
scant ½ teaspoon salt
1 ½ cups coarsely chopped pecans
1. Heat oven to 300 degrees and toast oats and seeds as in 2., above.
2. In a large bowl, mix oats and seeds with flour and wheat germ, then add remaining ingredients as in 3, above.
3. Very slowly toast the living bejeeziz out of it, lowering the heat if it starts browning before the first half hour is past. It’ll be done in 40 minutes to an hour.
Our bright lights chard is still going strong in the cold room, and last time I went shopping the commercial stuff looked pretty good ( for a change), so if you have become tired of cabbage, consider

Rainbow Slaw
Every measurement in this so-called recipe is “about,” “to taste,” “use what you’ve got,” ” fiddle,” because all three of the vegetables vary enormously in sweetness and flavor-strength. Plus it would be a shame not to enjoy it just because you were almost out of celery and didn’t realize it until a half-hour before dinner.
For 6 servings
Toss 1 ½ cups each julienned celery, fennel, and rainbow chard stems with a dressing of
¼ cup rice vinegar
1 tablespoon toasted sesame oil
1 teaspoon sugar
½ teaspoon salt
let it sit about 5 minutes, then taste and adjust.
At this point, you’ll have a very light, clear-flavored salad that goes well with almost everything, especially winter’s rich brown braises and stews. To jazz it up, add finely-minced jalapeno and coarsely-chopped cilantro. Shreds of Peking duck from the Chinese grocery are a nice addition, if you happen to have it ( either the duck or the grocery) handy.
At Seed Savers, it’s 5 Color Silverbeet. At Johnny’s, which got an AAS award for it in 1998, it’s Bright Lights. At our place, it’s just rainbow chard, a must-plant delight: easy to grow, easy to cook, beautiful all summer long and long into the fall.
Bill insists it’s sweeter after frost; I think he’s simply confusing it with cole crops like kale and collards, which are sweeter, because temperatures below 40 destroy sulfur compounds. Sweetened or not, rainbow is slightly less frost hardy than regular chard, so we dug it up when temperatures started going way down – way back in early November there actually were a couple of nights when it hit the mid-teens.
The plants were set upright in a big pot lined with a thick plastic bag, with no more dirt than what was left clinging to the substantial roots. The pot was stored in an unheated enclosed porch , aka our well-lit walk-in. Every once in a while, I pour some water over the bases, but not very much.

chard plant, out of pot for photographic purposes
We have been harvesting regularly, breaking off leaves as needed as though the plants were still in the ground. When all have been eaten, we’ll compost the stumps. They could be replanted in mid-spring, if we wanted to save seed, but we’re not that dedicated. (Colors cross, so the pros grow each one in isolation and mix the seeds at packaging. )
Some say the different colors taste different, a lot to assert given that the colors include pink, red, purple, magenta, orange, yellow, white, white with pink stripes and some extremely zingy mixtures of pink and tangerine. All I can say is that none of them are as good as plain old white-stemmed Lucullus. But gorgeousness counts, even if the colors don’t stand up all that well when cooked.
Cooking Swiss Chard
is sort of like cooking chickens and turkeys – it helps to remember that cooking the thing whole is likely to be unkind to one part. Instead of light and dark meat, chard has stems (petioles) and leaves.

Chard Stems appear almost celerylike, very sturdy and crisp when raw. But at least when the chard is freshly harvested, they get tender quickly and tend to end up unpleasantly flabby if cooked for more than a few minutes. Most recipes say the stems are tougher than the leaves and should be cooked longer, but when we cook the chard from the garden we add the chopped stems near the end, shortly before the leaves have cooked through.
In Europe , stems are as highly prized as the leaves and those from varieties like Blonde de Lyon and Monstruoso are frequently cooked solo. Standard advice is to cook them like asparagus , which I take to mean “like asparagus the old-fashioned way: briefly blanched, thoroughly drained, then finished with a rich sauce such as browned butter or hollandaise.” You’d think boiling would be ill-advised with something so watery, but in my experience it works as well or better than steaming and stir-frying.
The alternative, especially when you want to preserve the bright colors of Rainbow types, is not to cook the stems at all. Just slice thinly crosswise (longitudinal julienne can be stringy) and sprinkle over hot cooked greens, toss into salad or add to a slaw of fennel and celery.
Not much needs saying about the Chard Leaves, except that they’re delicious prepared any way you’d prepare spinach and most of the ways you’d prepare stronger greens like kale and broccoli raab. Also nice stuffed and stewed, just sub pairs of them for the single cabbage leaves in your favorite stuffed cabbage recipe.
I’ve spent years evangelizing, insisting that the fruitcake-resistant have never eaten the real thing, and given that “real thing” means “good candied fruit,” an item that pretty much must be home made if not purchased from purveyors like Fauchon ($60.00 per pound, not including shipping), I’m reasonably sure that’s true.
But perhaps you are saying, “no, no, for years home bakers and first-class commercial makers like good ol’ Alice Perron up there in Vermont at Bienfait have simply omitted the candied part. They just mix classic, no-fakery batter with lots and lots of succulent dried fruit and generous quantities of fresh nuts and …
Well, okay. It’s good. But it still lacks a certain chewy, aromatic, sweet but not too sweet component, a component that’s easy to make by defining “candied fruit” as “candied citrus peel”: lemon, orange, and grapefruit , each delicious in a slightly different way.
There’s a detailed step by step recipe here and about 8 zillion more floating around on the web ( see below for cautionary notes), but the bottom line is that candying peel is no more difficult than cooking pasta – and no more expensive, either, since the peels come free with the fruit.
After reading this introduction, you may be expecting a fruitcake recipe. But then who’d eat it besides you? Better to make the always popular
Universal Suit Yourself Fruit and Nut Bars
Everything that’s good about fruitcake but not so damned much of it, all on a buttery, crumbly crust that cuts the opulent sweetness.

Crust:
1 ¾ cup all purpose flour
1 tsp. baking powder
1/3 cup sugar
pinch salt
½ cup butter, plus more for the pan
1 lightly beaten egg
Topping:
2 ½ cups fruit, cut in @ 1/3 inch dice. Any combination of : raisins; currants; prunes; dates; dried apricots, pineapple, figs, or cherries; candied ginger and candied citrus peel.
½ cup rum or brandy
2 eggs
1/3 cup each white and dark brown sugar
2 tablespoons flour
½ teaspoon baking powder
1 teaspoon vanilla
1/2 teaspoon each cinnamon, cloves, ginger and nutmeg
2 ½ cups lightly toasted whole nutmeats. Any combination of: almonds, walnuts, pecans , hazelnuts, pistachios, pine nuts and macadamias. Cashews and peanuts overwhelm all else, so either eschew them or rename the bars.
1. Mix the topping fruits and alcohol in a small bowl, cover tightly and set aside in a warm place until all the liquid is absorbed, overnight, more or less.
2. Heat the oven to 350 (325 for a glass pan) and thickly butter a 9x13x2 inch baking pan.
3. Put crust dry ingredients in a shallow bowl and mix thoroughly with a wire whisk. Cut or pinch in the butter until you have coarse meal, then make a well in the center and add the egg.
4. Pinch in the egg – or stir with a fork – just until the mixture is clumpy and holds together when pressed (resist the impulse to keep squeezing). Dump it into the pan, gently spread it around, then press it into an even layer on the bottom. Bake until pale gold, 12 to 15 minutes.
5. While the crust is baking, beat the topping eggs until frothy, then beat in everything else except the fruit and nuts. Stir them in last.
6. When the crust is ready, recombine the topping and spread it evenly, being careful not to cheat the corners. Return to the oven and bake until set and browned on top, about 30 to 35 minutes. Let cool completely before cutting in small – @ 1.5 inch – squares.
Yield: about 30 squares, depending on your cutting and on the true measurements of your pan ( “9×13” is precise on the page, but it means quite different things to different pan-manufacturers).
Judging a candied peel recipe:
* It’s probably wise to choose organic citrus; just don’t assume – as I did for years – that certified organic citrus is innocent of wax.
* The thick white pith is essential. Recipes that tell you to remove it are actually recipes for candied zest.
* Bitterness varies, which should be noted/allowed for.
* not all recipes stress the necessity of having the peel completely tender before adding sugar, but if it isn’t tender before you add sugar it will be tough for all time.